Activiti 7 Deep Dive Series - Building, Deploying, and Running a Custom Business Process
- Alfresco Hub
- :
- APS & Activiti - Blog
- :
- Activiti 7 Deep Dive Series - Building, Deploying,...
Activiti 7 Deep Dive Series - Building, Deploying, and Running a Custom Business Process
- Subscribe to RSS Feed
- Mark as New
- Mark as Read
- Bookmark
- Subscribe
- Printer Friendly Page
- Report Inappropriate Content
- Introduction
- Activiti 7 Deep Dive Article Series
- Prerequisites
- Source Code
- Creating a Helm Repository
- Building a Runtime Bundle
- Generating a Spring Boot 2 App
- Test the standard Spring Boot App
- Adding Activiti 7 Runtime Bundle Dependencies to the App
- Make the App an Activiti Runtime Bundle
- Adding the App Name property
- Adding the Process Definition to the App
- Test the Spring Boot App containing Runtime Bundle Starter and Process Definition
- Configure App to use Keycloak for authentication
- Configure App to Produce and Consume Async Messages
- Configure App to connect to Zipkin for Tracing
- Miscellaneous App Configuration
- Deploying a Runtime Bundle
- Building a Docker Image for our Runtime Bundle
- Deploying a custom Runtime Bundle Docker Image
- Creating a Helm Chart for the Sample Runtime Bundle
- Package and Publish the Helm Chart for the Sample Runtime Bundle
- Add Our Helm Repository to the local Helm installation
- Update the Full Example Helm Charts to deploy Sample Runtime Bundle
- Deploy the Sample Runtime Bundle via the Full Example Helm Charts
- Building a Cloud Connector
- Generating a Spring Boot 2 App
- Test the standard Spring Boot App
- Adding Activiti 7 Cloud Connector Dependencies to the App
- Make the App a Cloud Connector
- Adding the App Name property
- Configure App to use Keycloak for authentication
- Configure App to Produce and Consume Async Messages
- Miscellaneous App Configuration
- Implementing the Input Channel Interface
- Implementing the Connector Class
- Build and run the Sample Cloud Connector
- Deployinga Cloud Connector
- Building a Docker Image for our Cloud Connector
- Deploying a custom Cloud Connector Docker Image
- Creating a Helm Chart for the Sample Cloud Connector
- Package and Publish the Helm Chart for the Sample Cloud Connector
- Add Our Helm Repository to the local Helm installation
- Update the Full Example Helm Charts to deploy Sample Cloud Connector
- Deploy the Sample Cloud Connector via the Full Example Helm Charts
- Testing the Custom Process
Introduction
So far in this article series about Activiti 7 we have just used out-of-the-box deployments with preconfigured business processes and business logic. What you really want to do is define your own business process and business logic and deploy it to a Kubernetes cluster. In this article we will take the process definition we designed in the previous article and deploy it as a custom Runtime Bundle. The service task in the process definition will be implemented with a custom Cloud Connector.
The runtime bundle and cloud connector that we develop will be deployed together with the Activiti Full Example that we worked with in the first article. By doing this we will see how several runtime bundles, with different business processes, and several cloud connectors, with different business logic, can be deployed together with Kubernetes and Helm.
Activiti 7 Deep Dive Article Series
This article is part of series of articles covering Activiti 7 in detail, they should be read in the order listed:
- Deploying and Running a Business Process
- Using the Modeler to Design a Business Process
- Building, Deploying, and Running a Custom Business Process - this article
- Using the Core Libraries
Prerequisites
- You have read and worked through the "Activiti 7 - Using the Modeler to Design Business Processes" article
- The Activiti 7 Full Example is running
Source Code
You can find the source code related to this article here:
- https://github.com/gravitonian/activiti7-sample-runtime-bundle
- https://github.com/gravitonian/activiti7-sample-cloud-connector
- https://github.com/gravitonian/helm-repo
Creating a Helm Repository
We will be creating two new services, one Runtime Bundle with the process definition and one Cloud Connector with the service task implementation. They will require their own deployment packages. These packages need to be stored somewhere so they can be picked up by other Helm Charts. For example, the Full Example that we have been using uses several other Helm packages for things like infrastructure and modeling.
We want to make use of the Full Example setup and just add our packages to it. So we would end up with a Full Example that has two Runtime Bundles and two Cloud Connectors. In order to do this our Helm Charts needs to be available in some Helm Repository.
A Helm Repository is a HTTP server that has an index.yaml file plus all the chart files. You can use any HTTP server, but the easiest way to do this is to use GitHub Pages. Create a GitHub project that will be used for this, such as (note. You need to have a GitHub account to do this):
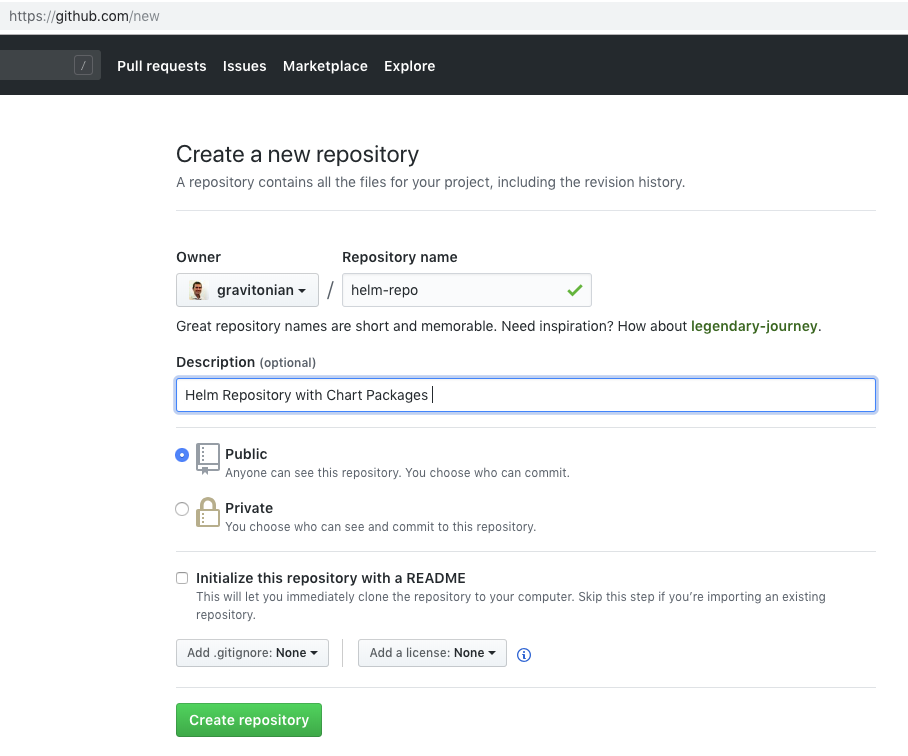
In this case I’m creating a new GitHub project called https://github.com/gravitonian/helm-repo to hold my Helm Repository.
Now, clone the GitHub project locally and create a branch called gh-pages:
$ git clone https://github.com/gravitonian/helm-repo.git
Cloning into 'helm-repo'...
warning: You appear to have cloned an empty repository.
$ cd helm-repo/
$ git checkout -b gh-pages
Switched to a new branch 'gh-pages'
Next step is to add an index.yaml file to the repo, it will contain a list of what Helm chart packages that are available in this repository:
$ touch index.yaml
$ git add .
$ git commit -m "Added helm repo index.yaml"
[gh-pages (root-commit) 9d76c1e] Added helm repo index.yaml
1 file changed, 0 insertions(+), 0 deletions(-)
create mode 100644 index.yaml
$ git push --set-upstream origin gh-pages
Counting objects: 3, done.
...
To https://github.com/gravitonian/helm-repo.git
* [new branch] gh-pages -> gh-pages
Branch 'gh-pages' set up to track remote branch 'gh-pages' from 'origin'.
Your GitHub repo should look something like this now:

Click on the Settings link to the right and scroll down to the GitHub pages config section, it should look something like this:
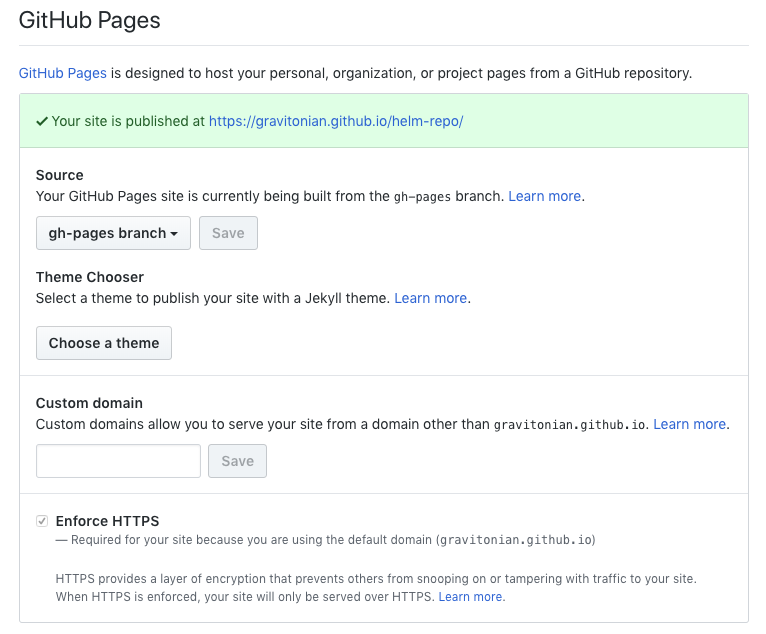
We should not have to change anything here, just grab the URL where the site is published (i.e. https://gravitonian.github.io/helm-repo/), this will be our Helm Repository URL.
Before we can add this new Helm Repo to our local Helm installation there needs to be a chart uploaded so the index.yaml file looks correct. We will do that next when creating a Runtime Bundle.
Building a Runtime Bundle
An Activiti 7 Runtime Bundle contains the business processes that we want to execute. A Runtime Bundle executes business processes. It has its own ReST API that clients can talk to to start the business process and to interact with the business process. We have an Example Runtime Bundle project here, so should not be too difficult to replicate building a custom Runtime Bundle with our process definition.
A Runtime Bundle is the cloud version of the process engine. If you ever expose Activiti (the process engine) as a service, then you are defining a Runtime Bundle. The following are some facts about Activiti Runtime Bundles:
- In the context of Activiti 7 a Runtime Bundle represent a stateless instance of the process engine, which is in charge of executing an immutable set of process definitions.
- You cannot deploy new process definitions to a Runtime Bundle, instead you will create a new immutable version of your Runtime Bundle for your updated process definitions.
- Runtime Bundles expose a synchronous ReST API and an asynchronous Message Based API.
- Runtime Bundles emit events (in a fire & forget fashion) using a default ActivitiEventListener (Listens to the internal Process Engine events and transform them into messages).
- When a Service Task (BPMN) is executed the Runtime Bundle will emit Integration Events so we can perform System to System integration. These Integration Events will be picked up by Activiti Cloud Connectors to perform integrations.
The following picture illustrates:
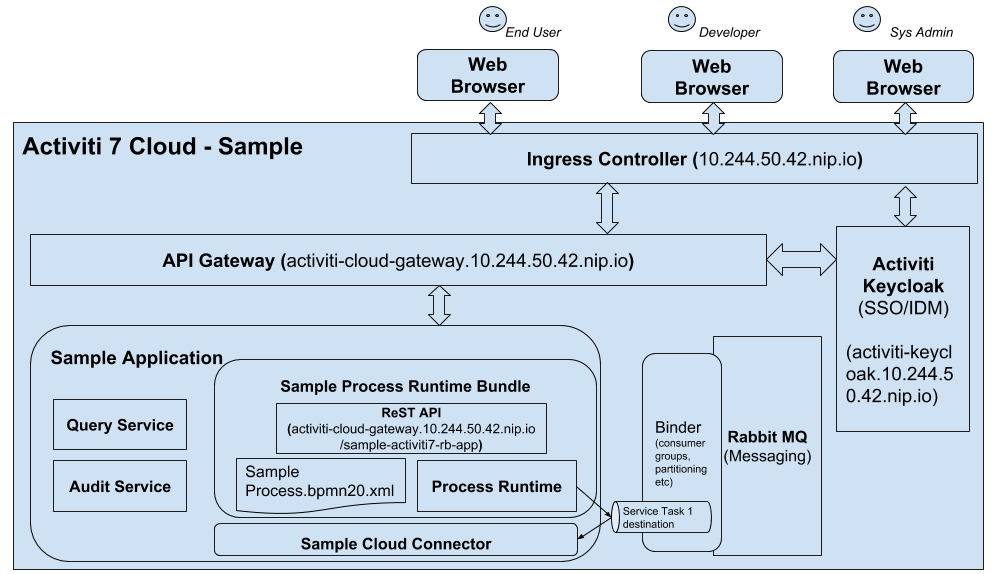
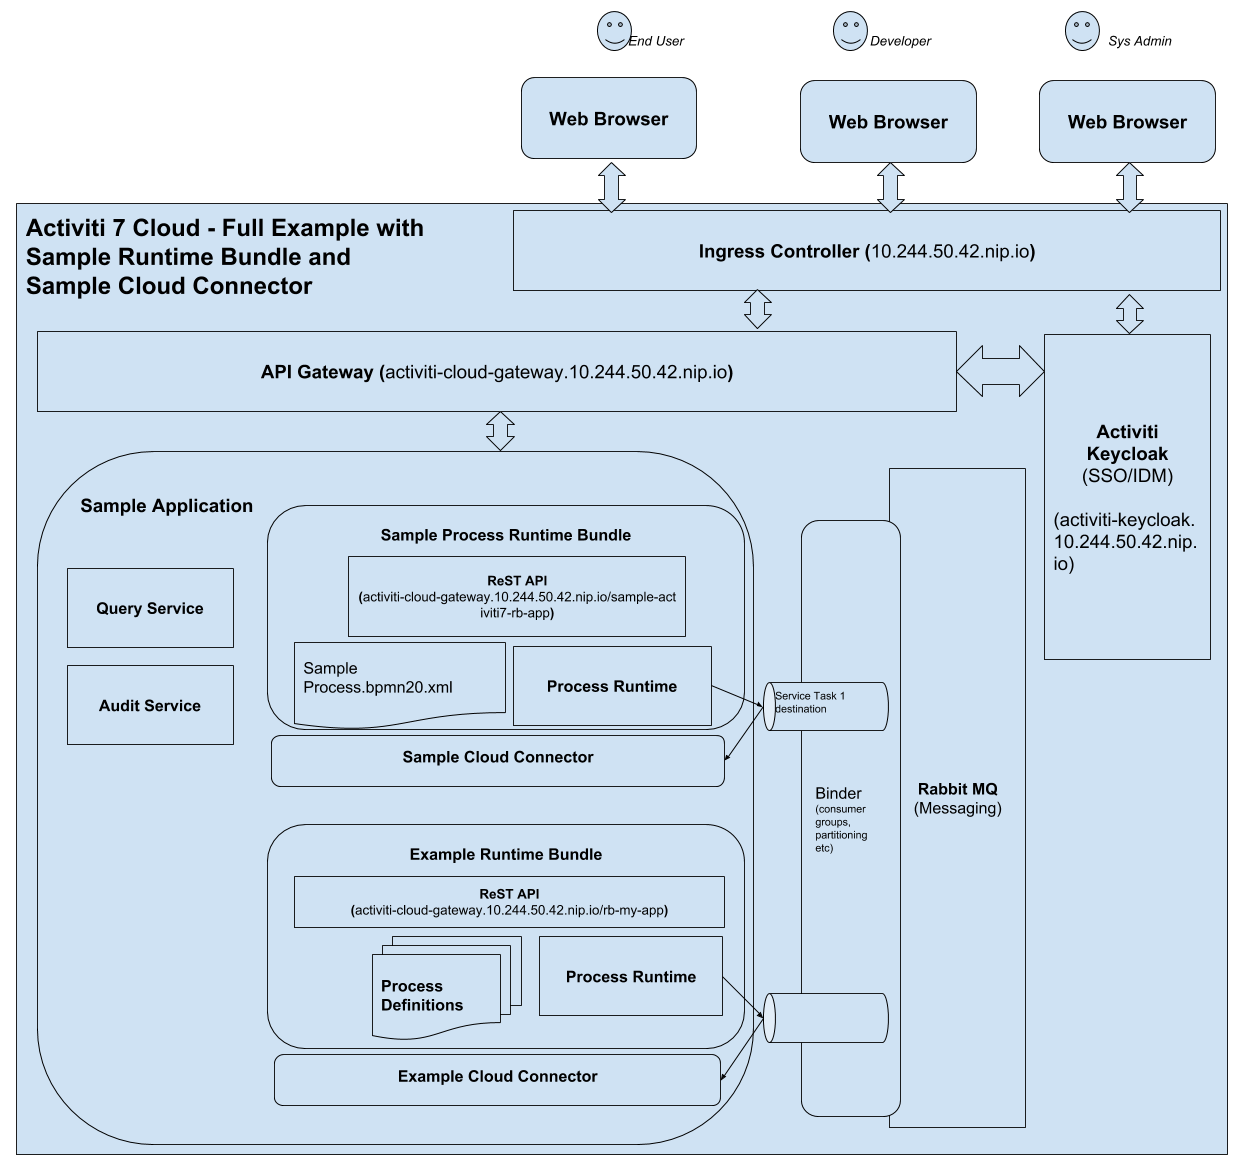
A Runtime Bundle can be implemented on top of a Spring Boot app. We will deploy the Sample Runtime Bundle as part of the out-of-the-box Full Example that we took for a test drive. So the Example Runtime Bundle and our Sample Runtime Bundle will live next to each other in the same release deployment:
Generating a Spring Boot 2 App
It’s really easy to get going with a Spring Boot application. Just head over to https://start.spring.io/ and fill in the data for the app as follows:

Make sure to use Spring Boot version 2.0.x with Activiti 7 Beta 1 - 3, Beta 4 should be aligned with version 2.1.x.
You don’t have to use the same Group (org.activiti.training) and Artifact (sample-activiti7-runtime-bundle) names as me, just use whatever you like. However, if you copy code from this article it might be easier if you use the same package names (i.e. the same group). Search for the H2 dependency so it’s included in the Maven POM. The Process Engine need a database to store process instance and task instance data. Then click the Generate Project button. The finished Spring Boot 2 Maven project will automatically download as a ZIP. Unpack it somewhere.
Test the standard Spring Boot App
Let’s make sure that the Spring Boot application works before we continue with the Activiti stuff. This involves two steps. First build the app JAR and then run the app JAR.
Building the application JAR:
$ cd sample-activiti7-runtime-bundle/
sample-activiti7-runtime-bundle mbergljung$ mvn package
[INFO] Scanning for projects...
[INFO]
[INFO] ------------------------------------------------------------------------
[INFO] Building sample-activiti7-runtime-bundle 0.0.1-SNAPSHOT
[INFO] ------------------------------------------------------------------------
[INFO]
...
[INFO] --- maven-jar-plugin:3.0.2:jar (default-jar) @ sample-activiti7-runtime-bundle---
[INFO] Building jar: /Users/mbergljung/IDEAProjects/sample-activiti7-runtime-bundle/target/sample-activiti7-runtime-bundle-0.0.1-SNAPSHOT.jar
[INFO]
[INFO] --- spring-boot-maven-plugin:2.0.4.RELEASE:repackage (default) @ sample-activiti7-runtime-bundle---
[INFO] ------------------------------------------------------------------------
[INFO] BUILD SUCCESS
[INFO] ------------------------------------------------------------------------
Running the application JAR:
sample-activiti7-runtime-bundle mbergljung$ java -jar target/sample-activiti7-runtime-bundle-0.0.1-SNAPSHOT.jar
. ____ _ __ _ _
/\\ / ___'_ __ _ _(_)_ __ __ _ \ \ \ \
( ( )\___ | '_ | '_| | '_ \/ _` | \ \ \ \
\\/ ___)| |_)| | | | | || (_| | ) ) ) )
' |____| .__|_| |_|_| |_\__, | / / / /
=========|_|==============|___/=/_/_/_/
:: Spring Boot :: (v2.0.4.RELEASE)
2018-09-12 09:57:58.567 INFO 33115 --- [ main] .SampleActiviti7RuntimeBundleApplication : Starting SampleActiviti7RuntimeBundleApplication v0.0.1-SNAPSHOT on MBP512-MBERGLJUNG-0917 with PID 33115 (/Users/mbergljung/IDEAProjects/sample-activiti7-runtime-bundle/target/sample-activiti7-runtime-bundle-0.0.1-SNAPSHOT.jar started by mbergljung in /Users/mbergljung/IDEAProjects/sample-activiti7-runtime-bundle)
2018-09-12 09:57:58.571 INFO 33115 --- [ main] .SampleActiviti7RuntimeBundleApplication : No active profile set, falling back to default profiles: default
2018-09-12 09:57:58.621 INFO 33115 --- [ main] s.c.a.AnnotationConfigApplicationContext : Refreshing org.springframework.context.annotation.AnnotationConfigApplicationContext@2db0f6b2: startup date [Wed Sep 12 09:57:58 BST 2018]; root of context hierarchy
2018-09-12 09:57:59.168 INFO 33115 --- [ main] o.s.j.e.a.AnnotationMBeanExporter : Registering beans for JMX exposure on startup
2018-09-12 09:57:59.181 INFO 33115 --- [ main] .SampleActiviti7RuntimeBundleApplication : Started SampleActiviti7RuntimeBundleApplication in 0.892 seconds (JVM running for 1.313)
2018-09-12 09:57:59.183 INFO 33115 --- [ Thread-2] s.c.a.AnnotationConfigApplicationContext : Closing org.springframework.context.annotation.AnnotationConfigApplicationContext@2db0f6b2: startup date [Wed Sep 12 09:57:58 BST 2018]; root of context hierarchy
2018-09-12 09:57:59.184 INFO 33115 --- [ Thread-2] o.s.j.e.a.AnnotationMBeanExporter : Unregistering JMX-exposed beans on shutdown
The application does not contain much so it will exit by itself.
Adding Activiti 7 Runtime Bundle Dependencies to the App
The Spring Boot app has most of the dependencies that we need, except for the Activiti 7 Runtime Bundle dependencies. So let’s add them. We can use a BOM (Bill-of-Materials) dependency that will bring in all the needed Activiti 7 dependency management configurations, including the correct versions of all dependencies.
Add the following to the pom.xml:
<dependencyManagement>
<dependencies>
<dependency>
<groupId>org.activiti.cloud.dependencies</groupId>
<artifactId>activiti-cloud-dependencies</artifactId>
<version>7.0.0.Beta3</version>
<scope>import</scope>
<type>pom</type>
</dependency>
</dependencies>
</dependencyManagement>This will import all the dependency management configurations for Activiti 7 Beta 3. Now we just need to add an Activiti 7 Runtime Bundle dependency that supports running the Activiti process engine, ReST APIs, events, etc. Add the following dependency to the pom.xml:
<dependency>
<groupId>org.activiti.cloud.rb</groupId>
<artifactId>activiti-cloud-starter-runtime-bundle</artifactId>
</dependency>This will bring in all the Activiti and Spring dependencies needed to run the Activiti 7 Runtime Bundle embedded in a Spring Boot application.
Make the App an Activiti Runtime Bundle
We can now use a so called Spring Boot Starter to turn this app into an Activiti 7 Runtime Bundle, add the @ActivitiRuntimeBundle annotation to the sample-activiti7-runtime-bundle/src/main/java/org/activiti/training/sampleactiviti7runtimebundle/SampleActiviti7RuntimeBundleApplication.java class as follows:
package org.activiti.training.sampleactiviti7runtimebundle;
import org.activiti.cloud.starter.rb.configuration.ActivitiRuntimeBundle;
import org.springframework.boot.SpringApplication;
import org.springframework.boot.autoconfigure.SpringBootApplication;
@SpringBootApplication
@ActivitiRuntimeBundle
public class SampleActiviti7RuntimeBundleApplication {
public static void main(String[] args) {
SpringApplication.run(SampleActiviti7RuntimeBundleApplication.class, args);
}
}We cannot yet run the application with these new dependencies as it will look for process definitions in the resources/processes directory. And if this directory does not exist, then an exception is thrown and the app halts. But even before that exception is thrown another exception is thrown about a missing spring.application.name property, so we need to add it too.
Adding the App Name property
To add the Spring Application Name property open up the sample-activiti7-runtime-bundle/src/main/resources/application.properties file and add the following property:
spring.application.name=${ACT_RB_APP_NAME:sample-activiti7-rb-app}The sample-activiti7-rb-app name will be the default one in our case. But we can also override this name by setting the ACT_RB_APP_NAME parameter for the Docker container. This property is very important as it will be used to create the new URL for the Runtime Bundle’s ReST API, for example: {{gatewayUrl}}/sample-activiti7-rb-app/v1/process-definitions
The application name also identifies this application in a microservice environment and is used when registering with a service registry such as Netflix Eureka service registry. It is also used to look up <applicationName>[-<profile>].[properties|yml] in Spring Cloud Config Server as well as configuration in other service registries like Hashicorp’s Consul or Apache Zookeeper.
Adding the Process Definition to the App
We will now add the custom sample process definition XML file to the project. Create a new directory called processes under the src/main/resources directory. Then copy the .bpmn20.xml file into this directory. You should see a directory structure like this now:
├── pom.xml
├── src
│ ├── main
│ │ ├── java
│ │ │ └── org
│ │ │ └── activiti
│ │ │ └── training
│ │ │ └── sampleactiviti7runtimebundle
│ │ │ └── SampleActiviti7RuntimeBundleApplication.java
│ │ └── resources
│ │ ├── application.properties
│ │ └── processes
│ │ └── sample-process.bpmn20.xmlI renamed the BPMN XML file to sample-process.bpmn20.xml.
Test the Spring Boot App containing Runtime Bundle Starter and Process Definition
We can now package and run the app to see that all the Activiti Runtime Bundle stuff is loaded properly and that the process definition is read correctly without errors.
sample-activiti7-runtime-bundle mbergljung$ mvn clean package -DskipTests
(you need to skip the tests as it tries to connect to RabbitMQ, we just want the App JAR created...)
sample-activiti7-runtime-bundle mbergljung$ java -jar target/sample-activiti7-runtime-bundle-0.0.1-SNAPSHOT.jar
2018-11-21 10:24:53.479 INFO [-,,,] 13199 --- [ main] s.c.a.AnnotationConfigApplicationContext : Refreshing org.springframework.context.annotation.AnnotationConfigApplicationContext@2b80d80f: startup date [Wed Nov 21 10:24:53 GMT 2018]; root of context hierarchy
2018-11-21 10:24:53.927 INFO [-,,,] 13199 --- [ main] trationDelegate$BeanPostProcessorChecker : Bean 'configurationPropertiesRebinderAutoConfiguration' of type [org.springframework.cloud.autoconfigure.ConfigurationPropertiesRebinderAutoConfiguration$$EnhancerBySpringCGLIB$$6f8c6440] is not eligible for getting processed by all BeanPostProcessors (for example: not eligible for auto-proxying)
. ____ _ __ _ _
/\\ / ___'_ __ _ _(_)_ __ __ _ \ \ \ \
( ( )\___ | '_ | '_| | '_ \/ _` | \ \ \ \
\\/ ___)| |_)| | | | | || (_| | ) ) ) )
' |____| .__|_| |_|_| |_\__, | / / / /
=========|_|==============|___/=/_/_/_/
:: Spring Boot :: (v2.0.4.RELEASE)
...
2018-11-21 10:25:00.721 INFO [sample-activiti7-rb-app,,,] 13199 --- [ main] o.s.b.w.embedded.tomcat.TomcatWebServer : Tomcat initialized with port(s): 8080 (http)
2018-11-21 10:25:00.775 INFO [sample-activiti7-rb-app,,,] 13199 --- [ main] o.apache.catalina.core.StandardService : Starting service [Tomcat]
2018-11-21 10:25:00.776 INFO [sample-activiti7-rb-app,,,] 13199 --- [ main] org.apache.catalina.core.StandardEngine : Starting Servlet Engine: Apache Tomcat/8.5.32
...
2018-11-21 10:25:11.230 INFO [sample-activiti7-rb-app,,,] 13199 --- [ main] s.w.s.m.m.a.RequestMappingHandlerMapping : Mapped "{[/v1/process-definitions/{id}/meta],methods=[GET],produces=[application/hal+json || application/json]}" onto public org.activiti.cloud.services.rest.api.resources.ProcessDefinitionMetaResource org.activiti.cloud.services.rest.controllers.ProcessDefinitionMetaControllerImpl.getProcessDefinitionMetadata(java.lang.String)
...
2018-11-21 10:25:16.677 INFO [sample-activiti7-rb-app,,,] 13199 --- [ main] o.s.i.monitor.IntegrationMBeanExporter : Registering MessageChannel signalProducer
2018-11-21 10:25:16.684 INFO [sample-activiti7-rb-app,,,] 13199 --- [ main] o.s.i.monitor.IntegrationMBeanExporter : Located managed bean 'org.springframework.integration:type=MessageChannel,name=signalProducer': registering with JMX server as MBean [org.springframework.integration:type=MessageChannel,name=signalProducer]
...
2018-11-21 10:28:17.366 INFO [sample-activiti7-rb-app,,,] 13199 --- [ main] o.s.a.r.c.CachingConnectionFactory : Attempting to connect to: [rabbitmq:5672]
We can see that it all starts up. We have an Apache Tomcat 8 server started on port 8080 to support the ReST API. We can see ReST API request mappings such as /admin/v1/process-definitions. We should be able to test them right now. We can also see different message channels being created. And finally we can see that the Runtime Bundle is trying to connect to a RabbitMQ message broker on 5672, which we don’t have running yet. In fact, there are more things we don’t have running, such as Keycloak, which contains the users and the groups. Before we can actually call any of the ReST APIs we need to be logged into Keycloak and have an access token.
The best way to test the new Runtime Bundle is to create a Docker Image with it, and then deploy it to the existing cluster we have just tested in previous section. But before we go ahead and create a new Docker Image there are a few more things we need to configure.
Configure App to use Keycloak for authentication
All the Runtime Bundles that are deployed uses Keycloak for user authentication. So we need to tell our Runtime Bundle where it can find the Keycloak server.
Open up the sample-activiti7-runtime-bundle/src/main/resources/application.properties configuration file and add the following properties:
keycloak.auth-server-url=${ACT_KEYCLOAK_URL:http://activiti-keycloak:8180/auth}
keycloak.realm=${ACT_KEYCLOAK_REALM:activiti}
keycloak.resource=${ACT_KEYCLOAK_RESOURCE:activiti}
keycloak.ssl-required=${ACT_KEYCLOAK_SSL_REQUIRED:none}
keycloak.public-client=${ACT_KEYCLOAK_CLIENT:true}
keycloak.security-constraints[0].authRoles[0]=${ACT_KEYCLOAK_USER_ROLE:ACTIVITI_USER}
keycloak.security-constraints[0].securityCollections[0].patterns[0]=${ACT_KEYCLOAK_PATTERNS:/v1/*}
keycloak.security-constraints[1].authRoles[0]=${ACT_KEYCLOAK_ADMIN_ROLE:ACTIVITI_ADMIN}
keycloak.security-constraints[1].securityCollections[0].patterns[0]=/admin/*
keycloak.principal-attribute=${ACT_KEYCLOAK_PRINCIPAL_ATTRIBUTE:preferred-username}
activiti.keycloak.admin-client-app=${ACT_KEYCLOAK_CLIENT_APP:admin-cli}
activiti.keycloak.client-user=${ACT_KEYCLOAK_CLIENT_USER:client}
activiti.keycloak.client-password=${ACT_KEYCLOAK_CLIENT_PASSWORD:client}Almost all of these properties can have their values set when the app is initialized via the ACT_* property substitutions.
Configure App to Produce and Consume Async Messages
All the Runtime Bundles that are deployed uses Spring Cloud Stream for producing and consuming asynchronous messages. These messages can be from for example RabbitMQ and the Runtime Bundle uses Spring AMQP protocol to make this happen with RabbitMQ. We need to tell our Runtime Bundle what the different message destinations are.
Open up the sample-activiti7-runtime-bundle/src/main/resources/application.properties configuration file and add the following properties:
spring.cloud.stream.bindings.auditProducer.destination=${ACT_RB_AUDIT_PRODUCER_DEST:engineEvents}
spring.cloud.stream.bindings.auditProducer.contentType=${ACT_RB_AUDIT_PRODUCER_CONTENT_TYPE:application/json}
spring.cloud.stream.bindings.myCmdResults.destination=${ACT_RB_COMMAND_RESULTS_DEST:commandResults}
spring.cloud.stream.bindings.myCmdResults.group=${ACT_RB_COMMAND_RESULTS_GROUP:myCmdGroup}
spring.cloud.stream.bindings.myCmdResults.contentType=${ACT_RB_COMMAND_RESULTS_CONTENT_TYPE:application/json}
spring.cloud.stream.bindings.myCmdProducer.destination=${ACT_RB_COMMAND_RESULTS_DEST:commandConsumer}
spring.cloud.stream.bindings.myCmdProducer.contentType=${ACT_RB_COMMAND_RESULTS_CONTENT_TYPE:application/json}
spring.cloud.stream.bindings.signalProducer.destination=${ACT_RB_SIGNAL_PRODUCER_DEST:signalEvent}
spring.cloud.stream.bindings.signalProducer.contentType=${ACT_RB_SIGNAL_PRODUCER_CONTENT_TYPE:application/json}
spring.cloud.stream.bindings.signalConsumer.destination=${ACT_RB_SIGNAL_CONSUMER_DEST:signalEvent}
spring.cloud.stream.bindings.signalConsumer.group=${ACT_RB_SIGNAL_CONSUMER_GROUP:mySignalConsumerGroup}
spring.cloud.stream.bindings.signalConsumer.contentType=${ACT_RB_SIGNAL_CONSUMER_CONTENT_TYPE:application/json}
spring.jackson.serialization.fail-on-unwrapped-type-identifiers=${ACT_RB_JACKSON_FAIL_ON_UNWRAPPED_IDS:false}
spring.rabbitmq.host=${ACT_RABBITMQ_HOST:rabbitmq}All of these properties can have their values set when the app is initialized via the ACT_* property substitutions.
Configure App to connect to Zipkin for Tracing
All the Runtime Bundles that are deployed uses Zipkin, which is a distributed tracing system. It helps gather timing data needed to troubleshoot latency problems in microservice architectures. It manages both the collection and lookup of this data.
Open up the sample-activiti7-runtime-bundle/src/main/resources/application.properties configuration file and add the following properties:
spring.zipkin.base-url=http://zipkin:80/
spring.zipkin.sender.type=web
spring.sleuth.enabled=true
spring.sleuth.sampler.probability=1.0Miscellaneous App Configuration
There are a few more configuration properties that we need to supply. Open up the sample-activiti7-runtime-bundle/src/main/resources/application.properties configuration file and add the following properties:
spring.activiti.useStrongUuids=true
activiti.cloud.application.name=default-appDeploying a Runtime Bundle
In this section we will have a look at one way of deploying Runtime Bundles.
Building a Docker Image for our Runtime Bundle
We now got the runtime bundle completed with our custom process definition. In order to use it we need to have it available as a Docker Image. And to produce a Docker image we need a Dockerfile. Create one in the top directory of the project with the following content:
FROM openjdk:alpine
RUN apk --update add fontconfig ttf-dejavu
ENV PORT 8080
EXPOSE 8080
COPY target/*.jar /opt/app.jar
WORKDIR /opt
ENTRYPOINT exec java $JAVA_OPTS -jar app.jarThis will create a runtime bundle image based on Alpine linux and OpenJDK. All we need to run it. It will be exposed on port 8080.
Let’s have our Maven project build the image automatically for us with the help of the Fabric8 Maven plugin. Add it to the sample-activiti7-runtime-bundle/pom.xml as follows:
<build>
<plugins>
...
<!-- Build the custom Activiti Runtime Bundle Docker Image -->
<plugin>
<groupId>io.fabric8</groupId>
<artifactId>docker-maven-plugin</artifactId>
<version>0.26.1</version>
<configuration>
<images>
<image>
<alias>activiti-rb-custom</alias>
<name>activiti-runtime-bundle-custom:${project.version}</name>
<build>
<dockerFileDir>${project.basedir}</dockerFileDir>
</build>
</image>
</images>
</configuration>
<executions>
<execution>
<id>docker</id>
<phase>install</phase>
<goals>
<goal>build</goal>
</goals>
</execution>
<execution>
<id>registry</id>
<phase>deploy</phase>
<goals>
<goal>push</goal>
</goals>
</execution>
</executions>
</plugin>
</plugins>
</build>Now, to get the Docker image built we just have to execute the following maven command:
sample-activiti7-runtime-bundle mbergljung$ mvn clean install -DskipTests
[INFO] Scanning for projects...
[INFO]
[INFO] ------------------------------------------------------------------------
[INFO] Building sample-activiti7-runtime-bundle 0.0.1-SNAPSHOT
[INFO] ------------------------------------------------------------------------
...
[INFO]
[INFO] --- docker-maven-plugin:0.26.1:build (docker) @ sample-activiti7-runtime-bundle ---
[INFO] DOCKER> Pulling from library/openjdk
8e3ba11ec2a2: Already exists
311ad0da4533: Already exists
df312c74ce16: Already exists
[INFO] DOCKER> Digest: sha256:1fd5a77d82536c88486e526da26ae79b6cd8a14006eb3da3a25eb8d2d682ccd6
[INFO] DOCKER> Status: Downloaded newer image for openjdk:alpine
[INFO] DOCKER> Pulled openjdk:alpine in 3 seconds
[INFO] Building tar: /Users/mbergljung/IDEAProjects/activiti7-sample-runtime-bundle/target/docker/activiti-runtime-bundle-custom/0.0.1-SNAPSHOT/tmp/docker-build.tar
[INFO] DOCKER> [activiti-runtime-bundle-custom:0.0.1-SNAPSHOT] "activiti-rb-custom": Created docker-build.tar in 962 milliseconds
[INFO] DOCKER> [activiti-runtime-bundle-custom:0.0.1-SNAPSHOT] "activiti-rb-custom": Built image sha256:a146b
[INFO] ------------------------------------------------------------------------
[INFO] BUILD SUCCESS
[INFO] ------------------------------------------------------------------------
[INFO] Total time: 50.889 s
[INFO] Finished at: 2018-11-21T10:47:17Z
[INFO] Final Memory: 77M/751M
[INFO] ------------------------------------------------------------------------
Make sure we got the image by listing local images:
$ docker image ls
REPOSITORY TAG IMAGE ID CREATED SIZE
activiti-runtime-bundle-custom 0.0.1-SNAPSHOT a146b0829d69 About a minute ago 193MB
...
We are now ready to include the runtime bundle in an Activiti 7 Deployment.
Deploying a custom Runtime Bundle Docker Image
What we want to do now is deploy our runtime bundle together with the necessary services and infrastructure. We can use the previous Full Example Helm Chart setup for this. We just need to add our Sample Runtime Bundle to this solution deployment. To do this we need to create a Helm package for our Runtime Bundle.
Creating a Helm Chart for the Sample Runtime Bundle
The easiest way to accomplish this is to copy the Helm Charts for the out-of-the-box Example Runtime Bundle into our Helm Repo project (the GitHub pages project we created earlier on, in my case https://github.com/gravitonian/helm-repo):
helm-repo mbergljung$ mkdir charts
helm-repo mbergljung$ cd charts/
charts mbergljung$ mkdir sample-runtime-bundle
charts mbergljung$ cd sample-runtime-bundle/
sample-runtime-bundle mbergljung$ cp -R ../../../activiti-cloud-charts/runtime-bundle/* .
sample-runtime-bundle mbergljung$ ls -l
total 32
-rw-r--r-- 1 mbergljung staff 184 22 Nov 15:27 Chart.yaml
-rw-r--r-- 1 mbergljung staff 18 22 Nov 15:27 README.md
-rw-r--r-- 1 mbergljung staff 251 22 Nov 15:27 requirements.yaml
drwxr-xr-x 7 mbergljung staff 224 22 Nov 15:27 templates
-rw-r--r-- 1 mbergljung staff 2651 22 Nov 15:27 values.yaml
Now we can update these charts to match our Sample Runtime Bundle.
Open up the helm-repo/charts/sample-runtime-bundle/Chart.yaml file and update it to look as follows, changing the name and version (note. The name of the chart and the directory it is contained in must match):
apiVersion: v1
description: A Helm chart for Kubernetes
icon: https://raw.githubusercontent.com/jenkins-x/jenkins-x-platform/master/images/java.png
name: sample-runtime-bundle
version: 0.1.0Next open up the helm-repo/charts/sample-runtime-bundle/requirements.yaml file and remove all its content, we are not going to be using PostgreSQL.
Then open up the helm-repo/charts/sample-runtime-bundle/values.yaml file and update it to look as follows:
# Default values for Maven projects.
# This is a YAML-formatted file.
# Declare variables to be passed into your templates.
replicaCount: 1
global:
rabbitmq:
host:
value: ""
username:
value: guest
password:
value: guest
keycloak:
url: ""
name: keycloak
service:
type: http
port: 80
## The list of hostnames to be covered with this ingress record.
## Most likely this will be just one host, but in the event more hosts are needed, this is an array
ingress:
hostName: ""
db:
uri: ""
name: activitipostgresql
deployPostgres: false
port: 5432
activitipostgresql:
postgresPassword: activiti
## Allows the specification of additional environment variables
extraEnv: |
# - name: ACT_KEYCLOAK_URL
# valueFrom:
# configMapKeyRef:
# name: {{ .Release.Name }}-keycloak-http
# key: expose-keycloak-service-key
javaOpts:
xmx: 768m
xms: 512m
other: -XX:+UnlockExperimentalVMOptions -XX:+UseCGroupMemoryLimitForHeap -Dsun.zip.disableMemoryMapping=true -XX:+UseParallelGC -XX:MinHeapFreeRatio=5 -XX:MaxHeapFreeRatio=10 -XX:GCTimeRatio=4 -XX:AdaptiveSizePolicyWeight=90
image:
repository: activiti-runtime-bundle-custom
tag: 0.0.1-SNAPSHOT
pullPolicy: IfNotPresent
service:
name: sample-activiti7-rb-app
type: ClusterIP
externalPort: 80
internalPort: 8080
annotations:
fabric8.io/expose: "false"
resources:
limits:
memory: 768Mi
requests:
cpu: 400m
memory: 768Mi
probePath: /actuator/health
livenessProbe:
initialDelaySeconds: 140
periodSeconds: 15
successThreshold: 1
timeoutSeconds: 4
readinessProbe:
periodSeconds: 15
successThreshold: 1
timeoutSeconds: 3
terminationGracePeriodSeconds: 20
ingress:
## Set to true to enable ingress record generation
enabled: false
path: /rb-sample-app
## Set this to true in order to enable TLS on the ingress record
tls: false
## If TLS is set to true, you must declare what secret will store the key/certificate for TLS
tlsSecret: myTlsSecret
## Ingress annotations done as key:value pairs
annotations:
kubernetes.io/ingress.class: nginx
nginx.ingress.kubernetes.io/rewrite-target: /
nginx.ingress.kubernetes.io/enable-cors: "true"
nginx.ingress.kubernetes.io/cors-allow-headers: "X-Forwarded-For, X-Forwarded-Proto, X-Forwarded-Port, X-Forwarded-Prefix,DNT,X-CustomHeader,Keep-Alive,User-Agent,X-Requested-With,If-Modified-Since,Cache-Control,Content-Type,Authorization,X-CSRF-Token,Access-Control-Request-Headers,Access-Control-Request-Method,accept,Keep-Alive"
nginx.ingress.kubernetes.io/x-forwarded-prefix: "true"The following values have been updated:
Name | New value | Description |
image.repository | activiti-runtime-bundle-custom | This is the name of the custom runtime bundle Docker Image in our local Docker repository. You can do $ docker image ls to view it. |
image.tag | 0.0.1-SNAPSHOT | This is the version of the custom runtime bundle Docker Image in our local Docker repository. You can do $ docker image ls to view it. |
service.name | sample-activiti7-rb-app | This is the name of the service representing the new runtime bundle. |
Package and Publish the Helm Chart for the Sample Runtime Bundle
We are now ready to create a Helm package for our Sample Runtime Bundle Helm Chart. Execute the following commands standing in the /helm-repo directory:
helm-repo mbergljung$ helm lint charts/sample-runtime-bundle
==> Linting .
Lint OK
1 chart(s) linted, no failures
helm-repo mbergljung$ helm package charts/sample-runtime-bundle
Successfully packaged chart and saved it to: /Users/mbergljung/DeployProjects/helm-repo/sample-runtime-bundle-0.1.0.tgz
Now, let’s upload all the chart files including the package to our Helm Repository (i.e. https://github.com/gravitonian/helm-repo). First generate the index file:
helm-repo mbergljung$ helm repo index --url https://gravitonian.github.io/helm-repo .
This command generates the index.yaml file. Let’s take a look at it:
helm-repo mbergljung$ more index.yaml
apiVersion: v1
entries:
sample-runtime-bundle:
- apiVersion: v1
created: 2018-11-23T13:22:51.768039Z
description: A Helm chart for Kubernetes
digest: 8215e08e933dda7372866796027b2aa80f28c0487ddd902d2ec9e27036092905
icon: https://raw.githubusercontent.com/jenkins-x/jenkins-x-platform/master/images/java.png
name: sample-runtime-bundle
urls:
- https://gravitonian.github.io/helm-repo/sample-runtime-bundle-0.1.0.tgz
version: 0.1.0
generated: 2018-11-23T13:22:51.764624Z
The helm repo GitHub project should now look something like this:
$ tree
.
├── charts
│ └── sample-runtime-bundle
│ ├── Chart.yaml
│ ├── README.md
│ ├── requirements.yaml
│ ├── templates
│ │ ├── NOTES.txt
│ │ ├── _helpers.tpl
│ │ ├── deployment.yaml
│ │ ├── ingress.yaml
│ │ └── service.yaml
│ └── values.yaml
├── index.yaml
└── sample-runtime-bundle-0.1.0.tgzNow commit & push the changes:
helm-repo mbergljung$ git add .
helm-repo mbergljung$ git commit -m "Sample Runtime Bundle Chart"
[gh-pages 17585d6] Sample Runtime Bundle Chart
...
helm-repo mbergljung$ git push
Counting objects: 18, done.
Delta compression using up to 8 threads.
Compressing objects: 100% (15/15), done.
Writing objects: 100% (18/18), 8.50 KiB | 4.25 MiB/s, done.
Total 18 (delta 1), reused 0 (delta 0)
remote: Resolving deltas: 100% (1/1), done.
To https://github.com/gravitonian/helm-repo.git
9d76c1e..17585d6 gh-pages -> gh-pages
Add Our Helm Repository to the local Helm installation
We can now add this Helm repo to our Helm installation as follows:
helm-repo mbergljung$ helm repo add gravitonian-helm-repo https://gravitonian.github.io/helm-repo
"gravitonian-helm-repo" has been added to your repositories
Update repo to make sure we got all the latest stuff locally:
helm-repo mbergljung$ helm repo update
Hang tight while we grab the latest from your chart repositories...
...Skip local chart repository
...Successfully got an update from the "alfresco-incubator" chart repository
...Successfully got an update from the "gravitonian-helm-repo" chart repository
...Successfully got an update from the "activiti-cloud-charts" chart repository
helm repo list...Successfully got an update from the "stable" chart repository
Update Complete. ⎈ Happy Helming!⎈
helm-repo mbergljung$ helm repo list
NAME URL
stable https://kubernetes-charts.storage.googleapis.com
local http://127.0.0.1:8879/charts
alfresco-incubator http://kubernetes-charts.alfresco.com/incubator
activiti-cloud-charts https://activiti.github.io/activiti-cloud-charts/
gravitonian-helm-repo https://gravitonian.github.io/helm-repo
Update the Full Example Helm Charts to deploy Sample Runtime Bundle
Add a dependency on the Sample Runtime Bundle in the activiti-cloud-charts/activiti-cloud-full-example/requirements.yaml file:
dependencies:
- name: infrastructure
repository: https://activiti.github.io/activiti-cloud-charts/
version: 0.4.0
- name: application
repository: https://activiti.github.io/activiti-cloud-charts/
version: 0.4.0
- name: activiti-cloud-modeling
repository: https://activiti.github.io/activiti-cloud-charts/
version: 0.4.0
condition: activiti-cloud-modeling.enabled,modeling.enabled
- name: sample-runtime-bundle
repository: https://gravitonian.github.io/helm-repo/
version: 0.1.0For the new dependency on the Sample Runtime Bundle to be picked up we need to update the dependencies as follows:
activiti-cloud-full-example mbergljung$ helm dependency update
Hang tight while we grab the latest from your chart repositories...
...Unable to get an update from the "local" chart repository (http://127.0.0.1:8879/charts):
Get http://127.0.0.1:8879/charts/index.yaml: dial tcp 127.0.0.1:8879: getsockopt: connection refused
...Successfully got an update from the "gravitonian-helm-repo" chart repository
...Successfully got an update from the "alfresco-incubator" chart repository
...Successfully got an update from the "activiti-cloud-charts" chart repository
...Successfully got an update from the "stable" chart repository
Update Complete. ⎈Happy Helming!⎈
Saving 4 charts
Downloading infrastructure from repo https://activiti.github.io/activiti-cloud-charts/
Downloading application from repo https://activiti.github.io/activiti-cloud-charts/
Downloading activiti-cloud-modeling from repo https://activiti.github.io/activiti-cloud-charts/
Downloading sample-runtime-bundle from repo https://gravitonian.github.io/helm-repo
Deleting outdated charts
You should see a charts directory with the downloaded dependencies:
activiti-cloud-full-example mbergljung$ tree
.
├── Chart.yaml
├── README.md
├── charts
│ ├── activiti-cloud-modeling-0.4.0.tgz
│ ├── application-0.4.0.tgz
│ ├── infrastructure-0.4.0.tgz
│ └── sample-runtime-bundle-0.1.0.tgz
├── helm-service-account-role.yaml
├── requirements.lock
├── requirements.yaml
├── upgrade-debug.txt
└── values.yaml
Deploy the Sample Runtime Bundle via the Full Example Helm Charts
We are now ready to upgrade our running Full Example solution (assuming it is running since before) with the new sample runtime bundle. First check what name the Full Example deployment has:
$ helm ls
NAME REVISION UPDATED STATUS CHART NAMESPACE
cloying-possum 1 Tue Nov 20 06:34:44 2018 DEPLOYED activiti-cloud-full-example-0.4.0 activiti7
intent-deer 1 Mon Nov 19 07:45:10 2018 DEPLOYED nginx-ingress-0.19.2 activiti7
We can see that the Full Example deployment has the name cloying-possum. Execute the following Helm command to upgrade it:
activiti-cloud-charts mbergljung$ cd activiti-cloud-full-example/
activiti-cloud-full-example mbergljung$ helm upgrade cloying-possum -f values.yaml . --namespace=activiti7
Note here that we cannot refer to the Full Example helm chart package in the Activiti Helm Repo like we did before when installing with activiti-cloud-charts/activiti-cloud-full-example. This is because we are changing more than just the values.yaml. We are also changing the requirements.yaml (i.e. the dependencies). And the dependencies would still be the same in the remote activiti-cloud-charts/activiti-cloud-full-example helm package, so we need to pick up the chart info from the local directory with just a dot(.).
Have a look in the Kubernetes Dashboard and make sure the new runtime bundle is deployed properly:
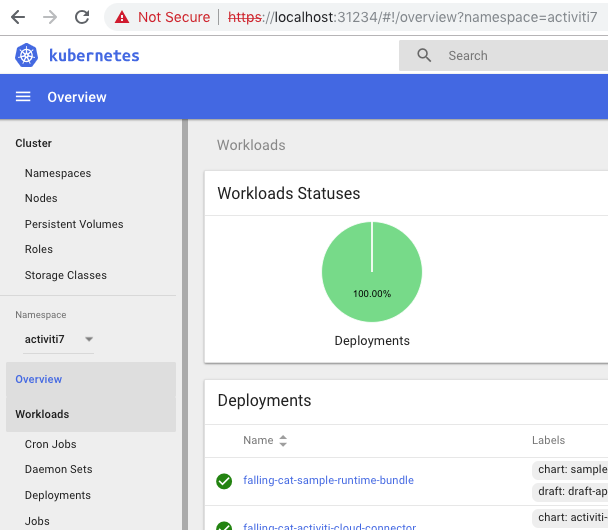
Before moving on let’s make sure we can call the ReST API in the new Sample Runtime Bundle. In Postman copy the rb-my-app collection so we can update the URLs in it. Then update the URL for the getProcessDefintions call from {{gatewayUrl}}/rb-my-app/v1/process-definitions to {{gatewayUrl}}/sample-activiti7-rb-app/v1/process-definitions. so the call targets the new Sample Runtime Bundle.
Now make a getKeycloakToken call to get auth token. And then make a getProcessDefinitions call in the new updated collection:
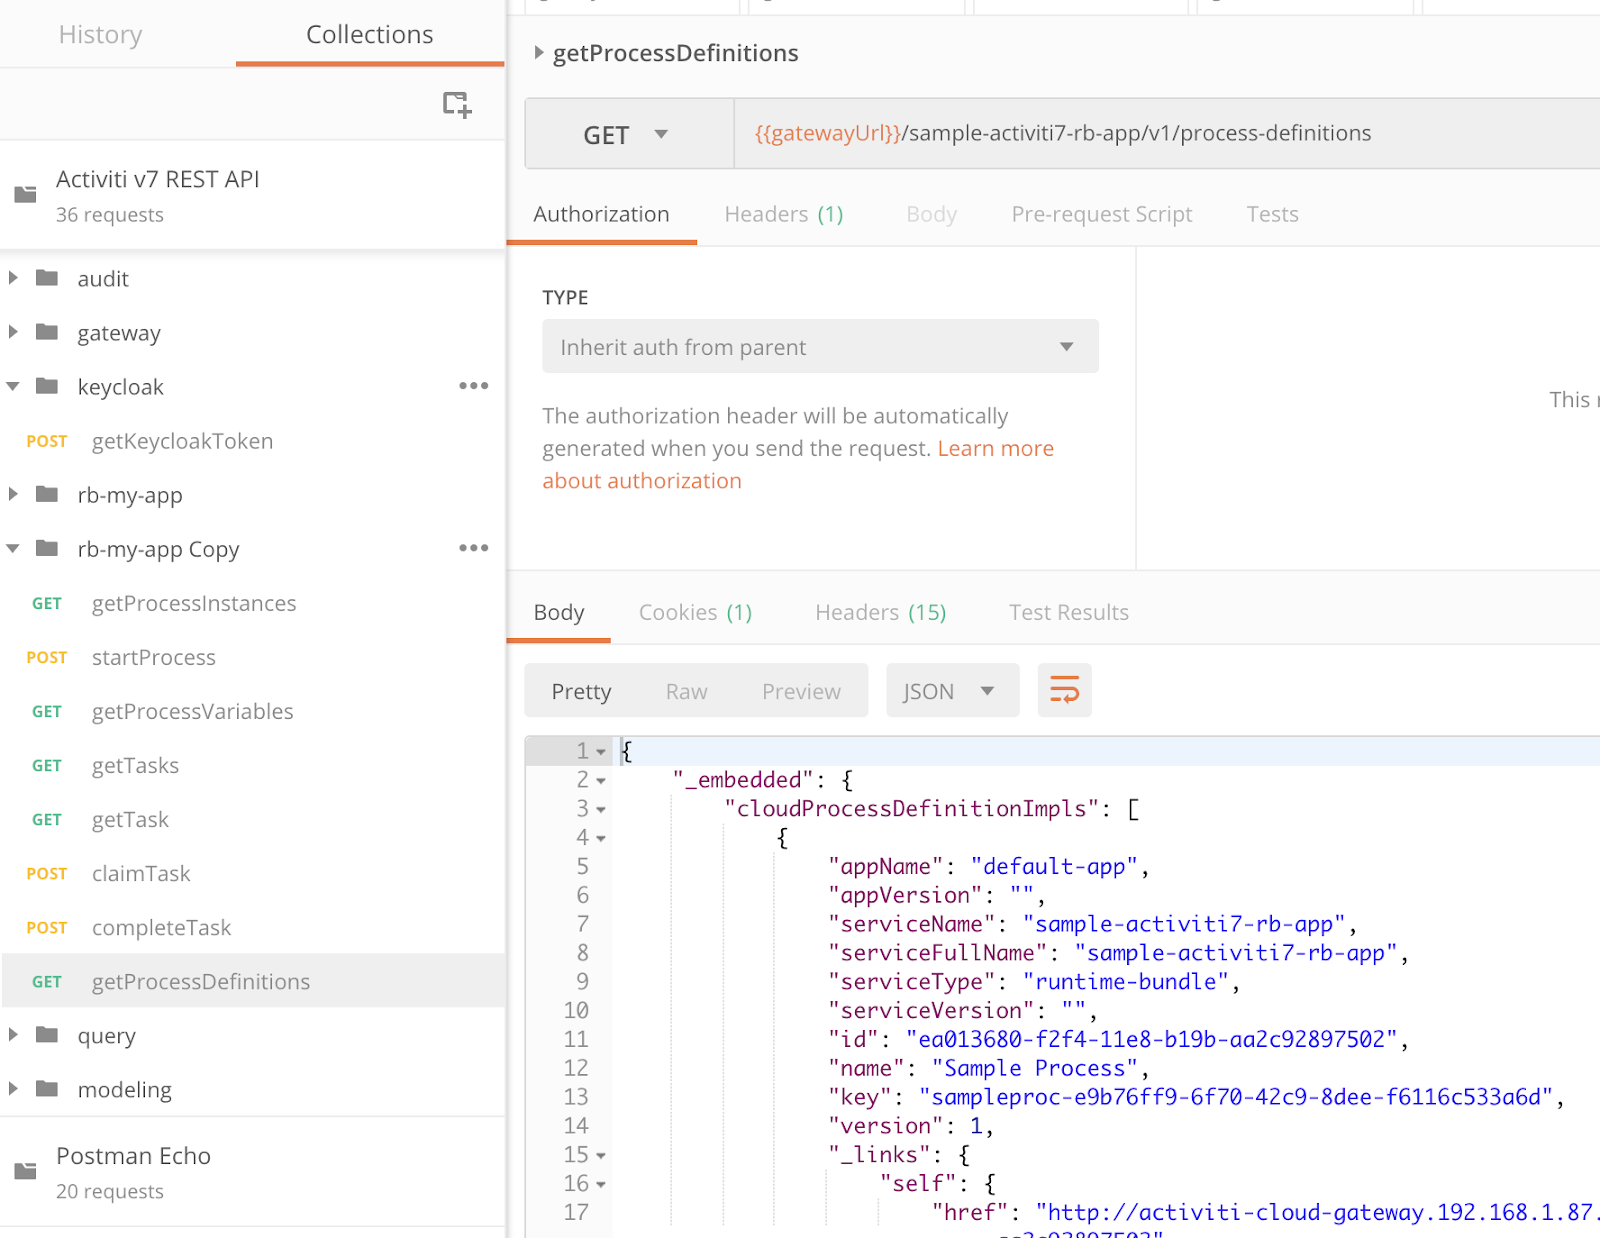
Everything seems to work fine. However, before we can run the new process definition we need to implement the custom cloud connector for Service Task 1.
Building a Cloud Connector
The process definition that we have deployed in our custom Runtime Bundle is dependent on a Cloud Connector for Service Task 1. Implementing a Cloud Connector can be done with a Spring Boot project in the same way we did for the runtime bundle. We have an example project for this here, so should not be too difficult to replicate building a custom Cloud Connector.
A Cloud Connector contains a Java implementation of the business logic that should be executed when a Service Task is processed by the Activiti 7 process engine. It lives in its own container next to the runtime bundle.
The following picture illustrates:
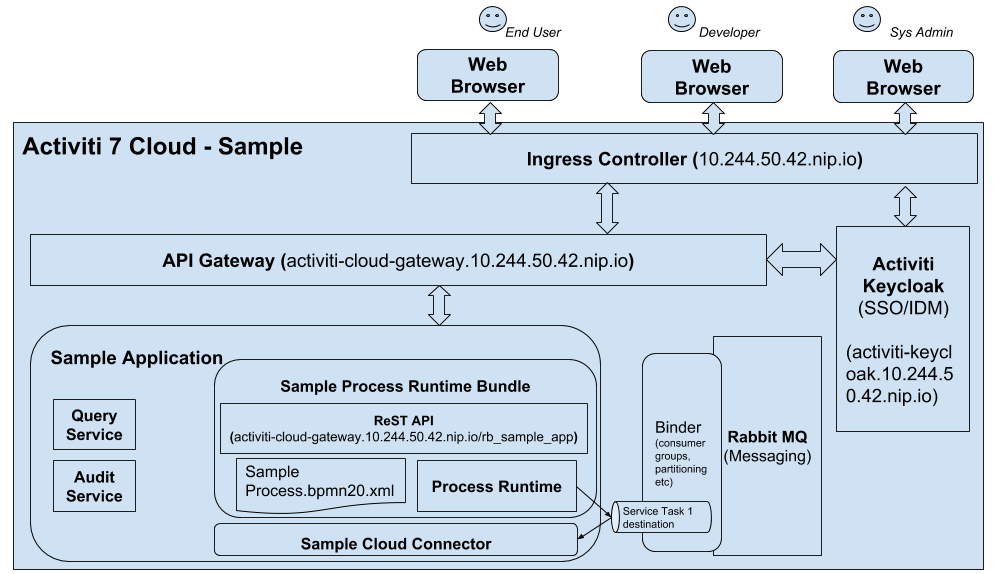
The implementation property value (i.e. serviceTask1Impl) on the Service Task 1 definition will be used as a Spring Cloud Stream channel destination name (on the bound middleware RabbitMQ). So we have to make sure the Cloud Connector creates a consumer bound to this name with the spring.cloud.stream.bindings.<channel>.destination property value.
Generating a Spring Boot 2 App
It’s really easy to get going with a Spring Boot application. Just head over to https://start.spring.io/ and fill in the data for the app as follows:
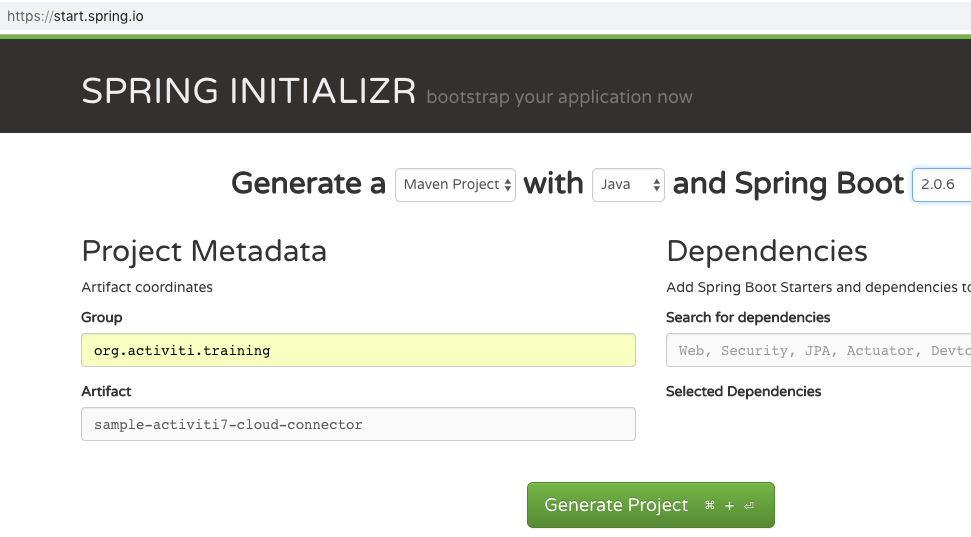
Make sure to use Spring Boot version 2.0.x with Activiti 7 Beta 1 - 3, Beta 4 should be aligned with version 2.1.x.
You don’t have to use the same Group (org.activiti.training) and Artifact (sample-activiti7-cloud-connector) names as me, just use whatever you like. However, if you copy code from this article it might be easier if you use the same package names (i.e. the same group). Then click the Generate Project button. The finished Spring Boot 2 Maven project will automatically download as a ZIP. Unpack it somewhere.
Test the standard Spring Boot App
Let’s make sure that the Spring Boot application works before we continue with the Activiti stuff. This involves two steps. First build the app JAR and then run the app JAR.
Building the application JAR:
$ cd sample-activiti7-cloud-connector/
sample-activiti7-cloud-connector mbergljung$ mvn package
[INFO] Scanning for projects...
[INFO]
[INFO] ------------------------------------------------------------------------
[INFO] Building sample-activiti7-cloud-connector 0.0.1-SNAPSHOT
[INFO] ------------------------------------------------------------------------
[INFO]
...
[INFO] --- maven-jar-plugin:3.1.0:jar (default-jar) @ sample-activiti7-cloud-connector---
[INFO] Building jar: /Users/mbergljung/IDEAProjects/sample-activiti7-cloud-connector/target/sample-activiti7-cloud-connector-0.0.1-SNAPSHOT.jar
[INFO]
[INFO] --- spring-boot-maven-plugin:2.1.0.RELEASE:repackage (repackage) @ sample-activiti7-cloud-connector---
...
[INFO] ------------------------------------------------------------------------
[INFO] BUILD SUCCESS
[INFO] ------------------------------------------------------------------------
Running the application JAR:
sample-activiti7-cloud-connector mbergljung$ java -jar target/sample-activiti7-cloud-connector-0.0.1-SNAPSHOT.jar
. ____ _ __ _ _
/\\ / ___'_ __ _ _(_)_ __ __ _ \ \ \ \
( ( )\___ | '_ | '_| | '_ \/ _` | \ \ \ \
\\/ ___)| |_)| | | | | || (_| | ) ) ) )
' |____| .__|_| |_|_| |_\__, | / / / /
=========|_|==============|___/=/_/_/_/
:: Spring Boot :: (v2.1.0.RELEASE)
2018-11-28 10:42:16.764 INFO 33357 --- [ main] SampleActiviti7CloudConnectorApplication : Starting SampleActiviti7CloudConnectorApplication v0.0.1-SNAPSHOT on MBP512-MBERGLJUNG-0917 with PID 33357 (/Users/mbergljung/IDEAProjects/sample-activiti7-cloud-connector/target/sample-activiti7-cloud-connector-0.0.1-SNAPSHOT.jar started by mbergljung in /Users/mbergljung/IDEAProjects/sample-activiti7-cloud-connector)
2018-11-28 10:42:16.768 INFO 33357 --- [ main] SampleActiviti7CloudConnectorApplication : No active profile set, falling back to default profiles: default
2018-11-28 10:42:17.298 INFO 33357 --- [ main] SampleActiviti7CloudConnectorApplication : Started SampleActiviti7CloudConnectorApplication in 0.866 seconds (JVM running for 1.28)
The application does not contain much so it will exit by itself.
Adding Activiti 7 Cloud Connector Dependencies to the App
The Spring Boot app has most of the dependencies that we need, except for the Activiti 7 Cloud Connector dependencies. So let’s add them. We can use a BOM (Bill-of-Materials) dependency that will bring in all the needed Activiti 7 dependency management configurations, including the correct versions of all dependencies.
Add the following to the pom.xml:
<dependencyManagement>
<dependencies>
<dependency>
<groupId>org.activiti.cloud.dependencies</groupId>
<artifactId>activiti-cloud-dependencies</artifactId>
<version>7.0.0.Beta3</version>
<scope>import</scope>
<type>pom</type>
</dependency>
</dependencies>
</dependencyManagement>This will import all the dependency management configurations for Activiti 7 Beta 3. Now we just need to add an Activiti 7 Cloud Connector dependency that supports building and running the Service Task Implementation etc. Add the following dependency to the pom.xml:
<dependency>
<groupId>org.activiti.cloud.connector</groupId>
<artifactId>activiti-cloud-starter-connector</artifactId>
</dependency>This will bring in all the Activiti and Spring dependencies needed to run the Activiti 7 Cloud Connector embedded in a Spring Boot application.
Note. you might also need the following dependency if you have ReST endpoints in your Cloud Connector and you want them secured the same way as in the Runtime Bundle:
<dependency>
<groupId>org.activiti.cloud.common</groupId>
<artifactId>activiti-cloud-services-common-security-keycloak</artifactId>
</dependency>Make the App a Cloud Connector
We can now use a so called Spring Boot Starter to turn this app into an Activiti 7 Cloud Connector, add the @EnableActivitiCloudConnector annotation to the sample-activiti7-cloud-connector/src/main/java/org/activiti/training/sampleactiviti7cloudconnector/SampleActiviti7CloudConnectorApplication.java class as follows:
package org.activiti.training.sampleactiviti7cloudconnector;
import org.activiti.cloud.connectors.starter.configuration.EnableActivitiCloudConnector;
import org.springframework.boot.SpringApplication;
import org.springframework.boot.autoconfigure.SpringBootApplication;
import org.springframework.context.annotation.ComponentScan;
@SpringBootApplication
@EnableActivitiCloudConnector
@ComponentScan({"org.activiti.cloud.connectors.starter","org.activiti.training.sampleactiviti7cloudconnector","org.activiti.cloud.services.common.security"})
public class SampleActiviti7CloudConnectorApplication {
public static void main(String[] args) {
SpringApplication.run(SampleActiviti7CloudConnectorApplication.class, args);
}
}At the same time we also add several Java Package paths that can be searched for Spring Beans, we do this with the @ComponentScan annotation. If you created your project with a different Java package then me, then you have to change the org.activiti.training.sampleactiviti7cloudconnector path to match your project environment.
Adding the App Name property
To add the Spring Application Name property open up the sample-activiti7-runtime-bundle/src/main/resources/application.properties file and add the following property:
spring.application.name=sample-activiti7-cloud-connectorThe application name identifies this application in a microservice environment and is used when registering with a service registry such as Netflix Eureka service registry. It is also used to look up <applicationName>[-<profile>].[properties|yml] in Spring Cloud Config Server as well as configuration in other service registries like Hashicorp’s Consul or Apache Zookeeper.
Configure App to use Keycloak for authentication
All the Cloud Connectors that are deployed uses Keycloak for user authentication. So we need to tell our connector where it can find the Keycloak server.
Open up the sample-activiti7-cloud-connector/src/main/resources/application.properties configuration file and add the following properties:
keycloak.auth-server-url=${ACT_KEYCLOAK_URL:http://activiti-keycloak:8180/auth}
keycloak.realm=${ACT_KEYCLOAK_REALM:activiti}
keycloak.resource=${ACT_KEYCLOAK_RESOURCE:activiti}
keycloak.ssl-required=${ACT_KEYCLOAK_SSL_REQUIRED:none}
keycloak.public-client=${ACT_KEYCLOAK_CLIENT:true}
keycloak.security-constraints[0].authRoles[0]=${ACT_KEYCLOAK_USER_ROLE:ACTIVITI_USER}
keycloak.security-constraints[0].securityCollections[0].patterns[0]=${ACT_KEYCLOAK_PATTERNS:/v1/*}
keycloak.security-constraints[1].authRoles[0]=${ACT_KEYCLOAK_ADMIN_ROLE:ACTIVITI_ADMIN}
keycloak.security-constraints[1].securityCollections[0].patterns[0]=/admin/*
keycloak.principal-attribute=${ACT_KEYCLOAK_PRINCIPAL_ATTRIBUTE:preferred-username}
activiti.keycloak.admin-client-app=${ACT_KEYCLOAK_CLIENT_APP:admin-cli}
activiti.keycloak.client-user=${ACT_KEYCLOAK_CLIENT_USER:client}
activiti.keycloak.client-password=${ACT_KEYCLOAK_CLIENT_PASSWORD:client}Almost all of these properties can have their values set when the app is initialized via the ACT_* property substitutions.
Configure App to Produce and Consume Async Messages
All the Cloud Connectors that are deployed uses Spring Cloud Stream for producing and consuming asynchronous messages. These messages can be from for example RabbitMQ and the Cloud Connector uses Spring AMQP protocol to make this happen with RabbitMQ. We need to tell our Cloud Connector what the different message destinations are.
Open up the sample-activiti7-cloud-connector/src/main/resources/application.properties configuration file and add the following properties:
spring.cloud.stream.bindings.sampleConnectorConsumer.destination=serviceTask1Impl
spring.cloud.stream.bindings.sampleConnectorConsumer.contentType=application/json
spring.cloud.stream.bindings.sampleConnectorConsumer.group=${spring.application.name}
spring.rabbitmq.host=${ACT_RABBITMQ_HOST:rabbitmq}The properties have the following meaning:
Property name | Value | Description |
spring.cloud.stream.bindings. sampleConnectorConsumer.destination | serviceTask1Impl | The target destination of a channel on the bound middleware (i.e. RabbitMQ). This must match the Service Task Definition implementation property value. |
spring.cloud.stream.bindings. sampleConnectorConsumer.contentType | application/json | The content type of the channel. |
spring.cloud.stream.bindings. sampleConnectorConsumer.group | ${spring.application.name} | The consumer group of the channel. Applies only to inbound bindings. All groups that subscribe to a given destination receive a copy of published data, but only one member of each group receives a given message from that destination. |
spring.rabbitmq.host | ${ACT_RABBITMQ_HOST:rabbitmq} | Hostname for where the RabbitMQ message broker is running. Usually initialized via the ACT_RABBITMQ_HOST in the Helm charts |
The channel name sampleConnectorConsumer is just internal Spring Cloud Streams wiring.
Miscellaneous App Configuration
There are a few more configuration properties that we need to supply. Open up the sample-activiti7-cloud-connector/src/main/resources/application.properties configuration file and add the following properties:
activiti.cloud.application.name=default-app
spring.main.allow-bean-definition-overriding=trueImplementing the Input Channel Interface
Our Cloud Connector is not going to do much unless we hook it up to the Spring Cloud Stream channel where the Service Task 1 events will appear. Create an interface called SampleConnectorChannel in the org.activiti.training.sampleactiviti7cloudconnector package:
package org.activiti.training.sampleactiviti7cloudconnector;
import org.springframework.cloud.stream.annotation.Input;
import org.springframework.messaging.SubscribableChannel;
public interface SampleConnectorChannel {
String SAMPLE_CONNECTOR_CONSUMER = "sampleConnectorConsumer";
@Input(SAMPLE_CONNECTOR_CONSUMER)
SubscribableChannel sampleConnectorConsumer();
}The SAMPLE_CONNECTOR_CONSUMER value must match the channel name as specified in spring.cloud.stream.bindings.<channel name>.<property> configuration. We can now use this sample consumer in the connector class implementation.
Implementing the Connector Class
So finally on to implement the Service Task 1 business logic. Create a class called SampleConnector in the org.activiti.training.sampleactiviti7cloudconnector package:
package org.activiti.training.sampleactiviti7cloudconnector;
import org.activiti.cloud.api.process.model.IntegrationRequest;
import org.activiti.cloud.api.process.model.IntegrationResult;
import org.activiti.cloud.connectors.starter.channels.IntegrationResultSender;
import org.activiti.cloud.connectors.starter.configuration.ConnectorProperties;
import org.activiti.cloud.connectors.starter.model.IntegrationResultBuilder;
import org.springframework.beans.factory.annotation.Autowired;
import org.springframework.beans.factory.annotation.Value;
import org.springframework.cloud.stream.annotation.EnableBinding;
import org.springframework.cloud.stream.annotation.StreamListener;
import org.springframework.messaging.Message;
import org.springframework.stereotype.Component;
import java.util.HashMap;
import java.util.Map;
@Component
@EnableBinding(SampleConnectorChannel.class)
public class SampleConnector {
@Value("${spring.application.name}")
private String appName;
@Autowired
private ConnectorProperties connectorProperties;
private final IntegrationResultSender integrationResultSender;
public SampleConnector(IntegrationResultSender integrationResultSender) {
this.integrationResultSender = integrationResultSender;
}
@StreamListener(value = SampleConnectorChannel.SAMPLE_CONNECTOR_CONSUMER)
public void execute(IntegrationRequest event) throws InterruptedException {
System.out.println("Called Cloud Connector " + appName);
String var1 = SampleConnector.class.getSimpleName() + " was called for instance " +
event.getIntegrationContext().getProcessInstanceId();
// Implement your business logic here
Map<String, Object> results = new HashMap<>();
results.put("var1", var1);
Message<IntegrationResult> message = IntegrationResultBuilder.resultFor(event, connectorProperties)
.withOutboundVariables(results)
.buildMessage();
integrationResultSender.send(message);
}
}
The class starts off with two annotations, one for making it a Spring bean (@Component) and the other one for binding it to the SampleConnectorChannel (@EnableBinding). Then we wire in the ConnectorProperties bean, which has info about the connector such as service type, service version, application name, and application version. Then the IntegrationResultSender bean is injected to be able to respond with data to the initiating runtime bundle, basically sending events back to the runtime bundle.
Then we implement the Service Task business logic in a method with the StreamListener annotation. We can call the method whatever we like, in this case it is called execute. The implementation does not actually do anything in this case, it just sends back a message with a variable called var1 to the runtime bundle.
So, the Sample Cloud Connector’s association with the Sample Runtime Bundle is just what stream it is listening to, which needs to match the implementation attribute of the Service Task in the process definition XML in the runtime bundle. There is also another stream that is used for sending the result back to the runtime bundle but we use the default value from the spring boot starter so nobody has to worry about that unless they hit on a reason to change it.
Build and run the Sample Cloud Connector
We are now ready to build and run the Cloud Connector, just to make sure everything compiles and runs properly before we create a Docker image and deploy. Build as follows:
sample-activiti7-cloud-connector mbergljung$ mvn package -DskipTests
I’m turning off tests as there is no RabbitMQ running on the correct host to do the tests.
Then run the Cloud Connector as follows:
sample-activiti7-cloud-connector mbergljung$ java -jar target/sample-activiti7-cloud-connector-0.0.1-SNAPSHOT.jar
…
2018-11-29 14:36:26.833 INFO 40967 --- [ main] o.s.c.support.GenericApplicationContext : Refreshing org.springframework.context.support.GenericApplicationContext@345f69f3: startup date [Thu Nov 29 14:36:26 GMT 2018]; root of context hierarchy
2018-11-29 14:36:27.117 INFO 40967 --- [ main] o.s.a.r.c.CachingConnectionFactory : Attempting to connect to: [rabbitmq:5672]
Looks like everything is starting as expected so on to deploying it.
Deploying a Cloud Connector
In this section we will have a look at one way of deploying Cloud Connectors.
Building a Docker Image for our Cloud Connector
We now got the cloud connector completed with our custom process definition. In order to use it we need to have it available as a Docker Image. And to produce a Docker image we need a Dockerfile. Create one in the top directory of the project with the following content:
FROM openjdk:alpine
RUN apk --update add fontconfig ttf-dejavu
ENV PORT 8080
EXPOSE 8080
COPY target/*.jar /opt/app.jar
WORKDIR /opt
ENTRYPOINT exec java $JAVA_OPTS -jar app.jarThis will create a cloud connector image based on Alpine linux and OpenJDK. All we need to run it. It will be exposed on port 8080.
Let’s have our Maven project build the image automatically for us with the help of the Fabric8 Maven plugin. Add it to the sample-activiti7-cloud-connector/pom.xml as follows:
<?xml version="1.0" encoding="UTF-8"?>
<project xmlns="http://maven.apache.org/POM/4.0.0"
...
<build>
<plugins>
<plugin>
<groupId>org.springframework.boot</groupId>
<artifactId>spring-boot-maven-plugin</artifactId>
</plugin>
<!-- Build the custom Activiti Cloud Connector Docker Image -->
<plugin>
<groupId>io.fabric8</groupId>
<artifactId>docker-maven-plugin</artifactId>
<version>0.26.1</version>
<configuration>
<images>
<image>
<alias>activiti-cc-custom</alias>
<name>activiti-cloud-connector-custom:${project.version}</name>
<build>
<dockerFileDir>${project.basedir}</dockerFileDir>
</build>
</image>
</images>
</configuration>
<executions>
<execution>
<id>docker</id>
<phase>install</phase>
<goals>
<goal>build</goal>
</goals>
</execution>
<execution>
<id>registry</id>
<phase>deploy</phase>
<goals>
<goal>push</goal>
</goals>
</execution>
</executions>
</plugin>
</plugins>
</build>
</project>Now, to get the Docker image built we just have to execute the following maven command:
sample-activiti7-cloud-connector mbergljung$ mvn clean install -DskipTests
[INFO] Scanning for projects...
[INFO]
[INFO] ------------------------------------------------------------------------
[INFO] Building sample-activiti7-cloud-connector 0.0.1-SNAPSHOT
[INFO] ------------------------------------------------------------------------
[INFO]
[INFO] --- maven-clean-plugin:3.0.0:clean (default-clean) @ sample-activiti7-cloud-connector---
[INFO] Deleting /Users/mbergljung/IDEAProjects/sample-activiti7-cloud-connector/target
[INFO]
[INFO] --- maven-resources-plugin:3.0.2:resources (default-resources) @ sample-activiti7-cloud-connector---
[INFO] Using 'UTF-8' encoding to copy filtered resources.
[INFO] Copying 1 resource
[INFO] Copying 0 resource
[INFO]
[INFO] --- maven-compiler-plugin:3.7.0:compile (default-compile) @ sample-activiti7-cloud-connector---
[INFO] Changes detected - recompiling the module!
[INFO] Compiling 3 source files to /Users/mbergljung/IDEAProjects/sample-activiti7-cloud-connector/target/classes
[INFO]
[INFO] --- maven-resources-plugin:3.0.2:testResources (default-testResources) @ sample-activiti7-cloud-connector---
[INFO] Using 'UTF-8' encoding to copy filtered resources.
[INFO] skip non existing resourceDirectory /Users/mbergljung/IDEAProjects/sample-activiti7-cloud-connector/src/test/resources
[INFO]
[INFO] --- maven-compiler-plugin:3.7.0:testCompile (default-testCompile) @ sample-activiti7-cloud-connector---
[INFO] Changes detected - recompiling the module!
[INFO] Compiling 1 source file to /Users/mbergljung/IDEAProjects/sample-activiti7-cloud-connector/target/test-classes
[INFO]
[INFO] --- maven-surefire-plugin:2.21.0:test (default-test) @ sample-activiti7-cloud-connector---
[INFO] Tests are skipped.
[INFO]
[INFO] --- maven-jar-plugin:3.0.2:jar (default-jar) @ sample-activiti7-cloud-connector---
[INFO] Building jar: /Users/mbergljung/IDEAProjects/sample-activiti7-cloud-connector/target/sample-activiti7-cloud-connector-0.0.1-SNAPSHOT.jar
[INFO]
[INFO] --- spring-boot-maven-plugin:2.0.6.RELEASE:repackage (default) @ sample-activiti7-cloud-connector---
[INFO]
[INFO] --- maven-install-plugin:2.5.2:install (default-install) @ sample-activiti7-cloud-connector---
[INFO] Installing /Users/mbergljung/IDEAProjects/sample-activiti7-cloud-connector/target/sample-activiti7-cloud-connector-0.0.1-SNAPSHOT.jar to /Users/mbergljung/.m2/repository/org/activiti/training/sample-activiti7-cloud-connector/0.0.1-SNAPSHOT/sample-activiti7-cloud-connector-0.0.1-SNAPSHOT.jar
[INFO] Installing /Users/mbergljung/IDEAProjects/sample-activiti7-cloud-connector/pom.xml to /Users/mbergljung/.m2/repository/org/activiti/training/sample-activiti7-cloud-connector/0.0.1-SNAPSHOT/sample-activiti7-cloud-connector-0.0.1-SNAPSHOT.pom
[INFO]
[INFO] --- docker-maven-plugin:0.26.1:build (docker) @ sample-activiti7-cloud-connector---
[INFO] Building tar: /Users/mbergljung/IDEAProjects/sample-activiti7-cloud-connector/target/docker/activiti-cloud-connector-custom/0.0.1-SNAPSHOT/tmp/docker-build.tar
[INFO] DOCKER> [activiti-cloud-connector-custom:0.0.1-SNAPSHOT] "activiti-cc-custom": Created docker-build.tar in 434 milliseconds
[INFO] DOCKER> [activiti-cloud-connector-custom:0.0.1-SNAPSHOT] "activiti-cc-custom": Built image sha256:6b999
[INFO] ------------------------------------------------------------------------
[INFO] BUILD SUCCESS
[INFO] ------------------------------------------------------------------------
[INFO] Total time: 9.614 s
[INFO] Finished at: 2018-11-30T09:13:36Z
[INFO] Final Memory: 56M/803M
[INFO] ------------------------------------------------------------------------
Make sure we got the image by listing local images:
$ docker image ls
REPOSITORY TAG IMAGE ID CREATED SIZE
activiti-cloud-connector-custom 0.0.1-SNAPSHOT 6b9999eed20b 51 seconds ago 153MB
activiti-runtime-bundle-custom 0.0.1-SNAPSHOT a146b0829d69 8 days ago 193MB
...
We are now ready to include the cloud connector in an Activiti 7 Deployment.
Deploying a custom Cloud Connector Docker Image
What we want to do now is deploy our cloud connector together with the necessary services and infrastructure. We can use the previous Full Example Helm Chart setup for this. We just need to add our Sample Cloud Connector to this solution deployment. To do this we need to create a Helm package for our cloud connector.
Creating a Helm Chart for the Sample Cloud Connector
The easiest way to accomplish this is to copy the Helm Charts for the out-of-the-box Example Cloud Connector into our Helm Repo project (the GitHub pages project we created earlier on, in my case https://github.com/gravitonian/helm-repo):
helm-repo mbergljung$ cd charts/
charts mbergljung$mkdir sample-cloud-connector
charts mbergljung$cd sample-cloud-connector/
sample-cloud-connector mbergljung$ cp -R ../../../activiti-cloud-charts/activiti-cloud-connector/* .
sample-cloud-connector mbergljung$ ls -l
total 24
-rw-r--r-- 1 mbergljung staff 194 30 Nov 09:18 Chart.yaml
-rw-r--r-- 1 mbergljung staff 18 30 Nov 09:18 README.md
drwxr-xr-x 7 mbergljung staff 224 30 Nov 09:18 templates
-rw-r--r-- 1 mbergljung staff 2531 30 Nov 09:18 values.yaml
Now we can update these charts to match our Sample Cloud Connector.
Open up the helm-repo/charts/sample-cloud-connector/Chart.yaml file and update it to look as follows, changing the name and version (note. The name of the chart and the directory it is contained in must match):
apiVersion: v1
description: A Helm chart for Kubernetes
icon: https://raw.githubusercontent.com/jenkins-x/jenkins-x-platform/master/images/java.png
name: sample-cloud-connector
version: 0.1.0Then open up the helm-repo/charts/sample-cloud-connector/values.yaml file and update it to look as follows:
# Default values for Maven projects.
# This is a YAML-formatted file.
# Declare variables to be passed into your templates.
replicaCount: 1
global:
rabbitmq:
host:
value: ""
username:
value: guest
password:
value: guest
keycloak:
url: ""
name: keycloak
service:
type: http
port: 80
## The list of hostnames to be covered with this ingress record.
## Most likely this will be just one host, but in the event more hosts are needed, this is an array
ingress:
hostName: ""
## Allows the specification of additional environment variables
extraEnv: |
# - name: ACT_KEYCLOAK_URL
# valueFrom:
# configMapKeyRef:
# name: {{ .Release.Name }}-keycloak-http
# key: expose-keycloak-service-key
javaOpts:
xmx: 768m
xms: 512m
other: -XX:+UnlockExperimentalVMOptions -XX:+UseCGroupMemoryLimitForHeap -Dsun.zip.disableMemoryMapping=true -XX:+UseParallelGC -XX:MinHeapFreeRatio=5 -XX:MaxHeapFreeRatio=10 -XX:GCTimeRatio=4 -XX:AdaptiveSizePolicyWeight=90
image:
repository: activiti-cloud-connector-custom
tag: 0.0.1-SNAPSHOT
pullPolicy: IfNotPresent
service:
name: sample-activiti7-cc-app
type: ClusterIP
externalPort: 80
internalPort: 8080
annotations:
fabric8.io/expose: "false"
resources:
limits:
memory: 768Mi
requests:
cpu: 400m
memory: 768Mi
probePath: /actuator/health
livenessProbe:
initialDelaySeconds: 140
periodSeconds: 15
successThreshold: 1
timeoutSeconds: 4
readinessProbe:
periodSeconds: 15
successThreshold: 1
timeoutSeconds: 3
terminationGracePeriodSeconds: 20
ingress:
## Set to true to enable ingress record generation
enabled: false
path: /sample-cloud-connector
## Set this to true in order to enable TLS on the ingress record
tls: false
## If TLS is set to true, you must declare what secret will store the key/certificate for TLS
tlsSecret: myTlsSecret
## Ingress annotations done as key:value pairs
annotations:
kubernetes.io/ingress.class: nginx
nginx.ingress.kubernetes.io/rewrite-target: /
nginx.ingress.kubernetes.io/enable-cors: "true"
nginx.ingress.kubernetes.io/cors-allow-headers: "X-Forwarded-For, X-Forwarded-Proto, X-Forwarded-Port, X-Forwarded-Prefix,DNT,X-CustomHeader,Keep-Alive,User-Agent,X-Requested-With,If-Modified-Since,Cache-Control,Content-Type,Authorization,X-CSRF-Token,Access-Control-Request-Headers,Access-Control-Request-Method,accept,Keep-Alive"
nginx.ingress.kubernetes.io/x-forwarded-prefix: "true"The following values have been updated:
Name | New value | Description |
image.repository | activiti-cloud-connector-custom | This is the name of the custom cloud connector Docker Image in our local Docker repository. You can do $ docker image ls to view it. |
image.tag | 0.0.1-SNAPSHOT | This is the version of the custom cloud connector Docker Image in our local Docker repository. You can do $ docker image ls to view it. |
service.name | sample-activiti7-cc-app | This is the name of the service representing the new cloud connector. |
Package and Publish the Helm Chart for the Sample Cloud Connector
We are now ready to create a Helm package for our Sample Cloud Connector Helm Chart. Execute the following commands standing in the /helm-repo directory:
helm-repo mbergljung$ helm lint charts/sample-cloud-connector
==> Linting charts/sample-cloud-connector
Lint OK
1 chart(s) linted, no failures
helm-repo mbergljung$ helm package charts/sample-cloud-connector
Successfully packaged chart and saved it to: /Users/mbergljung/DeployProjects/helm-repo/sample-cloud-connector-0.1.0.tgz
Now, let’s upload all the chart files including the package to our Helm Repository (i.e. https://github.com/gravitonian/helm-repo). First generate the index file:
helm-repo mbergljung$ helm repo index --url https://gravitonian.github.io/helm-repo .
This command generates the index.yaml file. Let’s take a look at it:
helm-repo mbergljung$ more index.yaml
apiVersion: v1
entries:
sample-cloud-connector:
- apiVersion: v1
created: 2018-11-30T09:33:10.290581Z
description: A Helm chart for Kubernetes
digest: 743e4c88dd9368cf2d5555c29f78c6732b428ecae9ec1cf14607955a4e7c55a1
icon: https://raw.githubusercontent.com/jenkins-x/jenkins-x-platform/master/images/java.png
name: sample-cloud-connector
urls:
- https://gravitonian.github.io/helm-repo/sample-cloud-connector-0.1.0.tgz
version: 0.1.0
sample-runtime-bundle:
- apiVersion: v1
created: 2018-11-30T09:33:10.291296Z
description: A Helm chart for Kubernetes
digest: 8215e08e933dda7372866796027b2aa80f28c0487ddd902d2ec9e27036092905
icon: https://raw.githubusercontent.com/jenkins-x/jenkins-x-platform/master/images/java.png
name: sample-runtime-bundle
urls:
- https://gravitonian.github.io/helm-repo/sample-runtime-bundle-0.1.0.tgz
version: 0.1.0
generated: 2018-11-30T09:33:10.288776Z
The helm repo GitHub project should now look something like this:
helm-repo mbergljung$ tree
.
├── charts
│ ├── sample-cloud-connector
│ │ ├── Chart.yaml
│ │ ├── README.md
│ │ ├── templates
│ │ │ ├── NOTES.txt
│ │ │ ├── _helpers.tpl
│ │ │ ├── deployment.yaml
│ │ │ ├── ingress.yaml
│ │ │ └── service.yaml
│ │ └── values.yaml
│ └── sample-runtime-bundle
│ ├── Chart.yaml
│ ├── README.md
│ ├── requirements.yaml
│ ├── templates
│ │ ├── NOTES.txt
│ │ ├── _helpers.tpl
│ │ ├── deployment.yaml
│ │ ├── ingress.yaml
│ │ └── service.yaml
│ └── values.yaml
├── index.yaml
├── sample-cloud-connector-0.1.0.tgz
└── sample-runtime-bundle-0.1.0.tgz
Now commit & push the changes:
helm-repo mbergljung$git add .
helm-repo mbergljung$ git commit -m "Sample Cloud Connector Chart"
[gh-pages 493f63d] Sample Cloud Connector Chart
...
helm-repo mbergljung$ git push
Counting objects: 11, done.
Delta compression using up to 8 threads.
Compressing objects: 100% (10/10), done.
Writing objects: 100% (11/11), 6.20 KiB | 6.20 MiB/s, done.
Total 11 (delta 2), reused 0 (delta 0)
remote: Resolving deltas: 100% (2/2), completed with 1 local object.
To https://github.com/gravitonian/helm-repo.git
907b594..493f63d gh-pages -> gh-pages
Add Our Helm Repository to the local Helm installation
We can now add this Helm repo to our Helm installation as follows (optional if you did this when developing the runtime bundle):
helm-repo mbergljung$ helm repo add gravitonian-helm-repo https://gravitonian.github.io/helm-repo
"gravitonian-helm-repo" has been added to your repositories
Update repo to make sure we got all the latest stuff locally (important, don’t forget to do this!):
charts mbergljung$ helm repo update
Hang tight while we grab the latest from your chart repositories...
...Skip local chart repository
...Successfully got an update from the "alfresco-incubator" chart repository
...Successfully got an update from the "gravitonian-helm-repo" chart repository
...Successfully got an update from the "activiti-cloud-charts" chart repository
helm repo list...Successfully got an update from the "stable" chart repository
Update Complete. ⎈ Happy Helming!⎈
Update the Full Example Helm Charts to deploy Sample Cloud Connector
Add a dependency on the Sample Cloud Connector in the activiti-cloud-charts/activiti-cloud-full-example/requirements.yaml file:
dependencies:
- name: infrastructure
repository: https://activiti.github.io/activiti-cloud-charts/
version: 0.4.0
- name: application
repository: https://activiti.github.io/activiti-cloud-charts/
version: 0.4.0
- name: activiti-cloud-modeling
repository: https://activiti.github.io/activiti-cloud-charts/
version: 0.4.0
condition: activiti-cloud-modeling.enabled,modeling.enabled
- name: sample-runtime-bundle
repository: https://gravitonian.github.io/helm-repo/
version: 0.1.0
- name: sample-cloud-connector
repository: https://gravitonian.github.io/helm-repo/
version: 0.1.0For the new dependency on the Sample Cloud Connector to be picked up we need to update the dependencies as follows:
activiti-cloud-full-example mbergljung$ helm dependency update
Hang tight while we grab the latest from your chart repositories...
...Unable to get an update from the "local" chart repository (http://127.0.0.1:8879/charts):
Get http://127.0.0.1:8879/charts/index.yaml: dial tcp 127.0.0.1:8879: getsockopt: connection refused
...Successfully got an update from the "alfresco-incubator" chart repository
...Successfully got an update from the "gravitonian-helm-repo" chart repository
...Successfully got an update from the "activiti-cloud-charts" chart repository
...Successfully got an update from the "stable" chart repository
Update Complete. ⎈Happy Helming!⎈
Saving 5 charts
Downloading infrastructure from repo https://activiti.github.io/activiti-cloud-charts/
Downloading application from repo https://activiti.github.io/activiti-cloud-charts/
Downloading activiti-cloud-modeling from repo https://activiti.github.io/activiti-cloud-charts/
Downloading sample-runtime-bundle from repo https://gravitonian.github.io/helm-repo/
Downloading sample-cloud-connector from repo https://gravitonian.github.io/helm-repo/
Deleting outdated charts
You should see a charts directory with the downloaded dependencies:
activiti-cloud-full-example mbergljung$ tree
.
├── Chart.yaml
├── README.md
├── charts
│ ├── activiti-cloud-modeling-0.4.0.tgz
│ ├── application-0.4.0.tgz
│ ├── infrastructure-0.4.0.tgz
│ ├── sample-cloud-connector-0.1.0.tgz
│ └── sample-runtime-bundle-0.1.0.tgz
├── helm-service-account-role.yaml
├── requirements.lock
├── requirements.yaml
├── upgrade-debug.txt
└── values.yaml
Deploy the Sample Cloud Connector via the Full Example Helm Charts
We are now ready to upgrade our running Full Example solution (assuming it is running since before) with the new sample cloud connector. First check what name the Full Example deployment has:
$ helm ls
NAME REVISION UPDATED STATUS CHART NAMESPACE
cloying-possum 1 Tue Nov 20 06:34:44 2018 DEPLOYED activiti-cloud-full-example-0.4.0 activiti7
intent-deer 1 Mon Nov 19 07:45:10 2018 DEPLOYED nginx-ingress-0.19.2 activiti7
We can see that the Full Example deployment has the name cloying-possum. Execute the following Helm command to upgrade it:
activiti-cloud-charts mbergljung$ cd activiti-cloud-full-example/
activiti-cloud-full-example mbergljung$ helm upgrade cloying-possum -f values.yaml . --namespace=activiti7
Note here that we cannot refer to the Full Example helm chart package in the Activiti Helm Repo like we did before when installing with activiti-cloud-charts/activiti-cloud-full-example. This is because we are changing more than just the values.yaml. We are also changing the requirements.yaml (i.e. the dependencies). And the dependencies would still be the same in the remote activiti-cloud-charts/activiti-cloud-full-example helm package, so we need to pick up the chart info from the local directory with just a dot(.).
Have a look in the Kubernetes Dashboard and make sure the new runtime bundle is deployed properly:
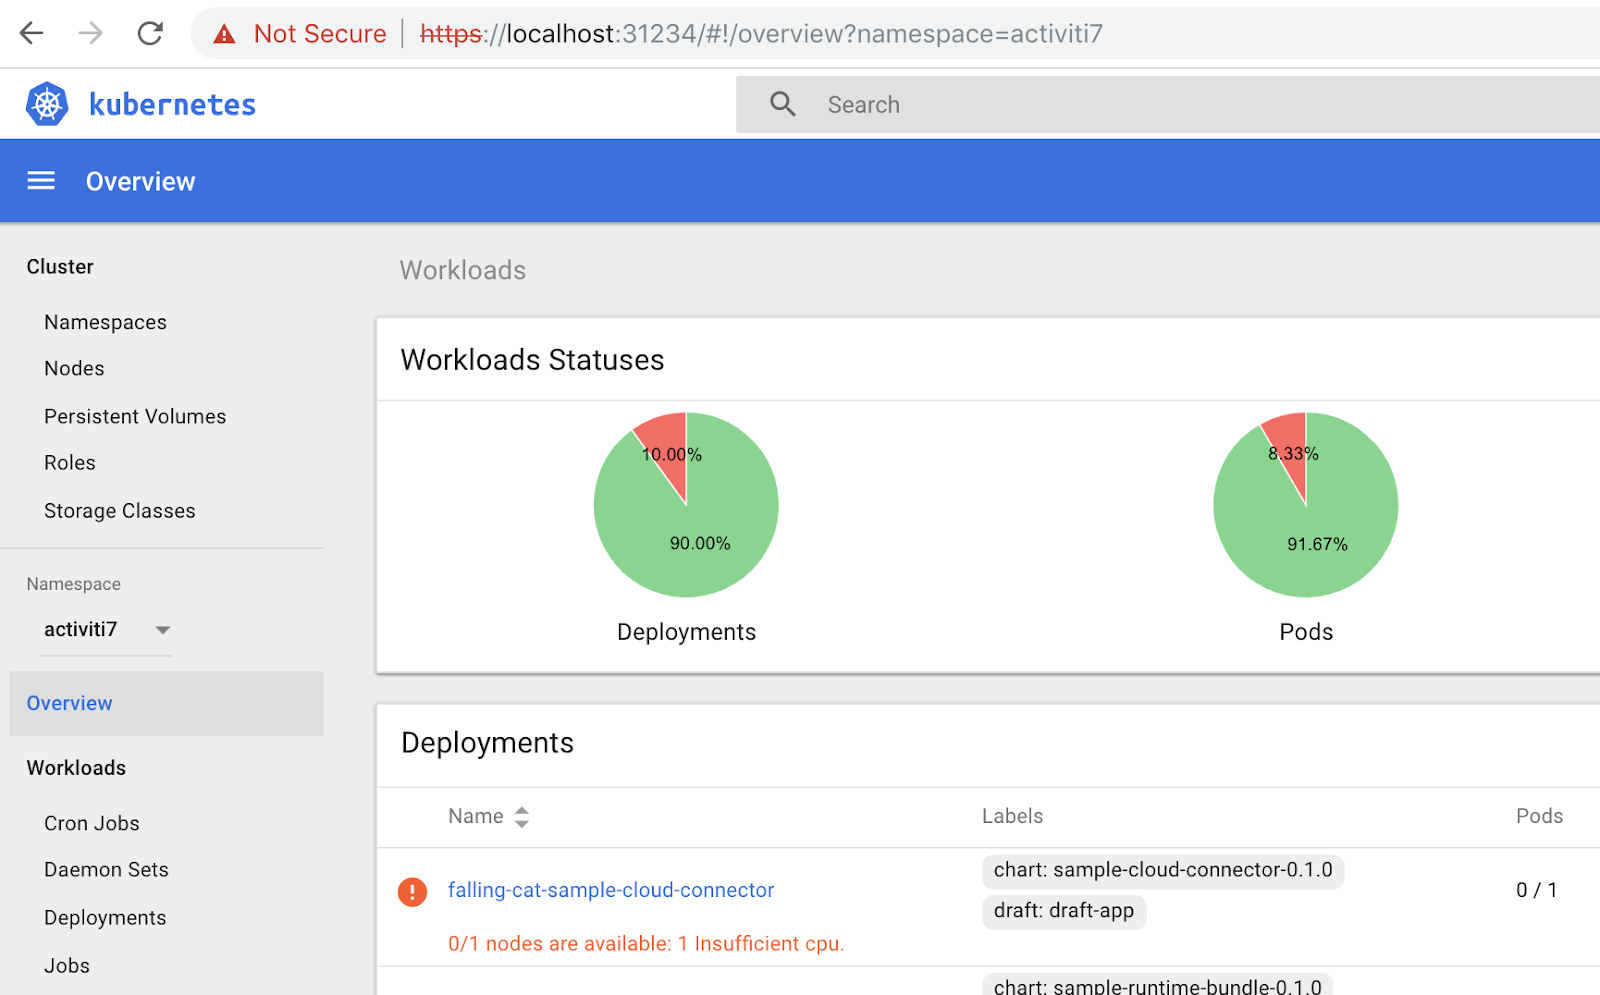
I get the above error first time around. To fix it I just added a CPU in the Docker for Desktop advanced settings and restarted:
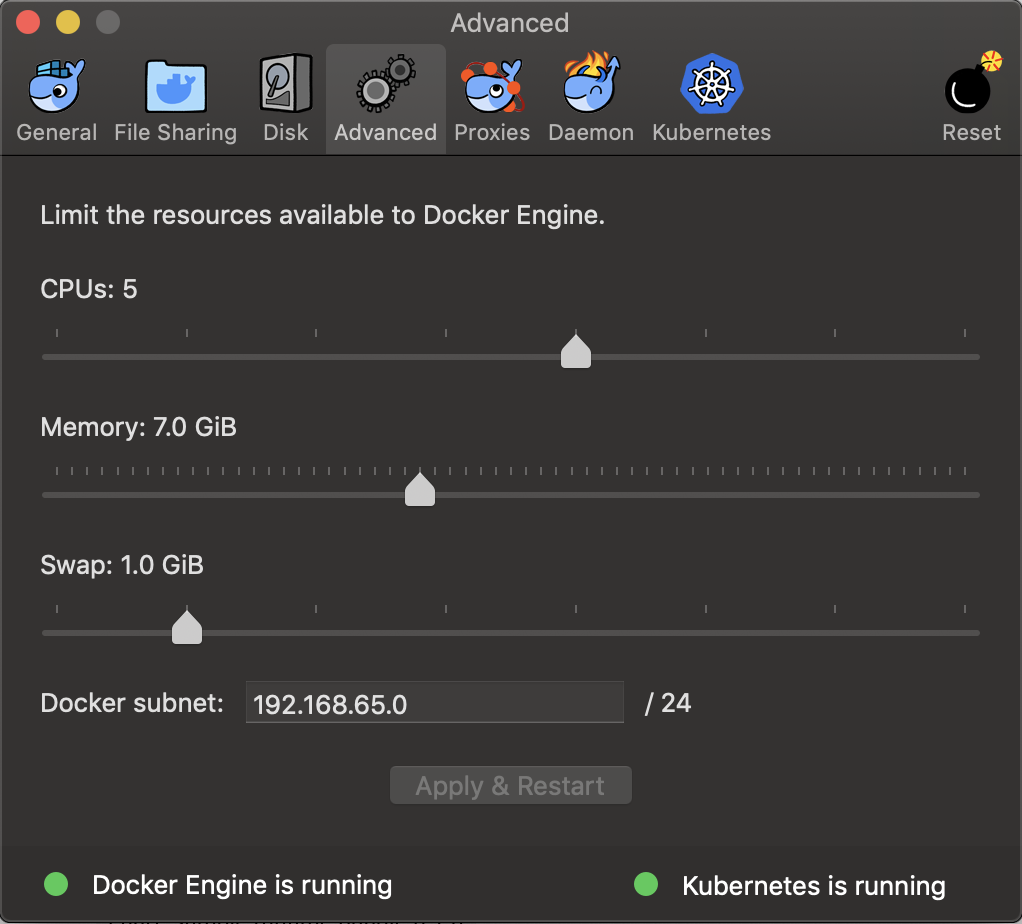
I had 4 CPUs allocated before the change.
Testing the Custom Process
We should now be in a state where we can test our custom process. We got the process definition deployed in the Sample Runtime Bundle and we got the Service task implementation deployed in the Sample Cloud Connector.
As usual, to be able to make any ReST calls we need to acquire an access token from Keycloak. If you go to the keycloak directory in the Postman collection and select the getKeycloakToken you will get an access token:
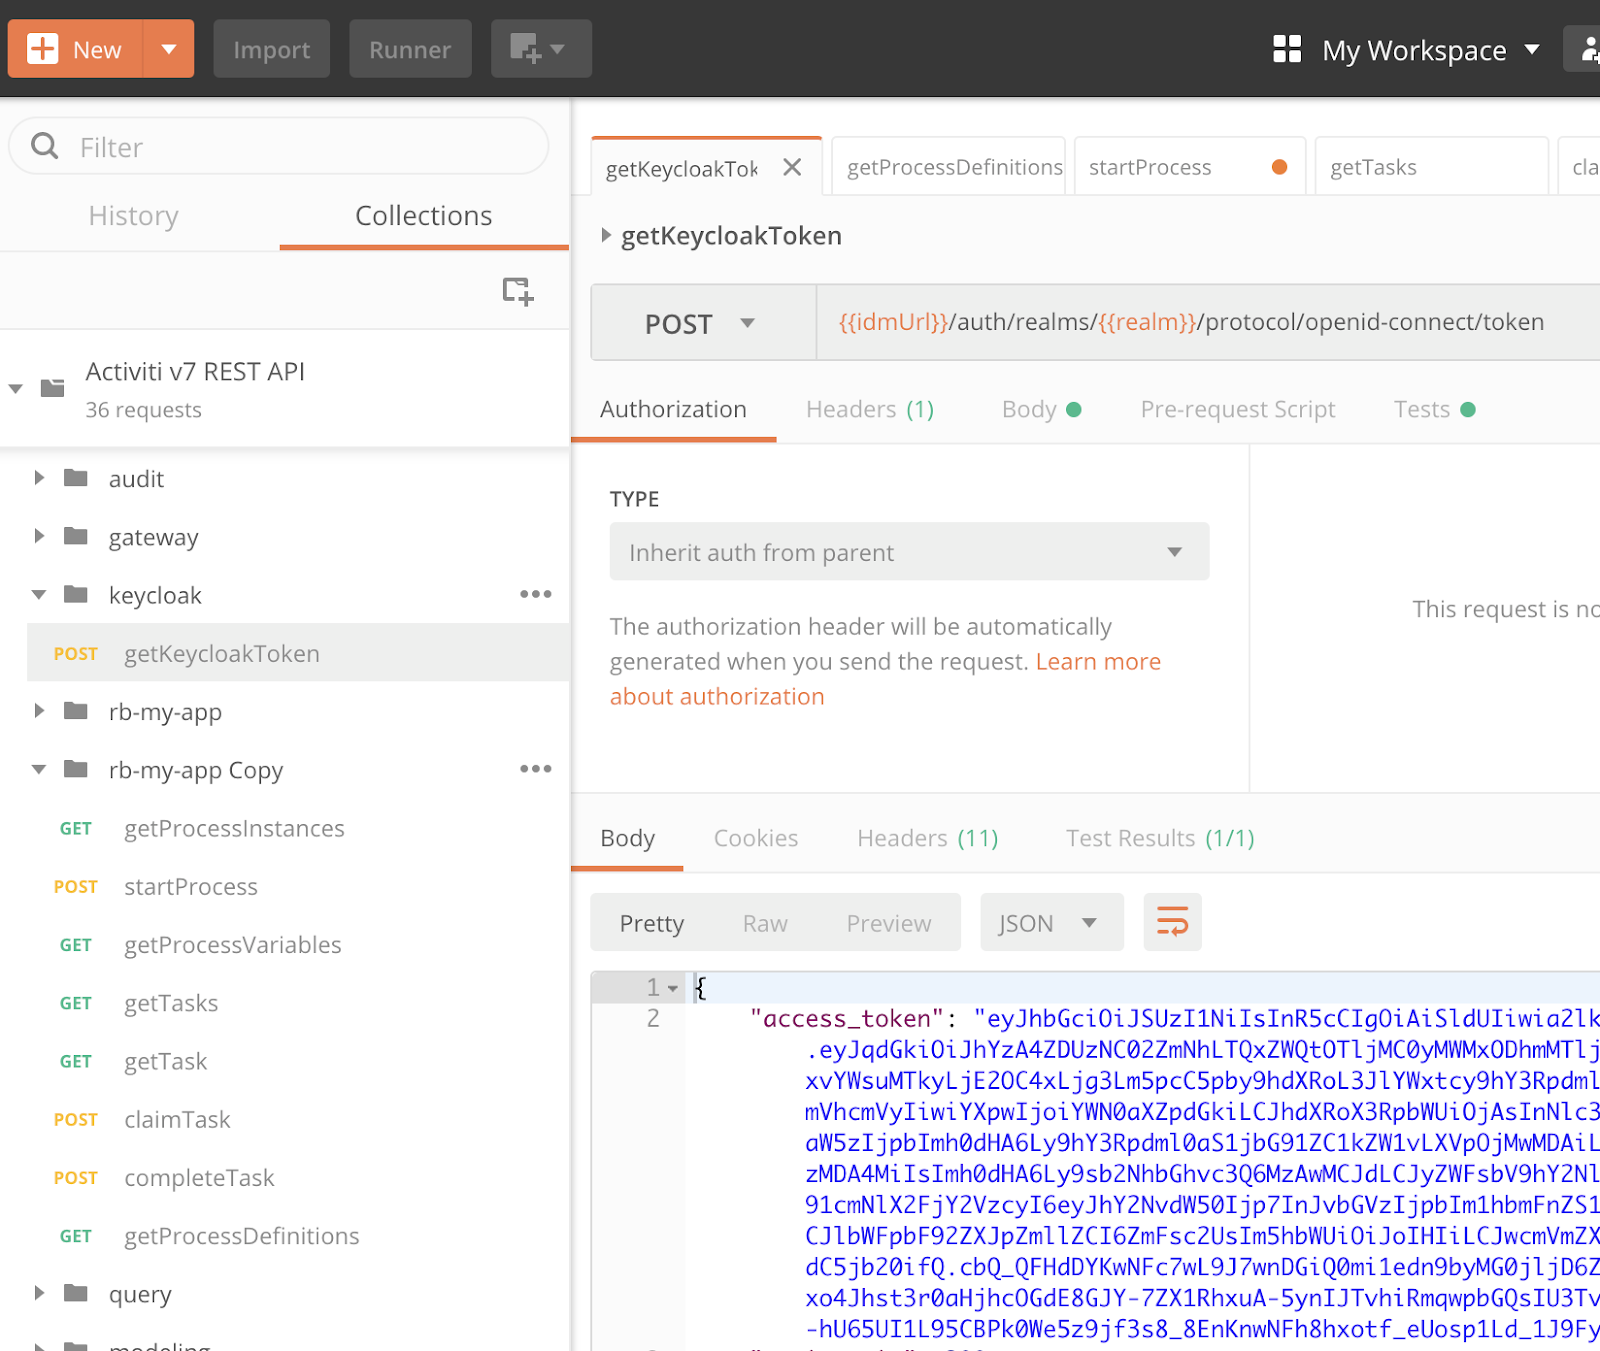
The returned access token will be used to authenticate further requests as user hruser. Note that this token is time sensitive and it will be automatically invalidated at some point, so you might need to request it again if you start getting unauthorized errors (you will see a 401 Unauthorized error in Postman to the right in the middle of the screen).
Once we get the token for a user we can interact with all the user endpoints. For example, we can invoke a ReST call to see what Process Definitions that are deployed inside our Sample Runtime Bundle. We made a copy earlier of the rb-my-app Postman collection and changed the URL to point to the new Sample Runtime Bundle: ({{gatewayUrl}}/sample-activiti7-rb-app/v1/process-definitions):
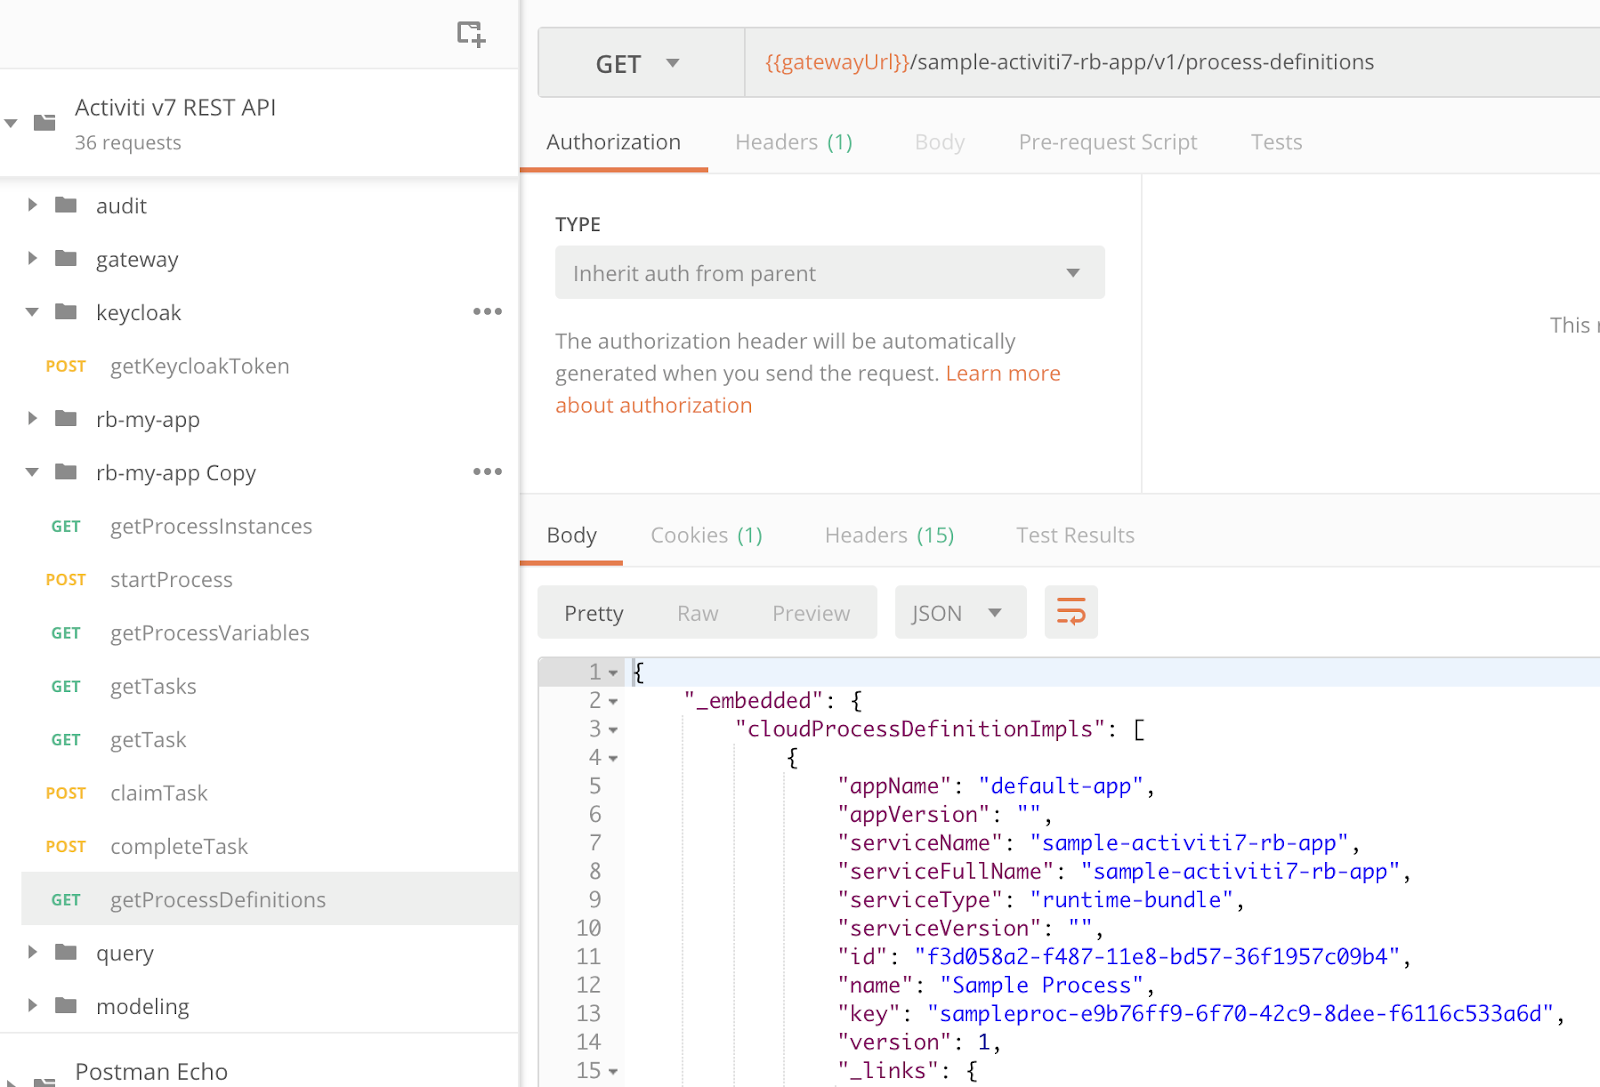
Now, let’s start a process instance with the Sample Process Definition contained in our Sample Runtime Bundle. To start a process instance based on this process definition we can use the startProcess Postman request that is in the rb-my-app Copy folder. This request should be updated to look like {{gatewayUrl}}/sample-activiti7-rb-app/v1/process-instances POST ReST call:
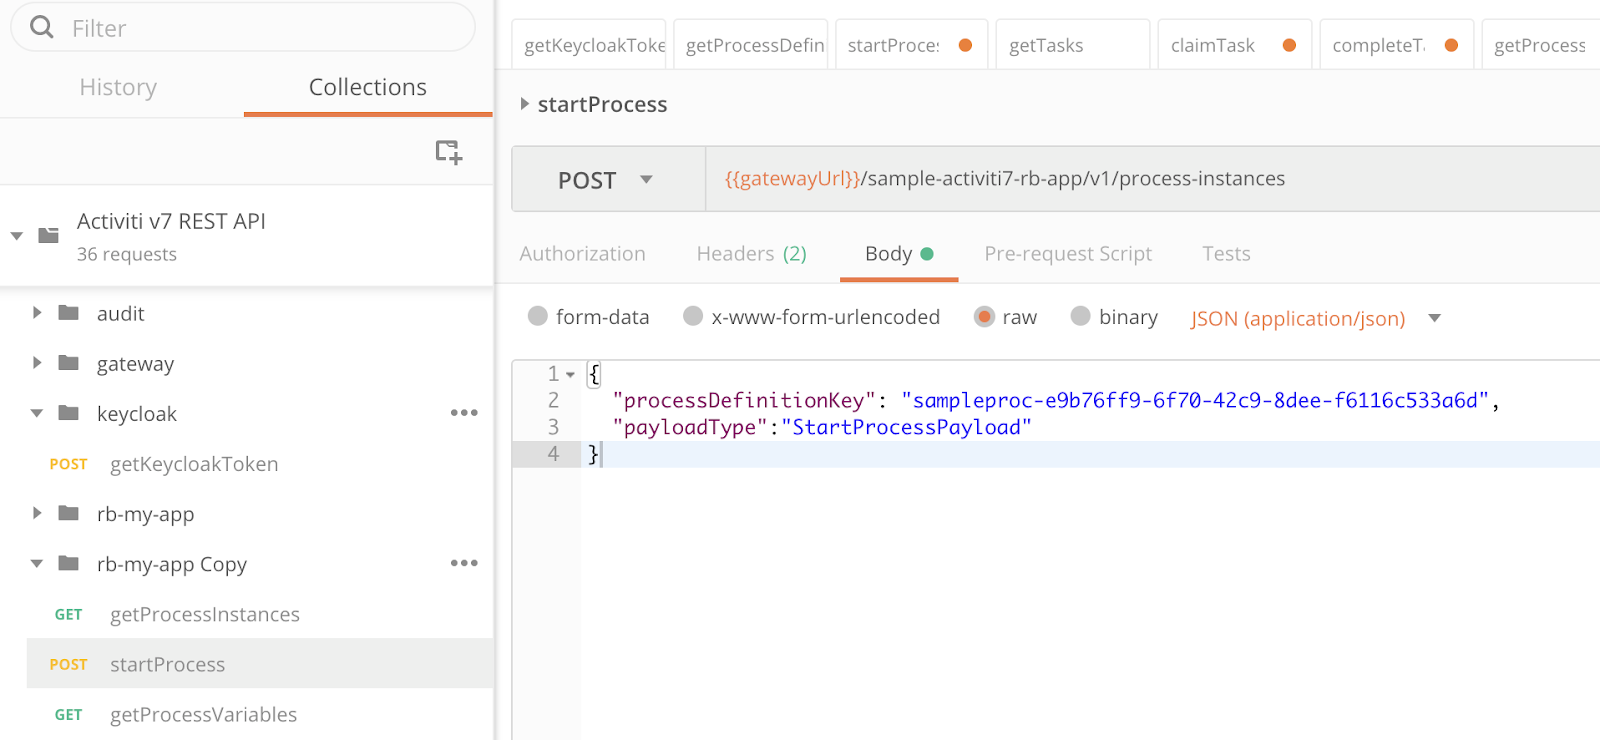
Note the POST body, it specifies the processDefinitionKey as sampleproc-e9b76ff9-6f70-42c9-8dee-f6116c533a6d (taken from the response to the getProcessDefinitions call) to tell Activiti to start a process instance based on the latest version of the Sample Process definition. I also removed the process variables that were specified by default for this call as the process does not expect to be initialized with any variables. The commandType property has also been changed to payloadType:
{
"processDefinitionKey": "sampleproc-e9b76ff9-6f70-42c9-8dee-f6116c533a6d",
"payloadType":"StartProcessPayload"
}Click the Send button (but make sure you have a valid access token first, otherwise you will see a 401 Unauthorized status). You should get a response with information about the new process instance:
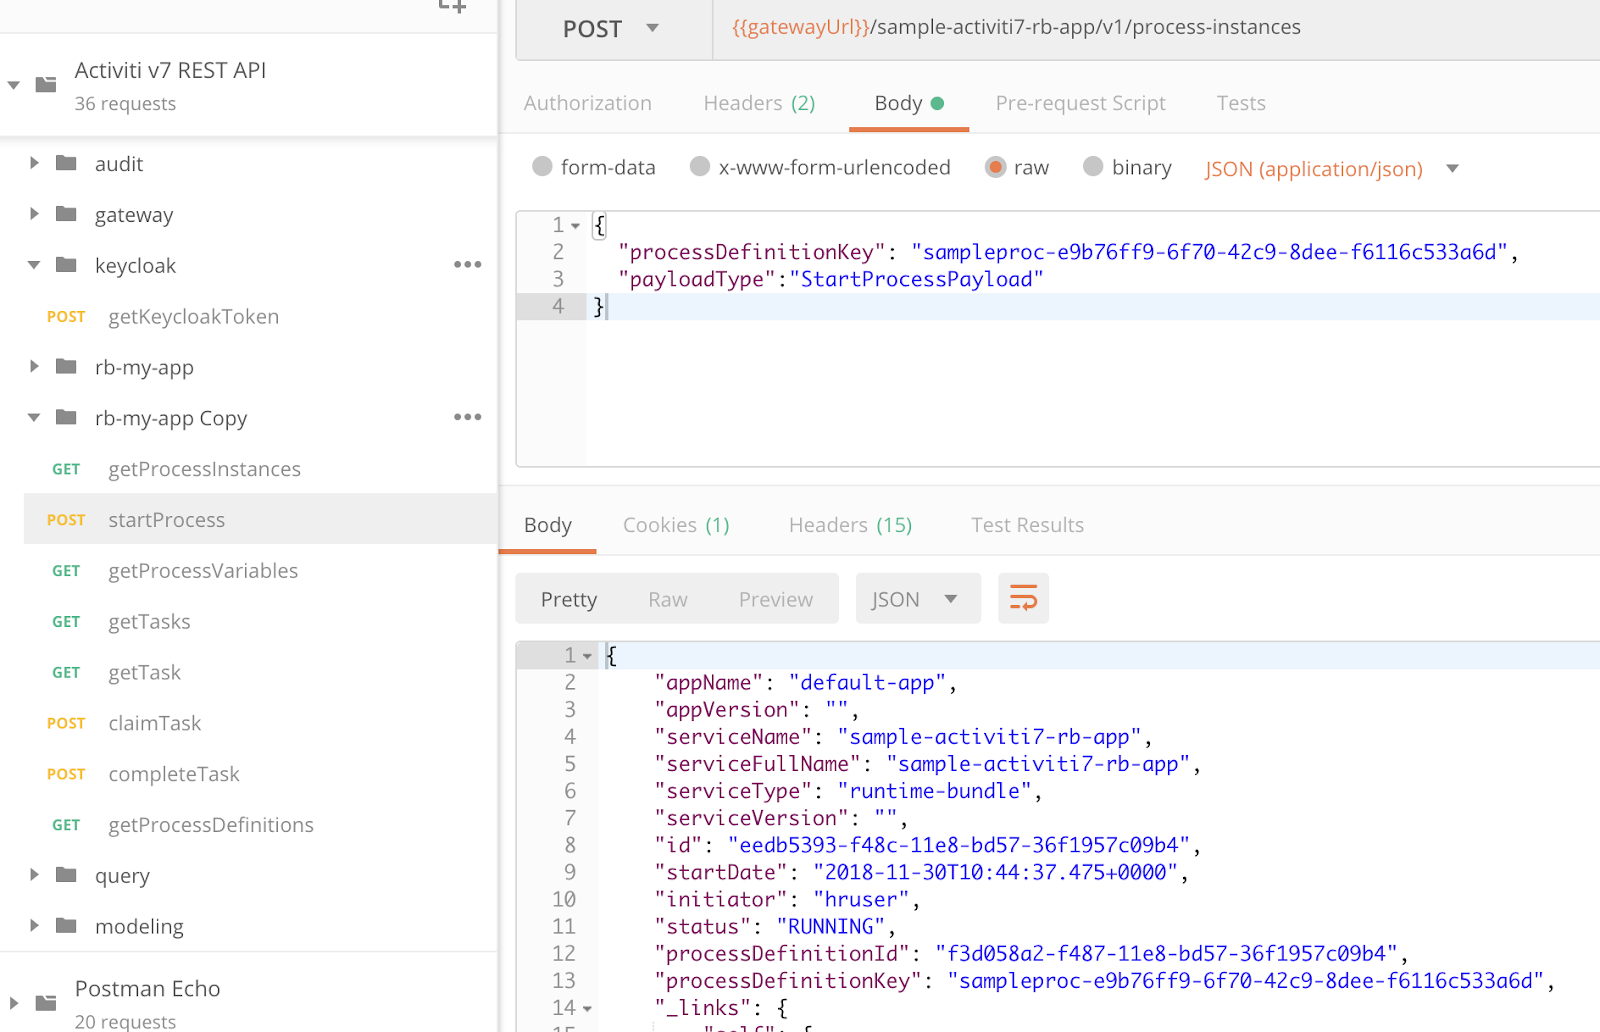
Next thing to do would probably be to list the active tasks. But before we do that we need to login (i.e. get an access token) with the user that is expected to have a task(s) assigned. Currently we are logged in as user hruser. Our custom process definition has a User Task that is assigned to the testuser. So we need to get a new access token for the testuser user before we can make a call and retrieve this task.
To do this click on the getKeycloakToken request in the keycloak folder, then click on the Body tab:
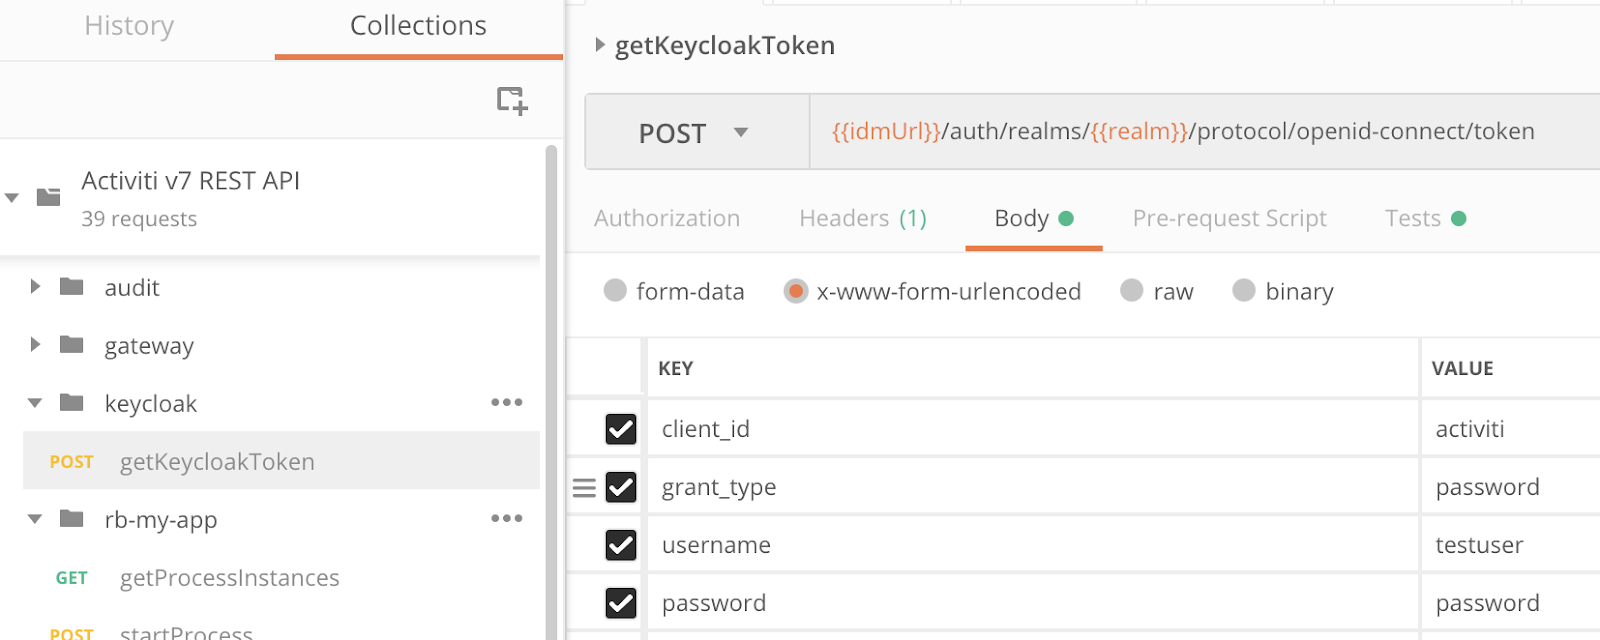
Change the username to testuser. Then click Send to get an access token for this user.
We can now call the getTasks request in the rb-my-app Copy folder. Update the URL to {{gatewayUrl}}/sample-activiti7-rb-app/v1/tasks?page=0&size=10, which is associated with the sample-activiti7-rb-app runtime bundle. If we run the getTasks request we should see a response such as this:

We can see the id of the task here and it is 4f36e024-f6e5-11e8-bbfe-46f0074bbf7d. The task is assigned to the testuser and can be completed by that user using the completeTask request as follows:
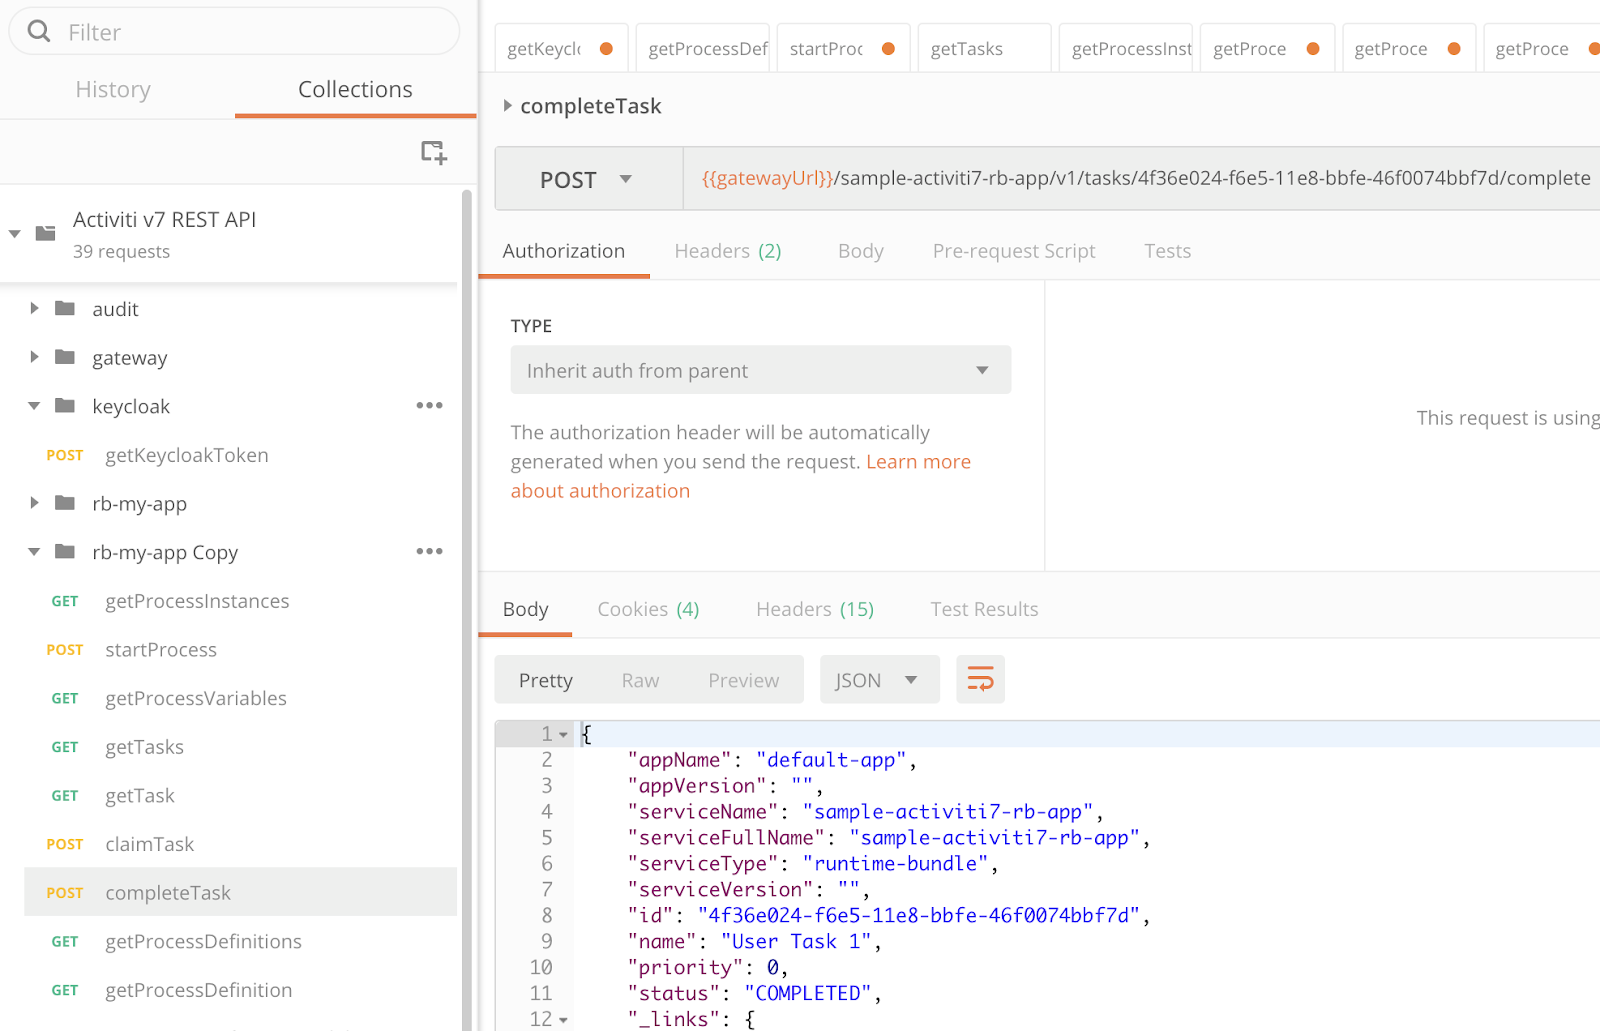
Here I have also updated the URL to include the task id: {{gatewayUrl}}/sample-activiti7-rb-app/v1/tasks/4f36e024-f6e5-11e8-bbfe-46f0074bbf7d/complete.
Completing this User Task should automatically make the process transition to Service Task 1. And we should see a log about the Service Task implementation being executed as follows:

To get to the log go to the Kubernetes Dashboard overview for namespace Activiti 7 (https://localhost:31234/#!/overview?namespace=activiti7) and then click on the Sample Cloud Connector Deployment (i.e. <helm-release-name>-sample-cloud-connector). In the New Replica Set box you have a couple of lines on the right side which, if you click on them, takes you to the logs.
Blog posts and updates about Alfresco Process Services and Activiti.
- Activiti Cloud 7.1.0.M2 released!
- Alfresco Process Services SDK Maven Module
- Activiti Updates, Just in Time for Summer
- New OSS challenges ahead
- Activiti Cloud 7.1.0.M1 released!
- Activiti: Last week Dev Logs #87
- Activiti: Last week Dev Logs #86
- Activiti Cloud SR1 Released!
- Activiti: Last week Dev Logs #85
- Activiti: Last week Dev Logs #84
- Activiti: Last week Dev Logs #83
- Activiti Cloud 7.0.0.GA Released
- Activiti: Last week Dev Logs #82
- Activiti: Last week Dev Logs #81
- Activiti Cloud @ DevCon 2019
We use cookies on this site to enhance your user experience
By using this site, you are agreeing to allow us to collect and use cookies as outlined in Alfresco’s Cookie Statement and Terms of Use (and you have a legitimate interest in Alfresco and our products, authorizing us to contact you in such methods). If you are not ok with these terms, please do not use this website.
