Activiti 7 Deep Dive Series - Deploying and Running a Business Process
- Alfresco Hub
- :
- APS & Activiti - Blog
- :
- Activiti 7 Deep Dive Series - Deploying and Runnin...
Activiti 7 Deep Dive Series - Deploying and Running a Business Process
- Subscribe to RSS Feed
- Mark as New
- Mark as Read
- Bookmark
- Subscribe
- Printer Friendly Page
- Report Inappropriate Content
Introduction
Activiti 7 is an evolution of the battle-tested Activiti workflow engine from Alfresco that is fully adopted to run in a cloud environment. It is built according to the Cloud Native application concepts and differs a bit from the previous Activiti versions in how it is architected. There is also a new Activiti Modeler that we will have a look at in a separate article.
The very core of the Activiti 7 engine is still very much the same as previous versions. However, it has been made much more narrowly focused to do one job and do it amazingly well, and that is to run BPMN business processes. The ancillary functions built into the Activiti runtime, include servicing API runtime request for Query and Audit data produced by the engine and stored in the Engine's database, have been moved out of the engine and made to operate as Spring Boot 2 microservices, each running in their own highly scalable containers.
The core libraries of the Activiti engine has also been re-architected for version 7, we will have a look at them in another article.
This article dives into how you can easily deploy and run your Activiti 7 applications in a cloud environment using Docker containers and Kubernetes. There are a lot of new technologies and concepts that are used with Activiti 7, so we will have a look at this first.
Activiti 7 Deep Dive Article Series
This article is part of series of articles covering Activiti 7 in detail, they should be read in the order listed:
- Deploying and Running a Business Process - this article
- Using the Modeler to Design a Business Process
- Building, Deploying, and Running a Custom Business Process
- Using the Core Libraries
Prerequisites
- You have Docker installed. You need a newer version of Docker that comes with Kubernetes bundled.
Concepts and Technologies
The following is a list of concepts (terms) and technologies that you will come in contact with when deploying and using the Activiti 7 product.
Virtual Machine Monitor (Hypervisor)
A Hypervisor is used to run other OS instances on your local host machine. Typically it's used to run a different OS on your machine, such as Windows on a Mac. When you run another OS on your host it is called a guest OS, and it runs in a so called Virtual Machine (VM).
Image
An image is a number of software layers that can be used to instantiate a container. It’s a lightweight, standalone, executable package of software that includes everything needed to run an application: code, runtime, system tools, system libraries and settings. This could be, for example, Java + Apache Tomcat. You can find all kinds of Docker Images on the public repository called Docker Hub. There are also private image repositories (for things like commercial enterprise images), such as the one Alfresco uses called Quay.
An image is read-only and does not change.
Container
An instance of an image is called a container. You have an image, which is a set of layers as described. If you start this image, you have a running container of this image. You can have many running containers of the same image. When a container is running a read-write layer is created where things are stored while you are running the container. If the container is removed, then anything in the read-write layer is also removed. If you want some data to be permanent, then you need to use what's called a Volume.
Docker
Docker is one of the most popular container platforms. Docker provides functionality for deploying and running applications in containers based on images.
Docker Compose
When you have many containers making up your solution, such as with Activiti 7, and you need to configure each one of the containers so they work nicely together, then you need a tool for this.
Docker Compose is such a tool for defining and running multi-container Docker applications. With Compose, you use a YAML file to configure your application’s services. Then, with a single command, you create and start all the services from your configuration.
Dockerfile
A Dockerfile is a script containing a successive series of instructions, directions, and commands which are to be executed to form a new Docker image. Each command executed translates to a new layer in the image, forming the end product. They replace the process of doing everything manually and repeatedly. When a Dockerfile is finished executing, you end up having built a new image, which then you use to start a new Docker container.
Difference between Containers and Virtual Machines
It is important to understand the difference between using containers and using VMs. Here is a picture that illustrates:

The main difference is that when you are running a container you are not kicking off a complete new OS instance. And this makes containers much more lightweight and quicker to start. A container is also taking up much less space on your hard-disk as it does not have to ship the whole OS.
For more info read What is a Container | Docker.
Cluster
A cluster forms a shared computing environment made up of servers (nodes with one or more containers), where resources have been clustered together to support the workloads and processes running within the cluster:

Kubernetes
Docker is great for running containers on one host, and provides all required functionality for that purpose. But in today’s distributed services environment, the real challenge is to manage resources and workloads across servers and complex infrastructures.
The most used and supported tool for this today is Kubernetes (a Greek word for “helmsman” or “pilot”), which was originally created by Google and then made open source. As the word suggest, Kubernetes undertakes the cumbersome task to orchestrate containers across many nodes, utilizing many useful features. Kubernetes is an open source platform that can be used to run, scale, and operate application containers in a cluster.
Kubernetes consists of several architectural components:
- Kubernetes Worker Node - a cluster node running one or more containers.
- Kube Proxy - facilitates external access to the services deployed on the node, can route to other nodes.
- Kubelet - the kubelet is the primary node-agent. It makes sure that the desired state for the node is upheld. Meaning it makes sure that the containers that has been scheduled to run on the node is running.
- Pods - this is the smallest unit in the Kubernetes Object Model (see next section) that can be deployed. It represents a running process in the cluster. A pod encapsulates an application container and Docker is the most used container runtime.
- Labels - metadata that's attached to Kubernetes objects, including pods.
- Kubernetes Master Node
- API Server - frontend to the cluster's shared state. Provides a ReST API that all components uses.
- Replication controllers - regulates the state of the cluster. Creates new pod "replicas" from a pod template to ensure that a configurable number of pods are running.
- Scheduler - is managing the workload by watching newly created pods that have no node assigned, and selects a node for them to run on.
- Kubectl - To control and manage the Kubernetes cluster from the command line we will use a tool called kubectl. It talks to the API Server in the Kubernetes Master Server, which in turn talks to the individual Kubernetes nodes.
- Services offer a low-overhead way to route requests to a logical set of pod backends in the cluster, using label-driven selectors.
The following picture illustrates:

You might also have heard of Docker Swarm, which is similar to Kubernetes.
Kubernetes Objects
When working with Kubernetes different kind of things will be created, deployed, managed, and destroyed. We can call these things objects, also commonly referred to as resources. There are a number of different types of objects in the Kubernetes Object Model that are good to know about. The following picture illustrates some of these objects that you are likely to come across:

Some of these objects are already familiar, here is a list explaining the rest:
- Container - our application is deployed with a Docker container.
- Volume - our application can store persistent data via a volume that points to physical storage.
- Pod - contains one or more containers and is short lived. It's not guaranteed to be constantly up. It's common to have one container per pod. A pod has a unique IP address so you don't have the typical port clashing problem like you do with Docker containers.
- ReplicaSet - manages a set of replicated pods. Making sure the correct numbers of replicas are always running.
- Deployment - pods are scheduled using deployments, which provides replica management, scaling, rolling updates, rollback, clean-up etc. They are referred to as controller objects as they control ReplicaSets with Pods.
- Service - defines a set of pods that provide a micro-service. Provides a stable virtual endpoint for the ephemeral (short lived) pods in the cluster. A service IP address is permanent and does not change. You can also reach a service via it's name (dns). There are a number of different types of services: ClusterIP (default) that is used for communication within the Kubernetes cluster, NodePort that can be used to expose a service externally to a node, and finally LoadBalancer that will expose the service via a Cloud based load balancer from for example AWS.
- Ingress - public access point for one or more services. When you have more than one service endpoint that should be exposed outside the Kubernetes Cluster it can be expensive to use the LoadBalancer type of service for all these services (A cloud load balancer will be created for each one) and you need an extra proxy to manage consolidated access. Ingress is the built‑in Kubernetes load‑balancing framework for HTTP traffic. With an Ingress you control the routing of external traffic and all configuration of it inside your Kubernetes YAML.
- ConfigMap - name and value pair property configuration for pods/containers.
- Secret - name and value pair property configuration for pods/containers that should be secret (i.e. not exposed in plain text). This is typically configuration such as passwords and tokens.
- Namespace - all object names in one namespace cannot clash with object names in another namespace. The use of namespaces provides complete isolation and is ideally suited for addressing multi-tenancy requirements or multiple teams working in parallel.
Kubernetes YAML
The objects that are created in a Kubernetes cluster to describe the desired state of an application, such as Activiti, are defined in a format called YAML. For example, to describe a deployment of an Nginx web server with 2 replicas and a service endpoint, YAML similar to the following could be used:
apiVersion: apps/v1
kind: Deployment
metadata:
name: nginx-deployment
labels:
app: nginx
spec:
replicas: 2
selector:
matchLabels:
app: nginx
template:
metadata:
labels:
app: nginx
spec:
containers:
- name: nginx
image: nginx:1.7.9
ports:
- containerPort: 80
---
apiVersion: v1
kind: Service
metadata:
name: nginx
labels:
app: nginx
spec:
type: LoadBalancer
selector:
app: nginx
ports:
- name: http
port: 80
protocol: TCP
targetPort: 80
As we can see, YAML is quite easy to read. The type of Kubernetes object/resource we are defining is specified with the kind property, in this case a Deployment is defined first and then a Service (they are separated with the ---). The stuff in the deployment spec section defines the Pods we want to create. As you can imagine, if you have a larger microservices architecture with loads of application components, then the extent of YAML definitions can be huge and the number of YAML files can then become quite a few. You also need to apply the YAML definitions in a specific order, such as namespace definitions first etc. See next section about Helm for a solution to how to manage all the YAML as one package that will be installed as one release.
Helm
So we have a Kubernetes cluster up and running, and it is now ready for container deployments. How do we handle this efficiently? We might have a whole lot of containers for things such as database layer, application layer, web layer, search layer, etc. And they should have different configurations for scalability and failover. Sounds quite complex and will require a lot of Kubernetes YAML to describe all objects/resources that the deployment will need (i.e. pods, services, deployments, config maps, secrets etc).
There is help however in the form of a tool called Helm. It is a package manager for Kubernetes clusters. With it we can bundle together all our Kubernetes YAML and have it deployed in the correct order as a release. A Helm package definition is referred to as a Helm Chart. Each chart is a collection of files that lists, or defines:
- The Kubernetes YAML files that should be deployed in template format.
- The configuration of the different Kubernetes objects/resources. So you can customize the values for different properties of your YAML files, to facilitate deployment to different environments such as UAT, STAGING, and PRODUCTION.
- Dependencies on other Helm charts.
Other important Helm concepts:
- Release - an instance of a chart loaded into Kubernetes.
- Helm Repository - a repository of published charts. There is a public repo at kubernetes.io but organisations can have their own repos. Alfresco has its own chart repo for example.
- Template - a Kubernetes configuration file written with the Go templating language (with addition of Sprig functions)
Helm Charts are stored in a Helm repository, much like JARs are stored in for example Maven Central. So Helm is actually built up of both a Client bit and a Server bit. The server bit of Helm is called Tiller and runs in the Kubernetes cluster. The Helm architecture looks something like this:

Helm is not only a package manager, it is also a deployment manager that can:
- Do repeatable deployments
- Manage dependencies: reuse and share
- Manage multiple configurations
- Update, rollback, and test application deployments (referred to as releases)
The Activiti 7 solution is packaged with Helm and Activiti provides a Helm repository with Charts related to the Activiti 7 components.
Minikube
Minikube is a tool that makes it easy to run Kubernetes locally. Minikube runs a single-node Kubernetes cluster inside a VM on your laptop. It's primarily for users looking to try out Kubernetes, or to use as a development environment.
We will be using the newest Docker for Desktop environment, which comes with Kubernetes, so no need to install Minikube.
Cloud Native Applications
In order to understand how Activiti 7 is architected, built, and runs it is useful to know a bit about Cloud Native applications. Let’s try and explain by an example. About 10 years ago Netflix was thinking about a future where customers could just click a button and watch a movie online. There would be no more DVDs. Sending around DVDs to people just don’t scale globally, you cannot watch what you want when you want where you want, there is only so many DVDs you can send via snail mail, DVDs could be damaged etc. Netflix also had limited ways of recommending new movies to customers in an efficient way.
To implement this new online streaming service Netflix would have to create a new type of online service that would be:
- Web-scale - everything is distributed, both services and compute power. The system is self-healing with fault isolation and distributed recovery. There would be API driven automation. Multiple applications running simultaneously.
- Global - the movie service would have to be available on a global scale instantly, wherever you are.
- Highly-available - when you click a button to see a movie it just works, otherwise clients would not adopt the service
- Consumer-facing - the online service would have to be directly facing the customers in their homes.
What Netflix really wanted was speed and access at scale. The movie site needed to be always on, always available, with pretty much no downtime. As a consumer you would not accept that you could not watch a movie because of technical problems. They also knew that they would have to change their product continuously while it was running to add new features based on consumer needs. Basically they would have to get better and better, faster and faster. And this is key to Cloud Native applications.
So what is it with Cloud Native that enables you provide an application that appears to be always online and that can have new features added and delivered continuously? The following are some of the characteristics of Cloud Native applications:
- Modularity - the applications can no longer be monoliths where all the functionality is baked into one massive application. Each application function need to be delivered as an independent service, referred to as microservice. In the case of Netflix they would see a transition from a traditional development model with 100 engineers producing a monolithic DVD‑rental application to a microservices architecture with many small teams responsible for the end‑to‑end development of hundreds of microservices that work together to stream digital entertainment to millions of Netflix customers every day.
- Observability - with all these microservices it is important to constantly monitor them to detect problems and then instantly fire up new instances of the services, so it appears as if the whole application is always working.
- Deployability - delivering the application as a number of microservices enable you to deploy these small services quickly and continuously. It also means you can upgrade and do maintenance on different parts of the application independently. The services are also deployed as Docker containers, which means that the OS is abstracted.
- Testability - when doing continuous delivery it is important that all tests are automated, so we can deliver new features as quickly as possible.
- Disposability - it should be very easy to get rid of feature or function in an application. This is easy if all the major functionality is independently delivered as microservices.
- Replaceability - how easy can we replace the features that make up the application. If it is easy to dispose of features, and replace them with new ones, then the application can be very flexible to new requirements from customers.
So what’s the main differences compared to traditional application development:
- OS abstraction - the different microservices are delivered and deployed as Docker containers, which means we don’t have to worry about what OS we need and other dependent libraries, which is often the case with traditional applications.
- Predictable - we can adhere to a contract and have predictability on how fast and reliable we can deliver a service. With one big monolith it can be difficult to predict when a new feature can be available.
- Right size capability - we can scale the individual services up and down depending on the load on each one of them. With traditional applications it is common to oversize the deployment to cater for “future” peak loads.
- Continuous Delivery (CD) - we will be able to make software updates as soon as they are ready as we can depend on our automated tests to quickly spot any regressions. With one big monolith you can’t easily update one feature as you have to test the whole application before you can deliver the feature update. And there is usually very low automated test coverage.
- Automated scaling: we can scale the whole application very efficiently and automatically depend on requirements and load. With traditional applications you would often see overscaling and most of the scaling would have to be done manually.
- Rapid recovery - how quickly can we recover from failure. With sophisticated monitoring of the individual microservices we can easily detect faults and recover quickly. The application will also be more resistant to complete downtime as it is often possible to continue servicing customers if just one or a few of the microservices are down momentarily. With one monolith application it can take hours to figure out which part of the application the problem reside in, resulting in longer downtimes.
So, can anyone build these kind of solutions today, or does it require special knowledge and long experience? Yes you can develop Cloud Native apps, if you have read up on the concepts around Cloud Native applications, and you know about some of the more prominent frameworks supporting it, then you can definitely do it.
Here are some of the building blocks of Cloud Native Applications:
- Service Registry
- Distributed Configuration Service
- Distributed Messaging (Streams)
- Distributed logging and monitoring
- Gateway
- Circuit Breakers, Bulkheads, Fallbacks, Feign
- Contracts
A lot of these features can be found in the Spring Cloud framework, which provides a number of tools that can be used to build Cloud Native applications:

A typical architecture for a cloud native solution looks like this:

Installing and enabling necessary software
This section walks through how to install and enable the required software, specifically in regards to Kubernetes.
Checking Docker Version
As mentioned in the beginning, you need to have Docker installer. But that’s not all, you need to have a Docker version that comes with Kubernetes. You can check this by looking at the About dialog for your Docker installation, you should see something like this:
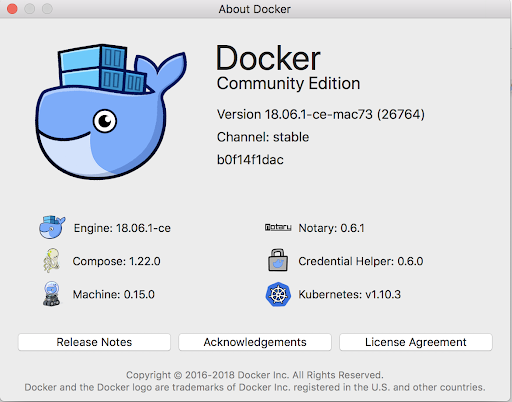
The dialog should list Kubernetes as a supported software (i.e. in the bottom right corner). This means that we don’t need to install Kubernetes locally with for example Minikube, we are ready to deploy stuff into a Kubernetes cluster as it is provided by our Docker installation.
These local Kubernetes deployments will mirror exactly how a production deployment would look like in for example AWS, which is good.
Enabling Kubernetes
Docker for Desktop comes with Kubernetes but we still need to enable it. To do this go into Docker Preferences..., then click on the Kubernetes tab, you should see the following:

Click on Enable Kubernetes followed by the Kubernetes radio button. It runs Swarm by default if we don't specifically select Kubernetes. Click Apply to install a Kubernetes cluster. You should see the following config dialog after a couple of minutes:
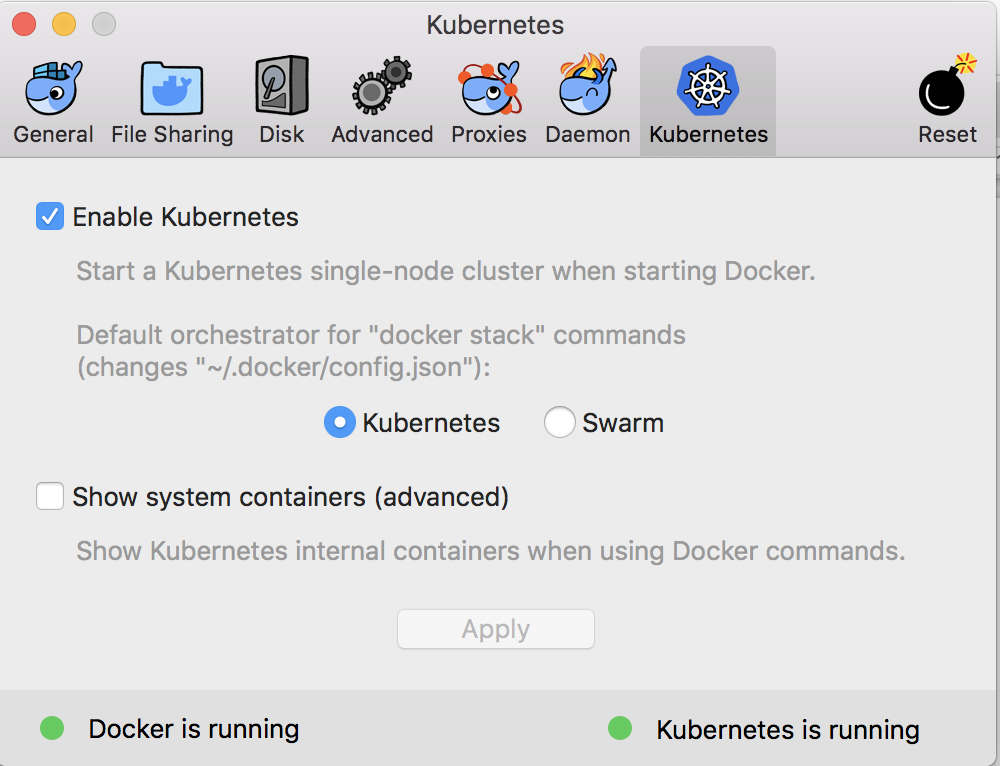
This means we are ready to deploy stuff into Kubernetes.
Now check that you have the correct kubectl context. I have been running minikube on my Mac so I don’t have the correct context:
$ kubectl config current-context
minikube
To change to Docker for Desktop context use:
$ kubectl config use-context docker-for-desktop
Switched to context "docker-for-desktop".
Check again:
$ kubectl config current-context
docker-for-desktop
Now check the kubectl version (no need to install kubectl, it comes with Docker):
$ kubectl version
Client Version: version.Info{Major:"1", Minor:"9", GitVersion:"v1.9.2", GitCommit:"5fa2db2bd46ac79e5e00a4e6ed24191080aa463b", GitTreeState:"clean", BuildDate:"2018-01-18T10:09:24Z", GoVersion:"go1.9.2", Compiler:"gc", Platform:"darwin/amd64"}
Server Version: version.Info{Major:"1", Minor:"10", GitVersion:"v1.10.3", GitCommit:"2bba0127d85d5a46ab4b778548be28623b32d0b0", GitTreeState:"clean", BuildDate:"2018-05-21T09:05:37Z", GoVersion:"go1.9.3", Compiler:"gc", Platform:"linux/amd64"}
You might have noticed that my server and client versions are different. I am using kubectl from a previous manual installation and the server is from the Docker for Desktop installation.
Let’s get some information about the Kubernetes cluster:
$ kubectl cluster-info
Kubernetes master is running at https://localhost:6443
KubeDNS is running at https://localhost:6443/api/v1/namespaces/kube-system/services/kube-dns:dns/proxy
And let’s check out the nodes we got in the cluster:
$ kubectl get nodes
NAME STATUS ROLES AGE VERSION
docker-for-desktop Ready master 1h v1.10.3
We can also find out what PODs we got in the Kubernetes system with the following command:
$ kubectl get pods --namespace=kube-system
NAME READY STATUS RESTARTS AGE
etcd-docker-for-desktop 1/1 Running 0 1h
kube-apiserver-docker-for-desktop 1/1 Running 0 1h
kube-controller-manager-docker-for-desktop 1/1 Running 0 1h
kube-dns-86f4d74b45-4jw6f 3/3 Running 0 1h
kube-proxy-zwwpx 1/1 Running 0 1h
kube-scheduler-docker-for-desktop 1/1 Running 0 1h
Configure memory for Docker and Kubernetes
The applications that we are going to deploy will most likely require more memory than is allocated by default. I am updating my setting from 4GB to 7GB:
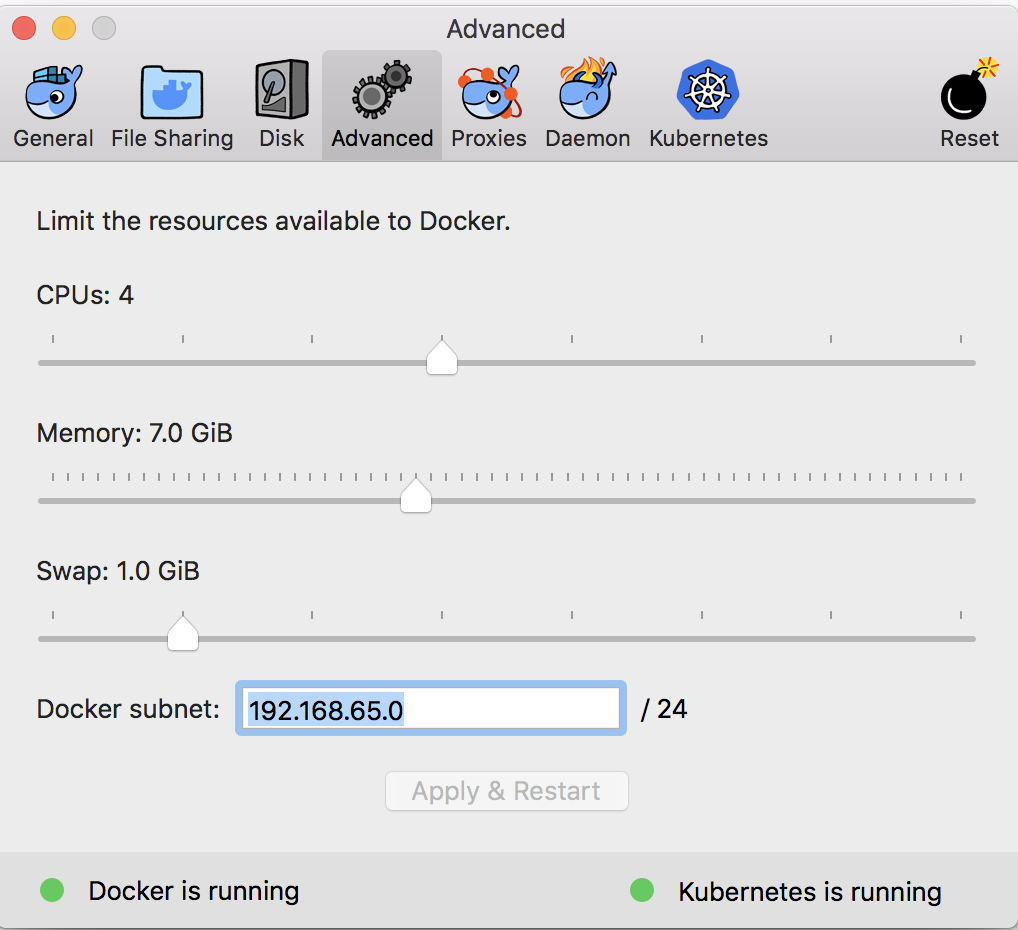
Updating the memory settings will restart Docker and Kubernetes so you will have to wait a bit before you proceed with the next step.
Installing Helm
The Helm package manager will be used to deploy container solutions, such as Activiti 7, to the Kubernetes cluster. It consist of both a client and a server. Find the appropriate installation package for your OS here.
I installed the Helm Client on my Mac using the following command:
$ brew install kubernetes-helm
Tiller, the server portion of Helm, typically runs inside of your Kubernetes cluster. The easiest way to install tiller into the cluster is simply to run helm init. This will validate that helm’s local environment is set up correctly (and set it up if necessary). Then it will connect to whatever cluster kubectl connects to by default. Once it connects, it will install tiller into the kube-system namespace.
I did an in-cluster installation as follows:
$ helm init
$HELM_HOME has been configured at /Users/mbergljung/.helm.
Tiller (the Helm server-side component) has been installed into your Kubernetes Cluster.
Please note: by default, Tiller is deployed with an insecure 'allow unauthenticated users' policy.
To prevent this, run `helm init` with the --tiller-tls-verify flag.
For more information on securing your installation see: https://docs.helm.sh/using_helm/#securing-your-helm-installation
Happy Helming!
To see Tiller running do:
$ kubectl get pods --namespace kube-system
NAME READY STATUS RESTARTS AGE
etcd-docker-for-desktop 1/1 Running 0 276d
kube-apiserver-docker-for-desktop 1/1 Running 0 113d
kube-controller-manager-docker-for-desktop 1/1 Running 0 113d
kube-dns-86f4d74b45-4jw6f 3/3 Running 0 276d
kube-proxy-kkprc 1/1 Running 0 113d
kube-scheduler-docker-for-desktop 1/1 Running 0 113d
tiller-deploy-78c6868dd6-8bwlp 1/1 Running 0 1h
The last pod runs tiller.
Adding the Activiti 7 Helm Repository
Add the Activiti Helm Repository so we can pull Activiti 7 Charts and deploy Activiti 7 applications.
$ helm repo add activiti-cloud-charts https://activiti.github.io/activiti-cloud-charts/
"activiti-cloud-charts" has been added to your repositories
List the helm repositories that you have access to like this:
$ helm repo list
NAME URL
stable https://kubernetes-charts.storage.googleapis.com
local http://127.0.0.1:8879/charts
activiti-cloud-charts https://activiti.github.io/activiti-cloud-charts/
To see what charts are available do a search like this:
$ helm search
NAME CHART VERSION APP VERSION DESCRIPTION
activiti-cloud-charts/activiti-cloud-audit 1.1.10 7.1.0.M1 A Helm chart for Activiti Cloud Audit Service
activiti-cloud-charts/activiti-cloud-connector 1.1.8 7.1.0.M1 A Helm chart for Activiti Cloud Connector
activiti-cloud-charts/activiti-cloud-demo-ui 0.1.10 7.1.0.M1 A Helm chart for Activiti Cloud Demo UI
activiti-cloud-charts/activiti-cloud-events-adapter 0.0.6 7.1.0.M1 A Helm chart for Activiti Cloud Events Adaptor
activiti-cloud-charts/activiti-cloud-full-example 1.1.16 7.1.0.M1 A Helm chart for Activiti Cloud Full Example
activiti-cloud-charts/activiti-cloud-gateway 1.1.9 7.1.0.M1 A Helm chart for Activiti Cloud Gateway
activiti-cloud-charts/activiti-cloud-modeling 1.1.10 7.1.0.M1 A Helm chart for Activiti Cloud Modeler
activiti-cloud-charts/activiti-cloud-notifications-graphql 1.1.11 7.1.0.M1 A Helm chart for Activiti Cloud Notifications GraphQL App...
activiti-cloud-charts/activiti-cloud-query 1.1.10 7.1.0.M1 A Helm chart for Activiti Cloud Query Service
activiti-cloud-charts/activiti-keycloak 1.1.6 7.1.0.M1 A Helm chart for Activiti Keycloak Service
activiti-cloud-charts/application 1.1.12 7.1.0.M1 A Helm chart for Activiti Cloud Application Services
activiti-cloud-charts/common 1.1.5 A Helm chart for Activiti Cloud Common Templates
activiti-cloud-charts/example-runtime-bundle 0.1.0 A Helm chart for Kubernetes
activiti-cloud-charts/infrastructure 1.1.9 7.1.0.M1 A Helm chart for Activiti infrastructure Services
activiti-cloud-charts/runtime-bundle 1.1.10 7.1.0.M1 A Helm chart for Activiti Cloud Runtime Bundle Example
We can see in the above listing that we have access to all the Activiti 7 Cloud app charts, including the activiti-cloud-full-example that we will deploy in a bit.
Installing the Kubernetes Dashboard
Kubernetes that comes bundled with Docker for Desktop doesn't include the Kubernetes Dashboard, which is a Webapp that is really handy to have around when working with Kubernetes. Installing the Kubernetes Dashboard is easy. On my Mac I do it as follows with helm (properties that can be set for the Helm chart can be found here):
$ helm install stable/kubernetes-dashboard --name kubernetes-dashboard --set=rbac.create=false,enableSkipLogin=true,enableInsecureLogin=true
NAME: kubernetes-dashboard
LAST DEPLOYED: Mon Jun 3 13:42:22 2019
NAMESPACE: default
STATUS: DEPLOYED
RESOURCES:
==> v1/Pod(related)
NAME READY STATUS RESTARTS AGE
kubernetes-dashboard-8495549db-zplzr 0/1 ContainerCreating 0 0s
==> v1/Secret
NAME TYPE DATA AGE
kubernetes-dashboard Opaque 0 0s
==> v1/Service
NAME TYPE CLUSTER-IP EXTERNAL-IP PORT(S) AGE
kubernetes-dashboard ClusterIP 10.100.157.207 <none> 443/TCP 0s
==> v1/ServiceAccount
NAME SECRETS AGE
kubernetes-dashboard 1 0s
==> v1beta1/Deployment
NAME READY UP-TO-DATE AVAILABLE AGE
kubernetes-dashboard 0/1 1 0 0s
NOTES:
*********************************************************************************
*** PLEASE BE PATIENT: kubernetes-dashboard may take a few minutes to install ***
*********************************************************************************
Get the Kubernetes Dashboard URL by running:
export POD_NAME=$(kubectl get pods -n default -l "app=kubernetes-dashboard,release=kubernetes-dashboard" -o jsonpath="{.items[0].metadata.name}")
echo http://127.0.0.1:9090/
kubectl -n default port-forward $POD_NAME 9090:9090
As we are setting up a development environment we customise the K8s Dashboard Helm Chart by setting properties so a login is not required.
To be able to access the Kubernetes Dashboard we need to start port forwarding as follows from a command window:
$ export POD_NAME=$(kubectl get pods -n default -l "app=kubernetes-dashboard,release=kubernetes-dashboard" -o jsonpath="{.items[0].metadata.name}")
$ kubectl -n default port-forward $POD_NAME 9090:9090
Forwarding from 127.0.0.1:9090 -> 9090
Now access the Dashboard from a browser via the http://localhost:9090 URL:
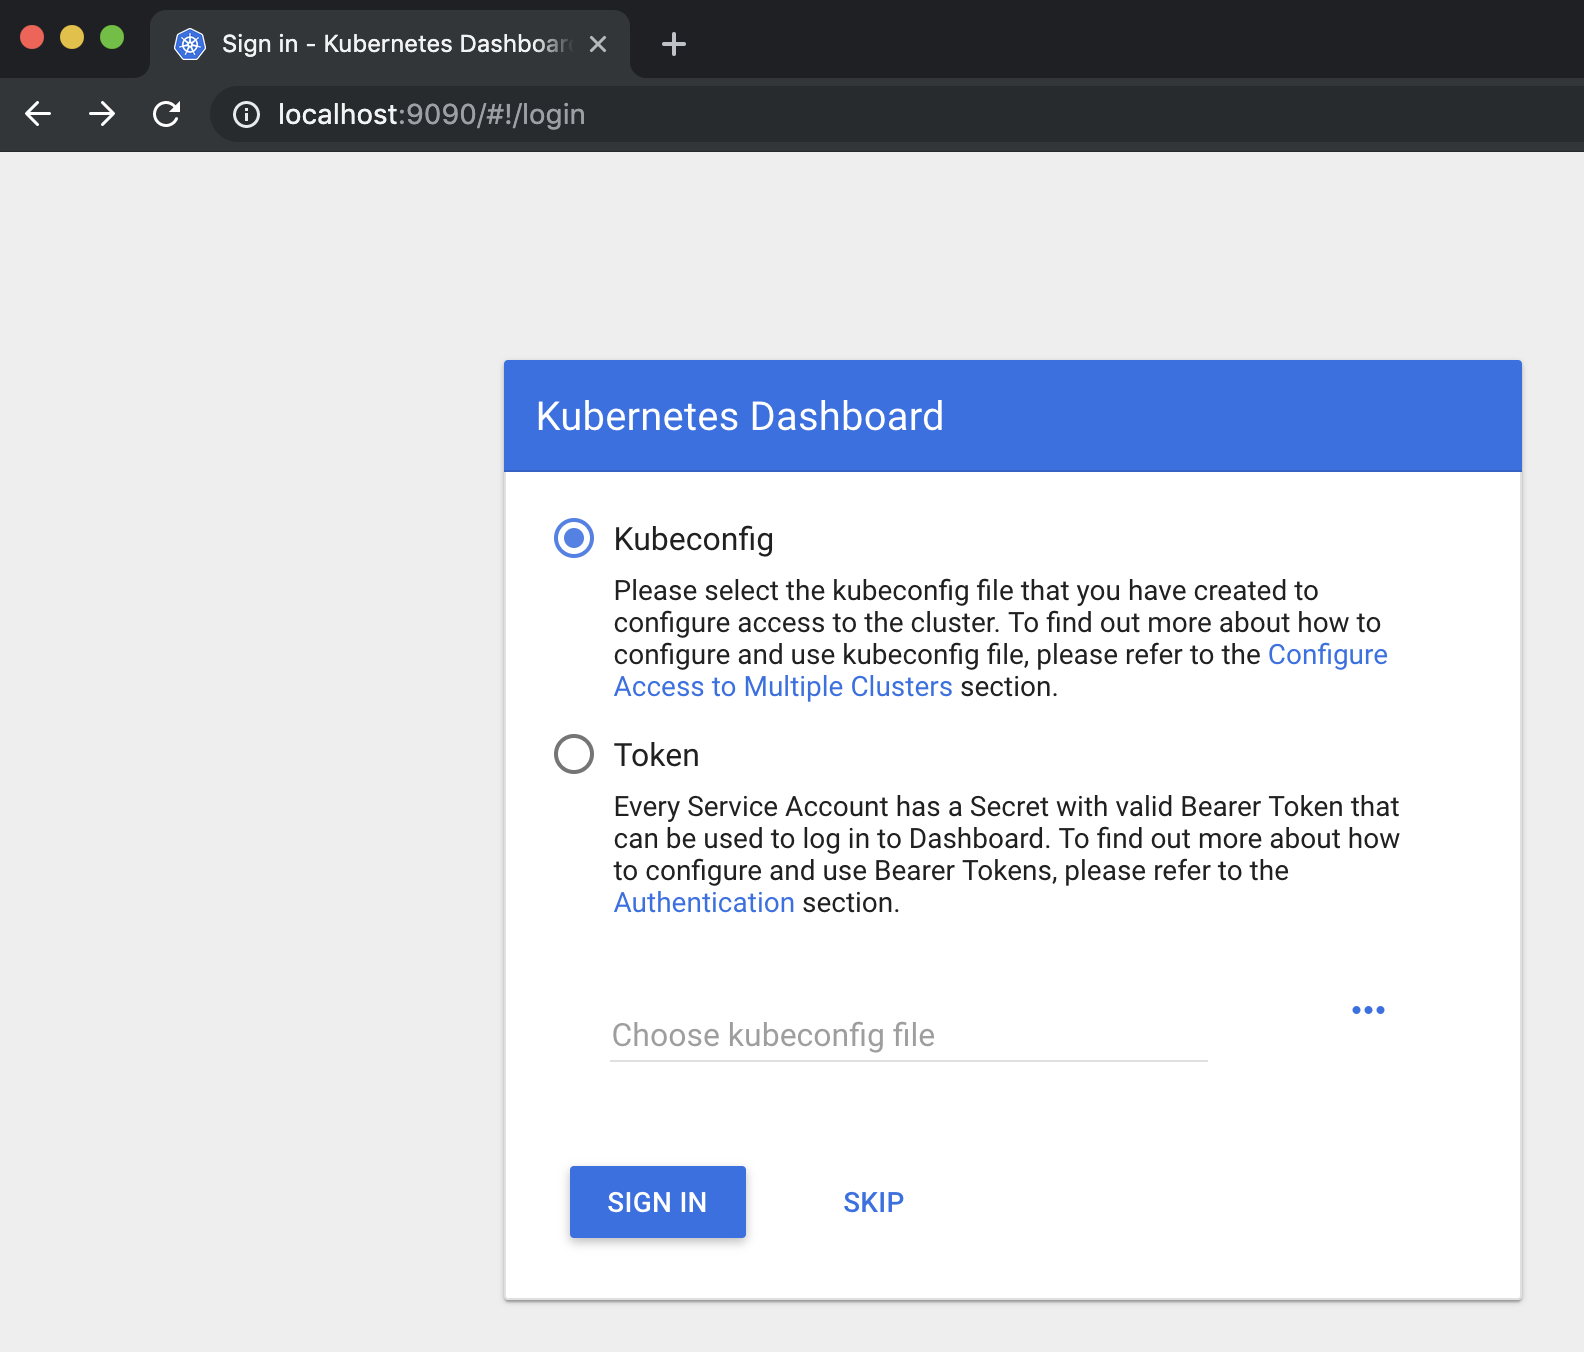
Click SKIP button to continue, this should lead to the Dashboard as shown below:

Under the Workloads section you can inspect the different Kubernetes objects/resources that you currently have deployed in the selected namespace, by default the dashboard shows resources in the default namespace.
Activiti 7 Overview
Activiti 7 is implemented as a Cloud Native application and its main abstraction layer against different cloud services, such as message queues and service registry, is the Spring Cloud framework. By using it the Activiti team does not have to reinvent and come up with new abstraction layers for cloud services.
To support scaling globally the Activiti team has chosen Kubernetes container orchestration engine. Kubernetes is supported by the main cloud providers, such as Amazon and Google. Some parts of the Activiti solution also uses the Spring Cloud Kubernetes project, such as the API Gateway, to achieve even better integration with Kubernetes.
The Activiti 7 infrastructure can be described with the following picture:

The different building blocks in the infrastructure can be explained as follows:
- Activiti Keycloak - SSO - Single Sign On to all services
- Activiti Keycloak - IDM - Identity Management so Activiti knows what the organisational structure looks like and who the groups and users are, and who are allowed to do what.
- Activiti Modeler - BPMN 2.0 modelling application where developers can define new process applications with one or more process definitions.
- API Gateway - Gives user interfaces and other systems access to the process applications
- Service Registry - a service registry that allows all the services and applications to register with it and be discovered in a dynamic way.
- Config Server - centralised and distributed configuration service that can be used by all other services.
- Zipkin - is a distributed tracing system. It helps gather timing data needed to troubleshoot latency problems in microservice architectures.
- Activiti Applications - each application represents one or more business process implementations. So one application could be an HR process for job applications while another application could be used for loan applications. Cloud connectors are used to make calls outside of the business process.
More specifically, An Activiti 7 Application consists of the following services:
- Runtime Bundles - will provide different runtimes for different business models. The first available runtime is for business processes. The Process Runtime would be comparable to what was previously referred to as the Activiti Process Engine. A runtime will be as small as possible and efficient as possible. A Runtime Bundle contains a number of process definitions and is immutable. This means that it will run just a number of immutable process definitions (instances).
- Query Service - is used to aggregate data and makes it possible to consume the data in an efficient way. There might be multiple Runtime Bundles inside an Activiti application and the Query Service will aggregate data from each of those.
- Notification Service - can provide notifications about what is happening in the different Runtime Bundles.
- Audit Service - this is the standard audit log that you have in BPM systems, it provides a log of what exactly happened when a process was executed.
- Cloud Connectors - are about System - to - System interaction. Instead of having all code that talks to external systems in the process definition implementation and the process runtime, it’s now decoupled and implemented as separate services with separate SLAs. A Service Task would typically be implemented as a Cloud Connector.
Deploying and Running a Business Process
This section will show you how to deploy and run a business process with the Activiti 7 product using Helm and Kubernetes. We will not develop any new processes, just get a feel for how Activiti 7 works by using a provided example. Note that Activiti 7 does not come with a UI, which means you will have to interact with the system via the ReST API.
To do this we will use one of the examples that are available out-of-the-box. It’s called the Activiti 7 Full Example and it includes all the building blocks that conforms an Activiti 7 application, such as:
- API Gateway (Spring Cloud)
- SSO/IDM (Keycloak)
- Activiti 7 Runtime Bundle (Example)
- Activiti 7 Cloud Connector (Example)
- Activiti 7 Query Service
- Activiti 7 Audit Service
The following picture illustrates:
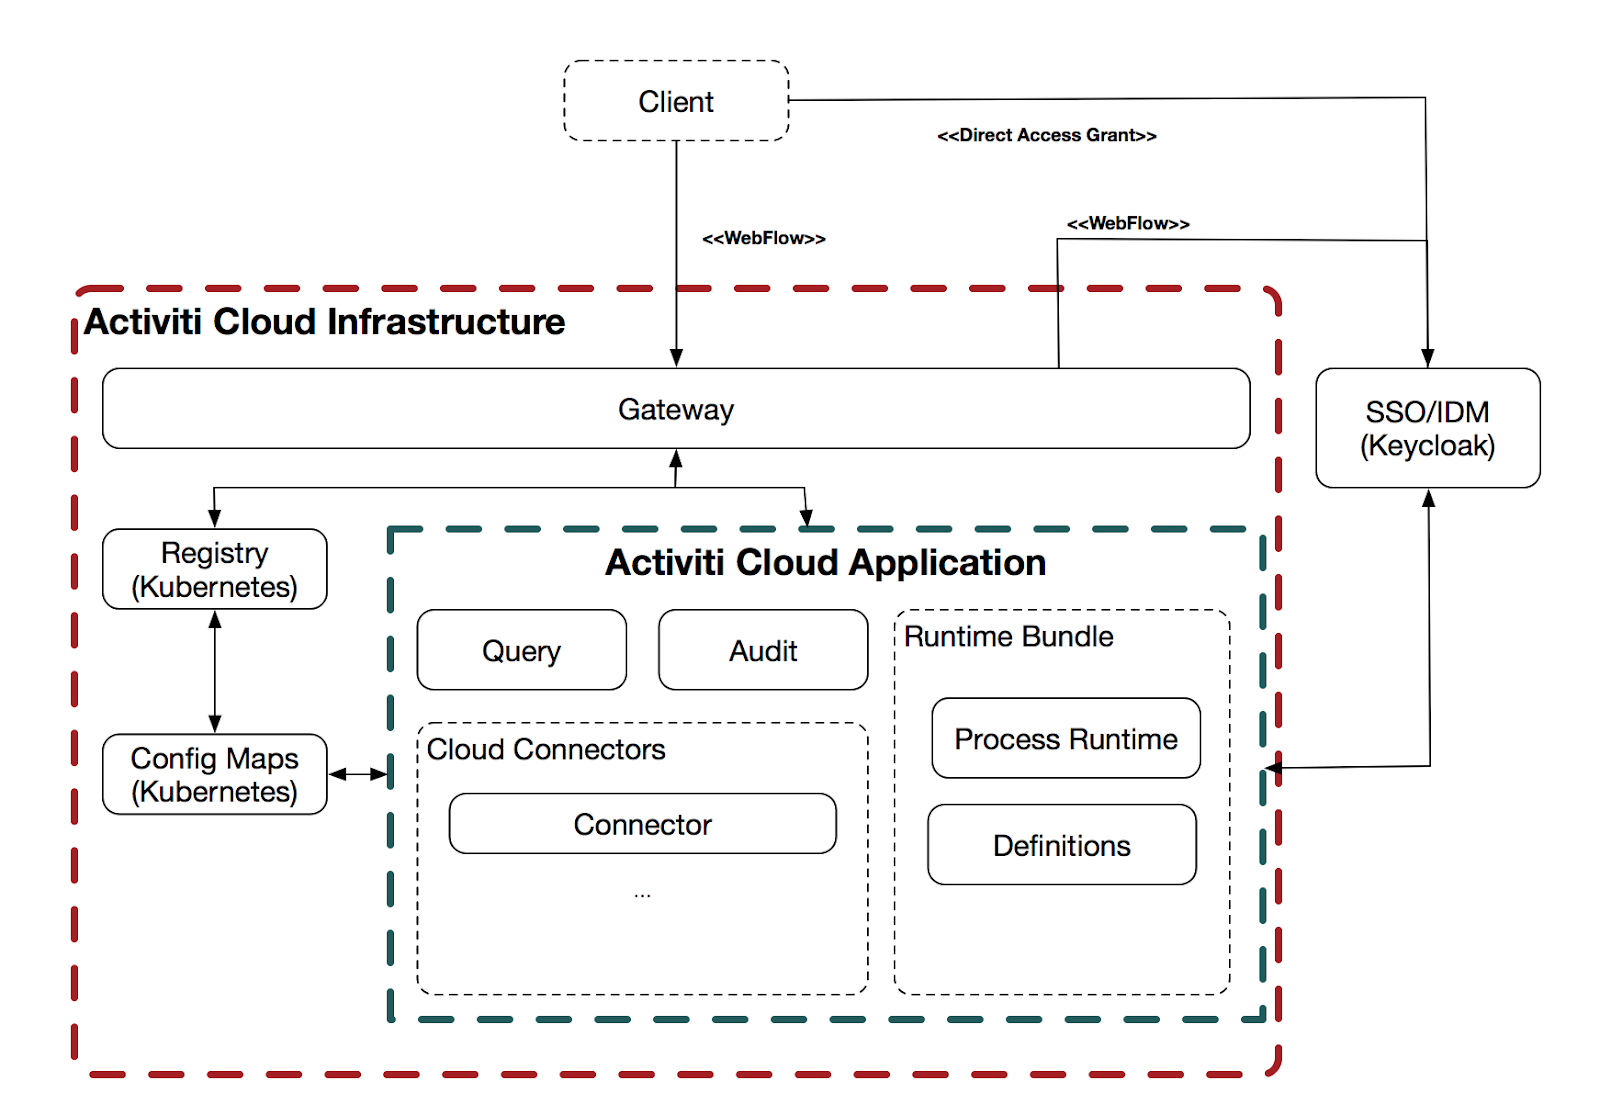
The actual example process definition is contained in what's called a Runtime Bundle. The Service Task implementation(s) and listener implementation(s) is contained in what’s called a Cloud Connector. The Client in this case will just be a Postman Collection that will be used to interact with the services. Activiti 7 currently doesn’t have a Process and Task management user interface.
The new Activiti Modeler application can be deployed at the same time as the rest of the example, but you need to enable it manually as it is not available by default.
Create a Kubernetes namespace for the Activiti 7 App Deployments
We are going to create a separate namespace for the Activiti 7 application deployments. This means that any name we use inside this namespace will not clash with the same name in other namespaces.
$ kubectl create namespace activiti7
namespace "activiti7" created
Check what namespaces we have now:
$ kubectl get namespaces
NAME STATUS AGE
activiti7 Active 36m
dbp Active 21d
default Active 276d
docker Active 276d
kube-public Active 276d
kube-system Active 276d
Installing an Ingress Controller to Expose Services Externally
Before we start installing Activiti 7 components we need to install an Ingress Controller. An Ingress Controller, such as Nginx, dynamically implements the URL Path mappings that have been defined in any Ingress objects/resources we have applied to the cluster. Using an Ingress makes it easier to provide one entry point into the Kubernetes Cluster for all our services, such as the API Gateway and the BPMN Modeler.
Before we install the Ingress Controller it’s always a good idea to update the local helm chart repo/cache, so we are not using an older version of the chart:
$ helm repo update
Hang tight while we grab the latest from your chart repositories...
...Skip local chart repository
...Successfully got an update from the "gravitonian-helm-repo" chart repository
...Successfully got an update from the "alfresco-stable" chart repository
...Successfully got an update from the "alfresco-incubator" chart repository
...Successfully got an update from the "activiti-cloud-charts" chart repository
...Successfully got an update from the "stable" chart repository
Update Complete. ⎈ Happy Helming!⎈
To install the Ingress Controller run the following command:
$ helm install stable/nginx-ingress --namespace=activiti7
NAME: plinking-chinchilla
LAST DEPLOYED: Mon Jun 3 14:25:15 2019
NAMESPACE: activiti7
STATUS: DEPLOYED
RESOURCES:
==> v1/ConfigMap
NAME DATA AGE
plinking-chinchilla-nginx-ingress-controller 0 0s
==> v1/Pod(related)
NAME READY STATUS RESTARTS AGE
plinking-chinchilla-nginx-ingress-controller-755449466d-kktzr 0/1 ContainerCreating 0 0s
plinking-chinchilla-nginx-ingress-default-backend-75f8c64f8zbn4 0/1 ContainerCreating 0 0s
==> v1/Service
NAME TYPE CLUSTER-IP EXTERNAL-IP PORT(S) AGE
plinking-chinchilla-nginx-ingress-controller LoadBalancer 10.99.19.225 <pending> 80:30192/TCP,443:32385/TCP 0s
plinking-chinchilla-nginx-ingress-default-backend ClusterIP 10.100.2.202 <none> 80/TCP 0s
==> v1/ServiceAccount
NAME SECRETS AGE
plinking-chinchilla-nginx-ingress 1 0s
==> v1beta1/ClusterRole
NAME AGE
plinking-chinchilla-nginx-ingress 0s
==> v1beta1/ClusterRoleBinding
NAME AGE
plinking-chinchilla-nginx-ingress 0s
==> v1beta1/Deployment
NAME READY UP-TO-DATE AVAILABLE AGE
plinking-chinchilla-nginx-ingress-controller 0/1 1 0 0s
plinking-chinchilla-nginx-ingress-default-backend 0/1 1 0 0s
==> v1beta1/Role
NAME AGE
plinking-chinchilla-nginx-ingress 0s
==> v1beta1/RoleBinding
NAME AGE
plinking-chinchilla-nginx-ingress 0s
NOTES:
The nginx-ingress controller has been installed.
It may take a few minutes for the LoadBalancer IP to be available.
You can watch the status by running 'kubectl --namespace activiti7 get services -o wide -w plinking-chinchilla-nginx-ingress-controller'
An example Ingress that makes use of the controller:
apiVersion: extensions/v1beta1
kind: Ingress
metadata:
annotations:
kubernetes.io/ingress.class: nginx
name: example
namespace: foo
spec:
rules:
- host: www.example.com
http:
paths:
- backend:
serviceName: exampleService
servicePort: 80
path: /
# This section is only required if TLS is to be enabled for the Ingress
tls:
- hosts:
- www.example.com
secretName: example-tls
If TLS is enabled for the Ingress, a Secret containing the certificate and key must also be provided:
apiVersion: v1
kind: Secret
metadata:
name: example-tls
namespace: foo
data:
tls.crt: <base64 encoded cert>
tls.key: <base64 encoded key>
type: kubernetes.io/tls
With the Ingress Controller created the services can then later on be accessed from outside the cluster by deploying Ingress objects/resources.
To access anything via the Ingress Controller we need to find out its IP address:
$ kubectl get services --namespace=activiti7
NAME TYPE CLUSTER-IP EXTERNAL-IP PORT(S) AGE
plinking-chinchilla-nginx-ingress-controller LoadBalancer 10.99.19.225 localhost 80:30192/TCP,443:32385/TCP 3m
plinking-chinchilla-nginx-ingress-default-backend ClusterIP 10.100.2.202 <none> 80/TCP 3m
The Ingress Controller is accessible via a LoadBalancer Service and external IP is localhost as we are not running in the cloud (if we were an IP would be given that points to an AWS or GCP Load balancer). The Ingress Controller comes with a default backend service that will be called if a route is not mapped in an Ingress object.
We cannot use localhost as that would not work both inside and outside Docker containers. We will use the host’s IP and the public nip.io service for DNS.
Note that you might need to run kubectl get services... several times until you can see the EXTERNAL-IP for your Ingress Controller. If you see PENDING, wait for a few seconds and run the command again.
Clone the Activiti 7 Helm Charts source code
We will need to do a few changes in the Helm Chart for the Full Example so let’s clone the source code as follows:
$ git clone https://github.com/Activiti/activiti-cloud-charts
Cloning into 'activiti-cloud-charts'...
This clones the Helm Chart source code for all Activiti 7 examples.
Configure the Full Example
The next step is to parameterise the Full Example deployment. The Helm Chart can be customised to turn on and off different features in the Full Example, but there is one mandatory parameter that needs to be provided, which is the external IP address for the Ingress Controller that is going to be used by this installation.
When we are running locally we need to find out the current IP address. We cannot use localhost (127.0.0.1) as then containers cannot talk to each other, such as the Runtime Bundle container talking to the Keycloak container. So, for example, find the IP in the following way:
$ hostname
MBP512-MBERGLJUNG-0917.local
MBP512-MBERGLJUNG-0917:activiti-cloud-full-example mbergljung$ ping MBP512-MBERGLJUNG-0917.local
PING mbp512-mbergljung-0917.local (10.250.22.233): 56 data bytes
64 bytes from 10.250.22.233: icmp_seq=0 ttl=64 time=0.068 ms
Make sure this is not a bridge IP address. Look for something like en0 when doing ifconfig.
The custom configuration is done in the values.yaml file located here: https://github.com/Activiti/activiti-cloud-charts/blob/master/activiti-cloud-full-example/values.yam... (you can copy this file or change it directly). We can update this file in the Helm Chart source code that we cloned previously.
Open up the activiti-cloud-charts/activiti-cloud-full-example/values.yaml file and replace the string REPLACEME with 10.250.22.233.nip.io, which is the EXTERNAL DNS of the Ingress Controller. We are using nip.io as DNS service to map our services to this External DNS which will have the following format: <EXTERNAL_IP>.nip.io.
Important! Make sure that you can ping 10.250.22.233.nip.io:
$ ping 10.250.22.233.nip.io
PING 10.250.22.233.nip.io (10.244.50.42): 56 data bytes
64 bytes from 10.250.22.233: icmp_seq=0 ttl=64 time=0.041 ms
64 bytes from 10.250.22.233: icmp_seq=1 ttl=64 time=0.083 ms
...
If this does not work then you might experience a DNS rebind protection problem with your router. See more info here.
So what are we going to deploy with this configuration? The following picture illustrates:
.png)
We can see here that everything is accessed via the Ingress controller at 10.250.22.233.nip.io. Then you just add the API Gateway service name plus namespace in front of that to get to the API Gateway. From which you can get to the other applications via different URL paths.
Deploy the Full Example
When we have customised the configuration of the Full Example Helm Chart we are ready to deploy the chart by running the following command. However, before doing that it’s always a good idea to update the local helm chart repo/cache, so we are not using an older version of the chart:
$ helm repo update
Hang tight while we grab the latest from your chart repositories...
...Skip local chart repository
...Successfully got an update from the "alfresco-incubator" chart repository
...Successfully got an update from the "activiti-cloud-charts" chart repository
...Successfully got an update from the "stable" chart repository
Update Complete. ⎈ Happy Helming!⎈
Now, remember to stand in the correct directory locally where you made the changes to the values.yaml file, then do the installation as follows:
activiti-cloud-charts mbergljung$ cd activiti-cloud-full-example/
activiti-cloud-full-example mbergljung$ helm install -f values.yaml activiti-cloud-charts/activiti-cloud-full-example --namespace=activiti7
some warnings...
NAME: kneeling-grasshopper
LAST DEPLOYED: Mon Jun 3 15:19:37 2019
NAMESPACE: activiti7
STATUS: DEPLOYED
RESOURCES:
==> v1/ConfigMap
NAME DATA AGE
kneeling-grasshopper 2 1s
kneeling-grasshopper-rabbitmq 2 1s
kneeling-grasshopper-test 1 1s
==> v1/Pod(related)
NAME READY STATUS RESTARTS AGE
kneeling-grasshopper-0 0/1 Pending 0 1s
kneeling-grasshopper-activiti-cloud-audit-774866fdd5-8nzqh 0/1 ContainerCreating 0 1s
kneeling-grasshopper-activiti-cloud-connector-d56b98d99-jrwm4 0/1 ContainerCreating 0 1s
kneeling-grasshopper-activiti-cloud-gateway-775bd695fd-29v7t 0/1 Pending 0 1s
kneeling-grasshopper-activiti-cloud-modeling-7bd88d5996-ph7nt 0/2 ContainerCreating 0 1s
kneeling-grasshopper-activiti-cloud-notifications-graphql-st5d9 0/1 ContainerCreating 0 1s
kneeling-grasshopper-activiti-cloud-query-777dfc768d-lt6pn 0/1 Pending 0 1s
kneeling-grasshopper-postgres-0 0/1 Pending 0 1s
kneeling-grasshopper-rabbitmq-0 0/1 Pending 0 1s
kneeling-grasshopper-runtime-bundle-69655dc9fd-ffwvv 0/1 Pending 0 1s
==> v1/Role
NAME AGE
activiti-cloud-gateway 1s
kneeling-grasshopper-activiti-cloud-connector 1s
kneeling-grasshopper-runtime-bundle 1s
==> v1/RoleBinding
NAME AGE
activiti-cloud-gateway 1s
kneeling-grasshopper-activiti-cloud-connector 1s
kneeling-grasshopper-runtime-bundle 1s
==> v1/Secret
NAME TYPE DATA AGE
kneeling-grasshopper-db Opaque 1 1s
kneeling-grasshopper-http Opaque 1 1s
kneeling-grasshopper-postgres Opaque 1 1s
kneeling-grasshopper-rabbitmq Opaque 4 1s
kneeling-grasshopper-realm-secret Opaque 1 1s
==> v1/Service
NAME TYPE CLUSTER-IP EXTERNAL-IP PORT(S) AGE
activiti-cloud-gateway ClusterIP 10.96.125.79 <none> 80/TCP 1s
activiti-cloud-modeling ClusterIP 10.102.235.107 <none> 80/TCP 1s
activiti-cloud-modeling-backend ClusterIP 10.105.206.86 <none> 80/TCP 1s
activiti-cloud-notifications ClusterIP 10.111.183.127 <none> 80/TCP 1s
audit ClusterIP 10.108.8.55 <none> 80/TCP 1s
example-cloud-connector ClusterIP 10.111.141.59 <none> 80/TCP 1s
kneeling-grasshopper-headless ClusterIP None <none> 80/TCP 1s
kneeling-grasshopper-http ClusterIP 10.96.70.155 <none> 80/TCP 1s
kneeling-grasshopper-postgres ClusterIP 10.105.170.191 <none> 5432/TCP 1s
kneeling-grasshopper-postgres-headless ClusterIP None <none> 5432/TCP 1s
kneeling-grasshopper-rabbitmq ClusterIP None <none> 15672/TCP,5672/TCP,4369/TCP,61613/TCP,61614/TCP 1s
kneeling-grasshopper-rabbitmq-discovery ClusterIP None <none> 15672/TCP,5672/TCP,4369/TCP,61613/TCP,61614/TCP 1s
query ClusterIP 10.98.191.5 <none> 80/TCP 1s
rb-my-app ClusterIP 10.111.215.17 <none> 80/TCP 1s
==> v1/ServiceAccount
NAME SECRETS AGE
activiti-cloud-gateway 1 1s
example-cloud-connector 1 1s
kneeling-grasshopper-rabbitmq 1 1s
rb-my-app 1 1s
==> v1beta1/Deployment
NAME READY UP-TO-DATE AVAILABLE AGE
kneeling-grasshopper-activiti-cloud-audit 0/1 1 0 1s
kneeling-grasshopper-activiti-cloud-connector 0/1 1 0 1s
kneeling-grasshopper-activiti-cloud-gateway 0/1 1 0 1s
kneeling-grasshopper-activiti-cloud-modeling 0/1 1 0 1s
kneeling-grasshopper-activiti-cloud-notifications-graphql 0/1 1 0 1s
kneeling-grasshopper-activiti-cloud-query 0/1 1 0 1s
kneeling-grasshopper-runtime-bundle 0/1 1 0 1s
==> v1beta1/Ingress
NAME HOSTS ADDRESS PORTS AGE
kneeling-grasshopper activiti-cloud-gateway.activiti7.10.250.22.233.nip.io 80 1s
kneeling-grasshopper-activiti-cloud-gateway activiti-cloud-gateway.activiti7.10.250.22.233.nip.io 80 1s
kneeling-grasshopper-activiti-cloud-notifications-graphql activiti-cloud-gateway.activiti7.10.250.22.233.nip.io 80 1s
==> v1beta1/Role
NAME AGE
kneeling-grasshopper-rabbitmq 1s
==> v1beta1/RoleBinding
NAME AGE
kneeling-grasshopper-rabbitmq 1s
==> v1beta1/StatefulSet
NAME READY AGE
kneeling-grasshopper 0/1 1s
kneeling-grasshopper-rabbitmq 0/1 1s
==> v1beta2/StatefulSet
NAME READY AGE
kneeling-grasshopper-postgres 0/1 1s
NOTES:
_ _ _ _ _ _____ _ _
/\ | | (_) (_) | (_) / ____| | | |
/ \ ___| |_ ___ ___| |_ _ | | | | ___ _ _ __| |
/ /\ \ / __| __| \ \ / / | __| | | | | |/ _ \| | | |/ _` |
/ ____ \ (__| |_| |\ V /| | |_| | | |____| | (_) | |_| | (_| |
/_/ \_\___|\__|_| \_/ |_|\__|_| \_____|_|\___/ \__,_|\__,_|
Version: 7.1.0.M1
Thank you for installing activiti-cloud-full-example-1.1.16
Your release is named kneeling-grasshopper.
To learn more about the release, try:
$ helm status kneeling-grasshopper
$ helm get kneeling-grasshopper
Get the application URLs:
Activiti Keycloak : http://activiti-cloud-gateway.activiti7.10.250.22.233.nip.io/auth
Activiti Gateway : http://activiti-cloud-gateway.activiti7.10.250.22.233.nip.io/
Activiti Modeler : http://activiti-cloud-gateway.activiti7.10.250.22.233.nip.io/activiti-cloud-modeling
Activiti GraphiQL : http://activiti-cloud-gateway.activiti7.10.250.22.233.nip.io/notifications/graphiql
To see deployment status, try:
$ kubectl get pods -n activiti7
This installs the full example based on the remote activiti-cloud-charts/activiti-cloud-full-example Helm chart from the Activiti 7 Helm chart repo with the custom configuration from the local values.yaml file.
Now, wait for all the services to be up and running, check the pods as follows:
$ kubectl get pods --namespace=activiti7
NAME READY STATUS RESTARTS AGE
kneeling-grasshopper-0 0/1 Running 0 1m
kneeling-grasshopper-activiti-cloud-audit-774866fdd5-8nzqh 0/1 Running 0 1m
kneeling-grasshopper-activiti-cloud-connector-d56b98d99-jrwm4 0/1 Running 0 1m
kneeling-grasshopper-activiti-cloud-gateway-775bd695fd-29v7t 1/1 Running 0 1m
kneeling-grasshopper-activiti-cloud-modeling-7bd88d5996-ph7nt 2/2 Running 0 1m
kneeling-grasshopper-activiti-cloud-notifications-graphql-st5d9 0/1 Running 0 1m
kneeling-grasshopper-activiti-cloud-query-777dfc768d-lt6pn 0/1 Running 0 1m
kneeling-grasshopper-postgres-0 1/1 Running 0 1m
kneeling-grasshopper-rabbitmq-0 0/1 Running 0 1m
kneeling-grasshopper-runtime-bundle-69655dc9fd-ffwvv 0/1 PodInitializing 0 1m
plinking-chinchilla-nginx-ingress-controller-755449466d-kktzr 1/1 Running 0 56m
plinking-chinchilla-nginx-ingress-default-backend-75f8c64f8zbn4 1/1 Running 0 56m
Pay attention to the READY column, it should show 1/1 in all the pods before we can proceed. If some pods are not starting it can be useful to look at it in the Kubernetes Dashboard. Select the activiti7 namespace and then click on Pods:
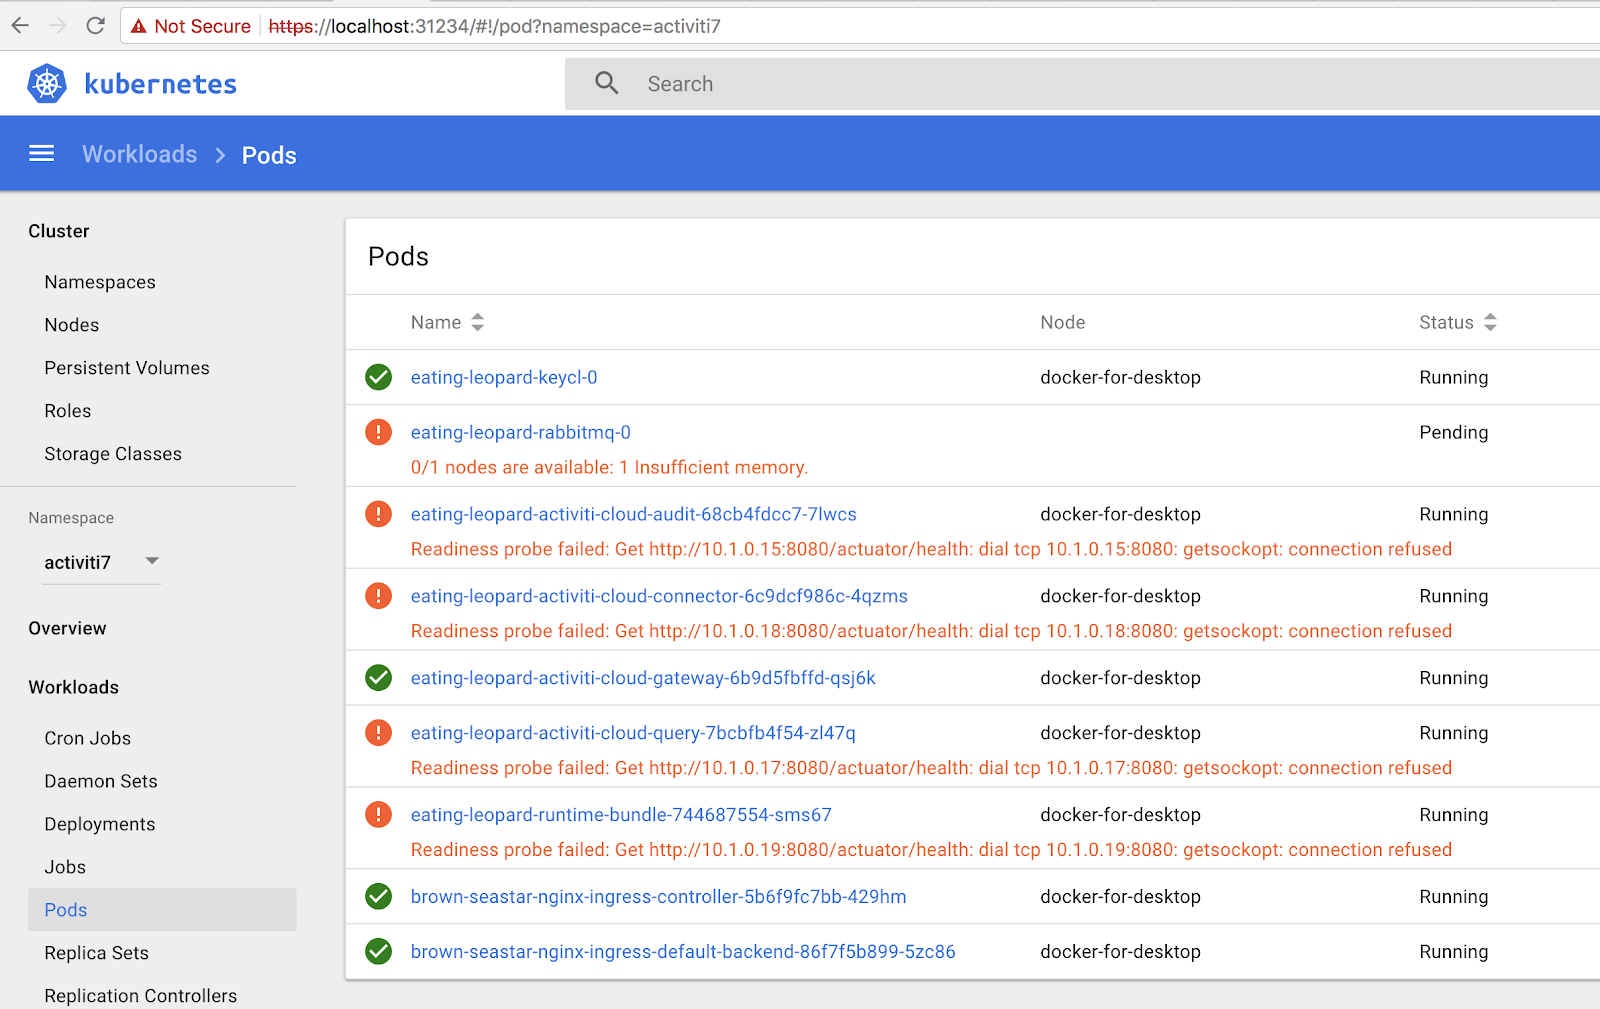
In this case we can see that there is not enough memory to load all pods. If you see an insufficient memory error then you need to increase the available memory for Kubernetes running in Docker for Desktop (Preferences... | Advanced | Memory). You will also see a lot of these readiness probe failed... errors. They will eventually disappear, but it will take 5-10 minutes.
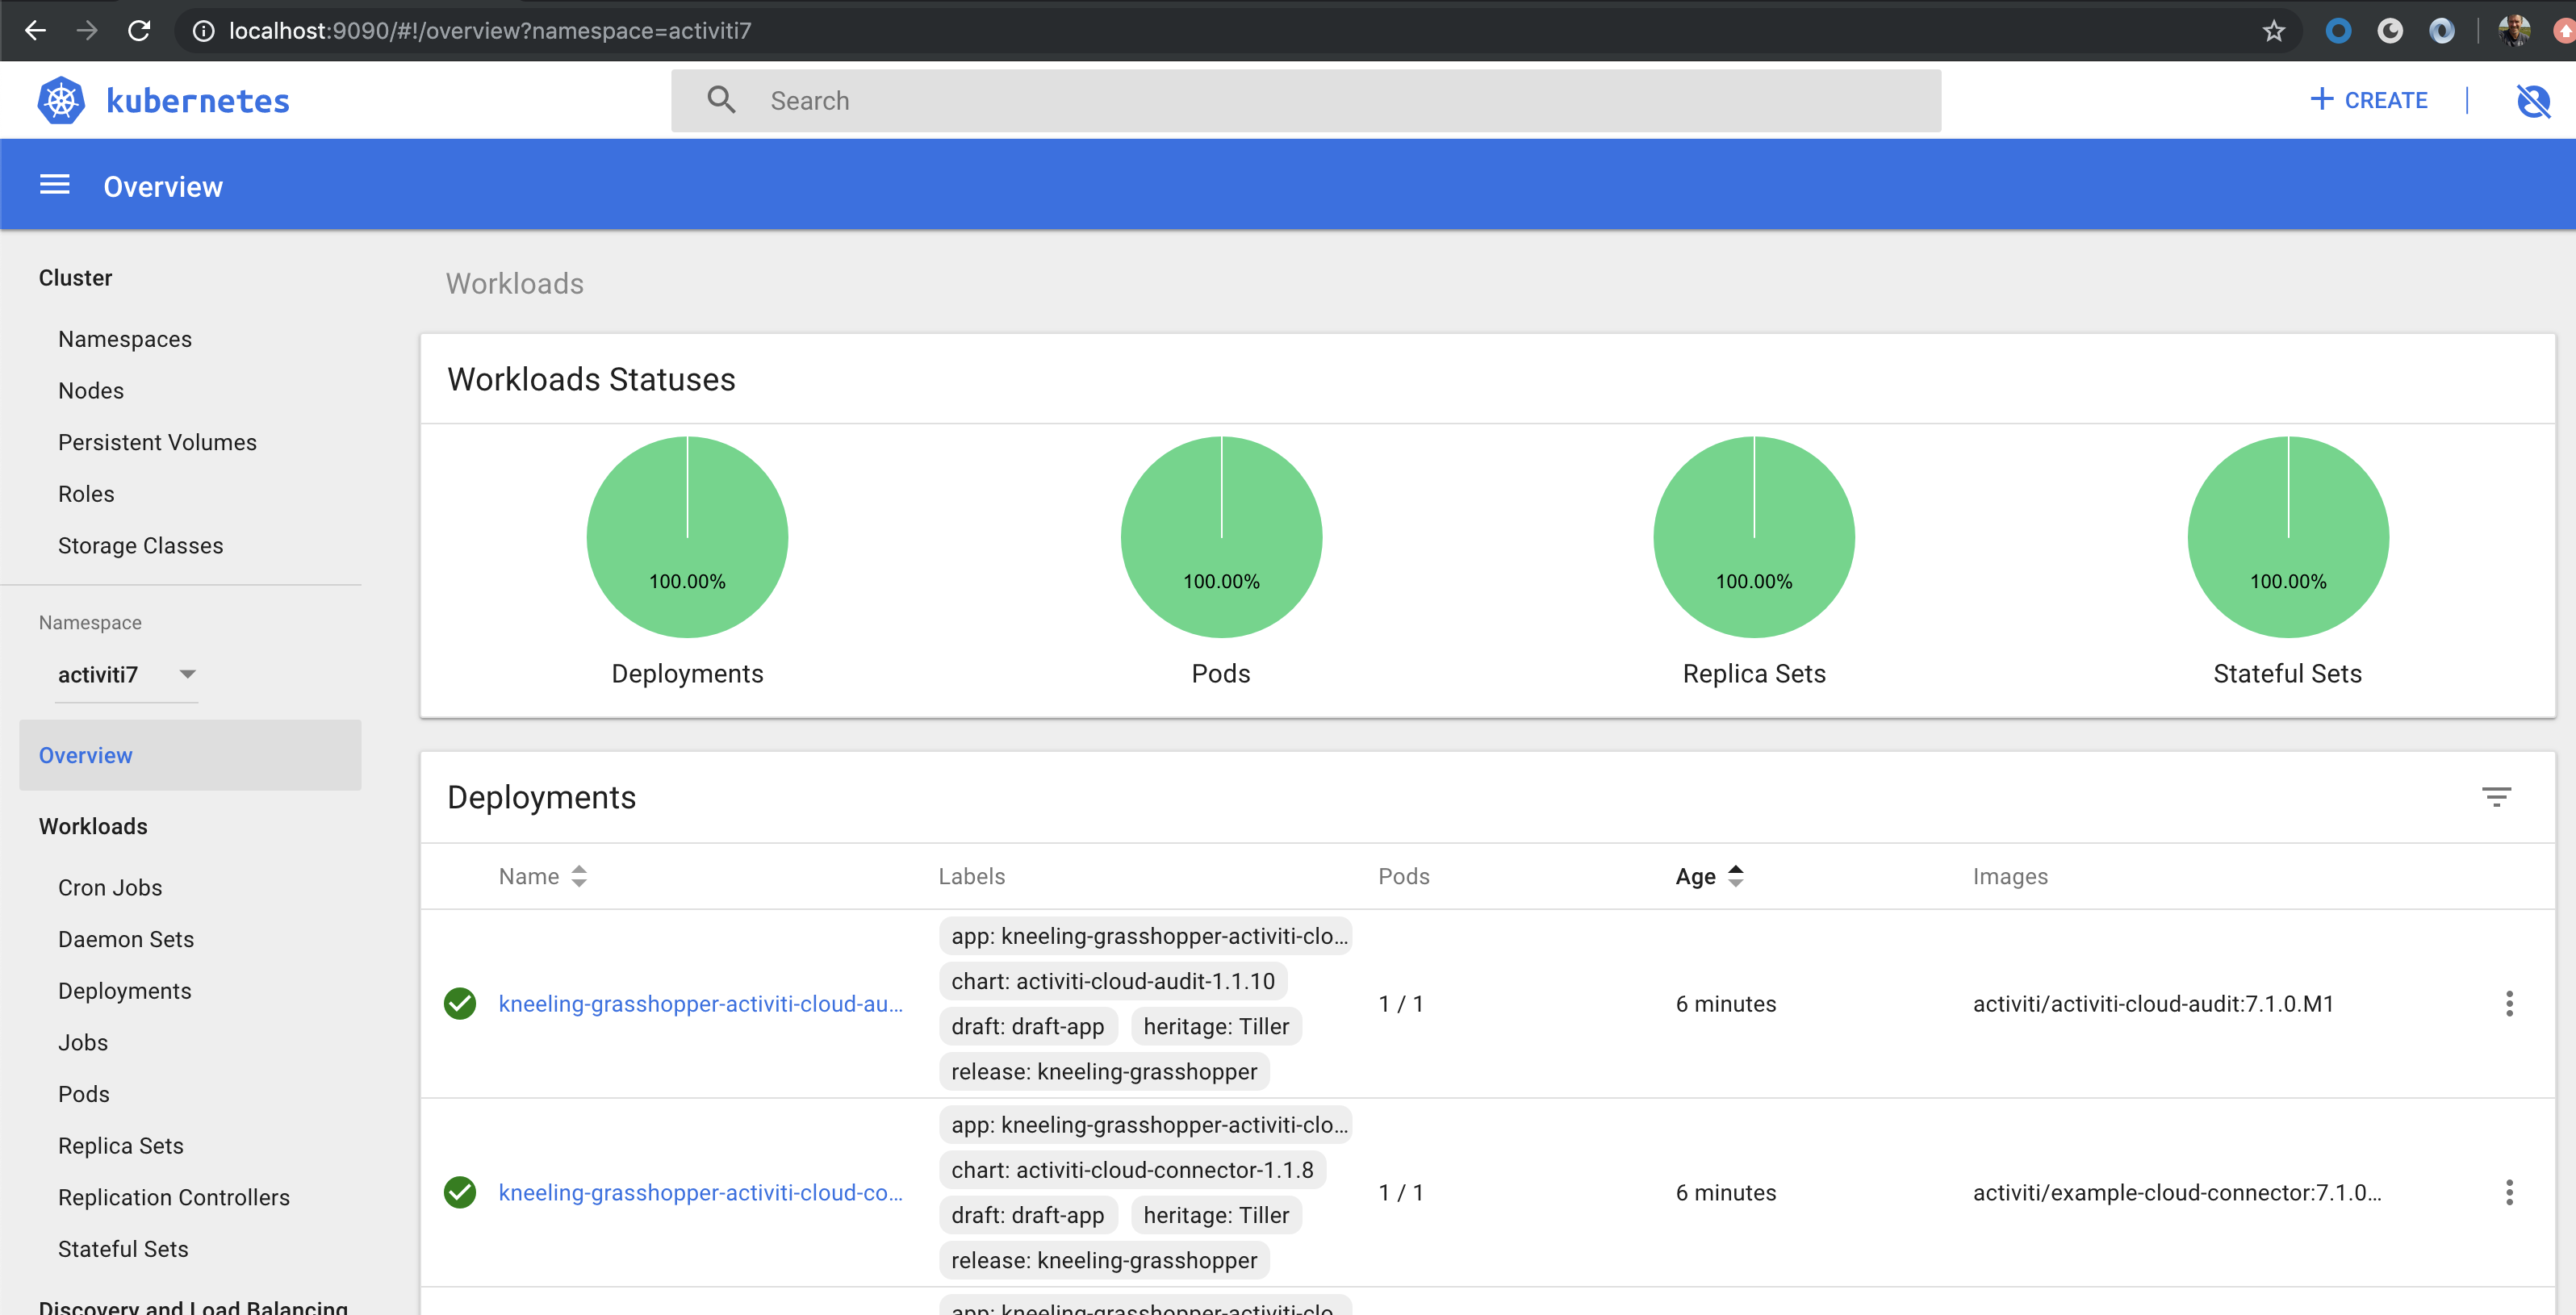
When all starts successfully you should see the following after a while:
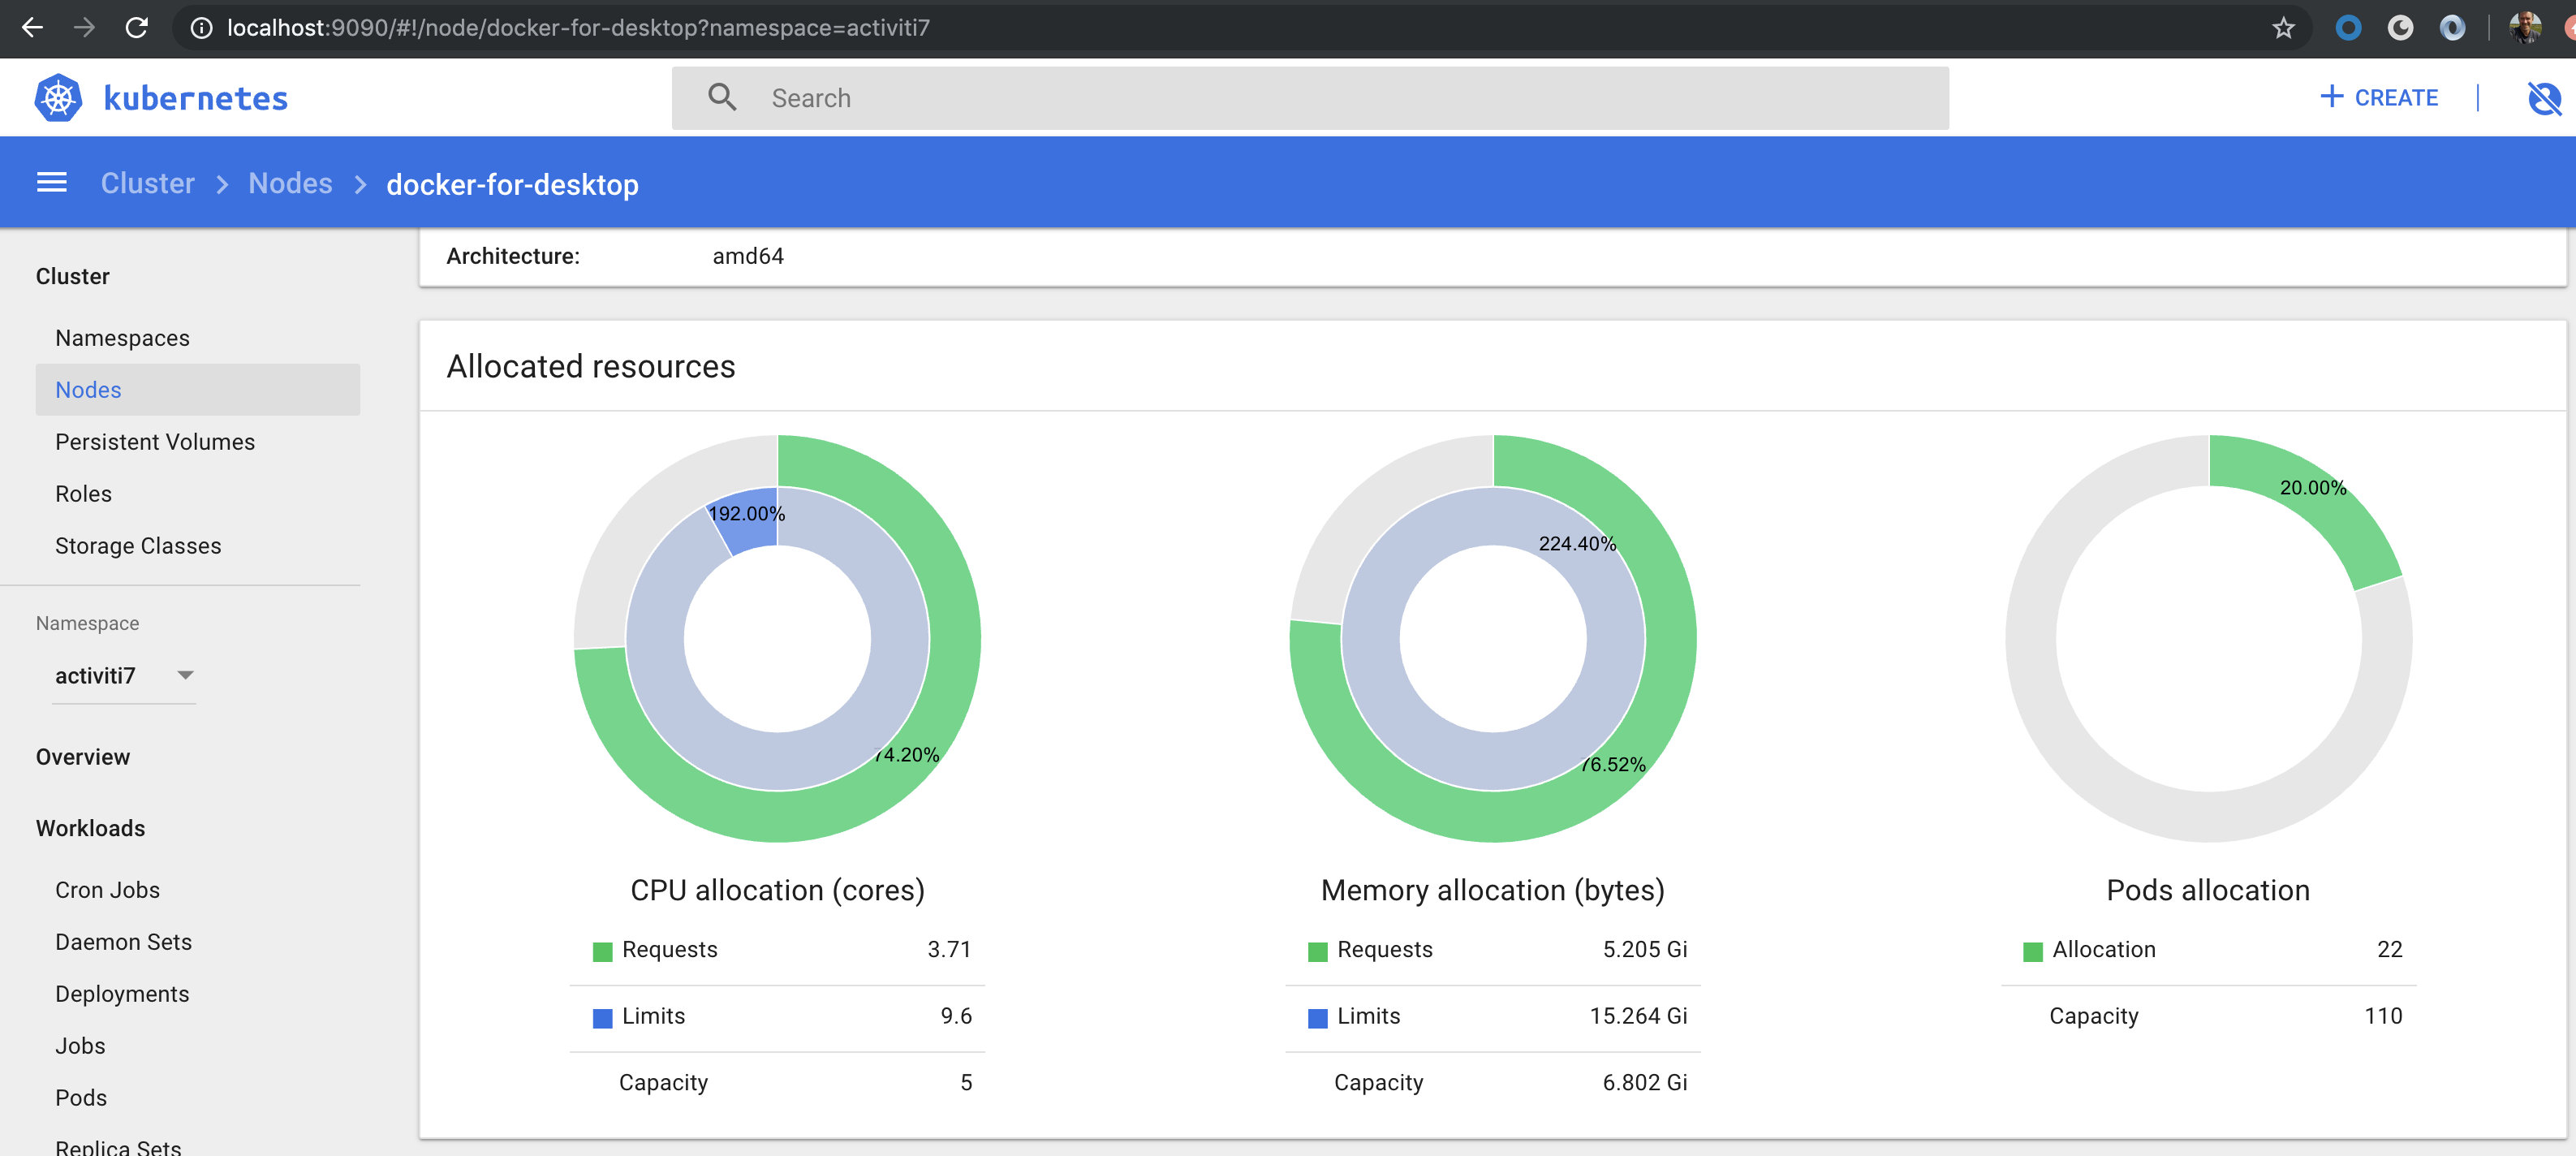
We can also check the status of the Kubernetes node by selecting Cluster | Nodes | docker-for-desktop:
It is important to notice that Helm created a release of our Chart. Because we haven’t specified a name for this release Helm choose a random name, in my case kneeling-grasshopper. This means that we can manage this release independently of other deployments that we do.
You can run helm ls to see all deployed applications:
$ helm ls --namespace=activiti7
NAME REVISION UPDATED STATUS CHART APP VERSION NAMESPACE
kneeling-grasshopper 1 Mon Jun 3 15:19:37 2019 DEPLOYED activiti-cloud-full-example-1.1.16 7.1.0.M1 activiti7
plinking-chinchilla 1 Mon Jun 3 14:25:15 2019 DEPLOYED nginx-ingress-1.6.16 0.24.1 activiti7
To delete a release do helm delete <release-name>.
Checking what Users and Groups that are available
Before we start interacting with the deployed example application, let’s check out what users and groups we have available in Keycloak. These can be used in process definitions and when we interact with the application.
Access Keycloak Admin Console on the following URL: http://activiti-cloud-gateway.activiti7.10.250.22.233.nip.io/auth/admin/master/console
Login with admin/admin.
You should see a home page such as:

From this page we can access users and groups under the Manage section in the lower left corner. But first, note that there is already a security realm setup called activiti. We will be using it in a bit. There is also an Activiti client setup and the following Roles:

The ACTIVITI_ADMIN and ACTIVITI_USER roles are important to understand because they tell Activiti 7 what part of the core API the user can access. In the next section we will use the modeler user to login to the Activiti Modeler and it’s a member of the ACTIVITI_MODELER role.
Now, click on Users | View all users so we can see what type of users we have to work with when accessing the application:

So there are several custom users configured. We can use for example the testuser as it has the role ACTIVITI_USER applied:
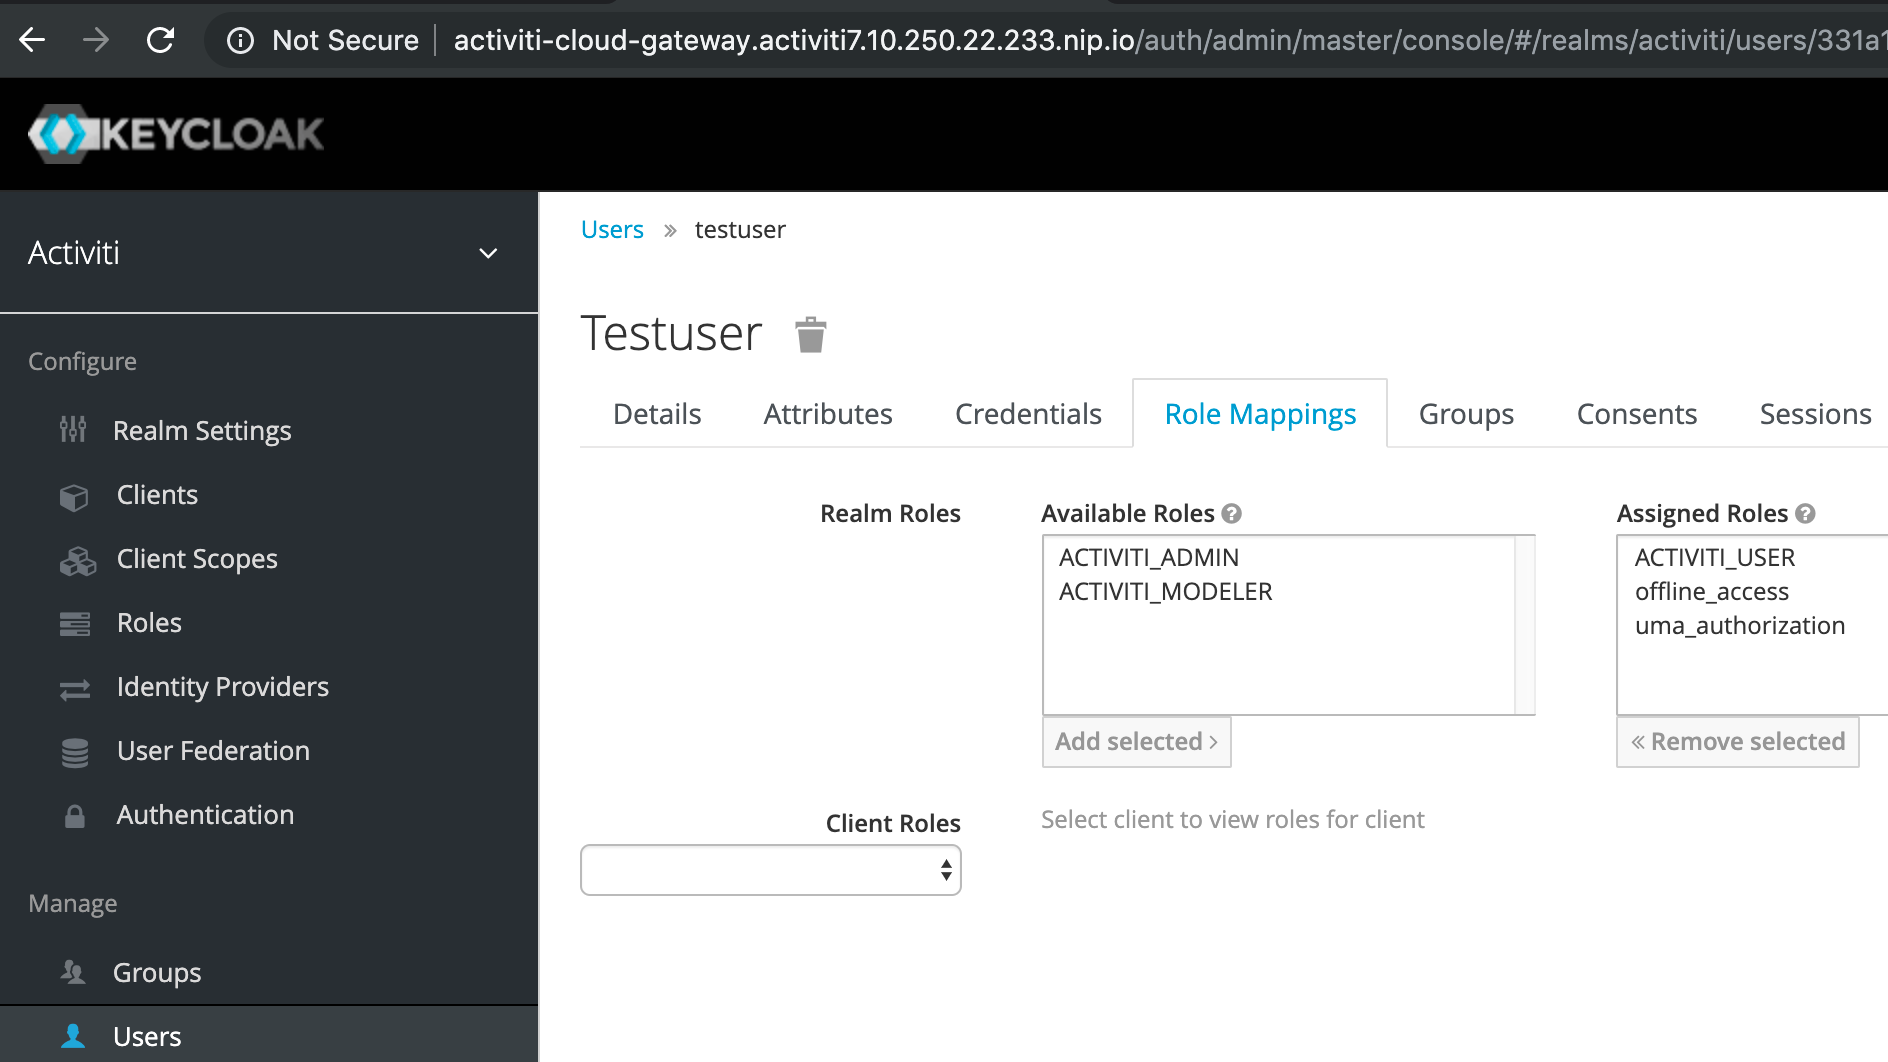
Now, let’s move on and have a look at how we can interact with the deployed Activiti 7 application. But first, let’s just verify that we got the Activiti BPMN Modeler app running.
A quick look at the Activiti 7 Modeler
Let’s have a quick look at the new Activiti 7 Modeler. So we can make sure it has been deployed properly. You can access the BPMN Modeler App via the
http://activiti-cloud-gateway.activiti7.10.250.22.233.nip.io/activiti-cloud-modeling URL. Make sure you login with modeler/password as this user is part of the ACTIVITI_MODELER role. You might have to logout as admin first. You will get a SSO button, click it and then you will get the Keycloak login as follows:
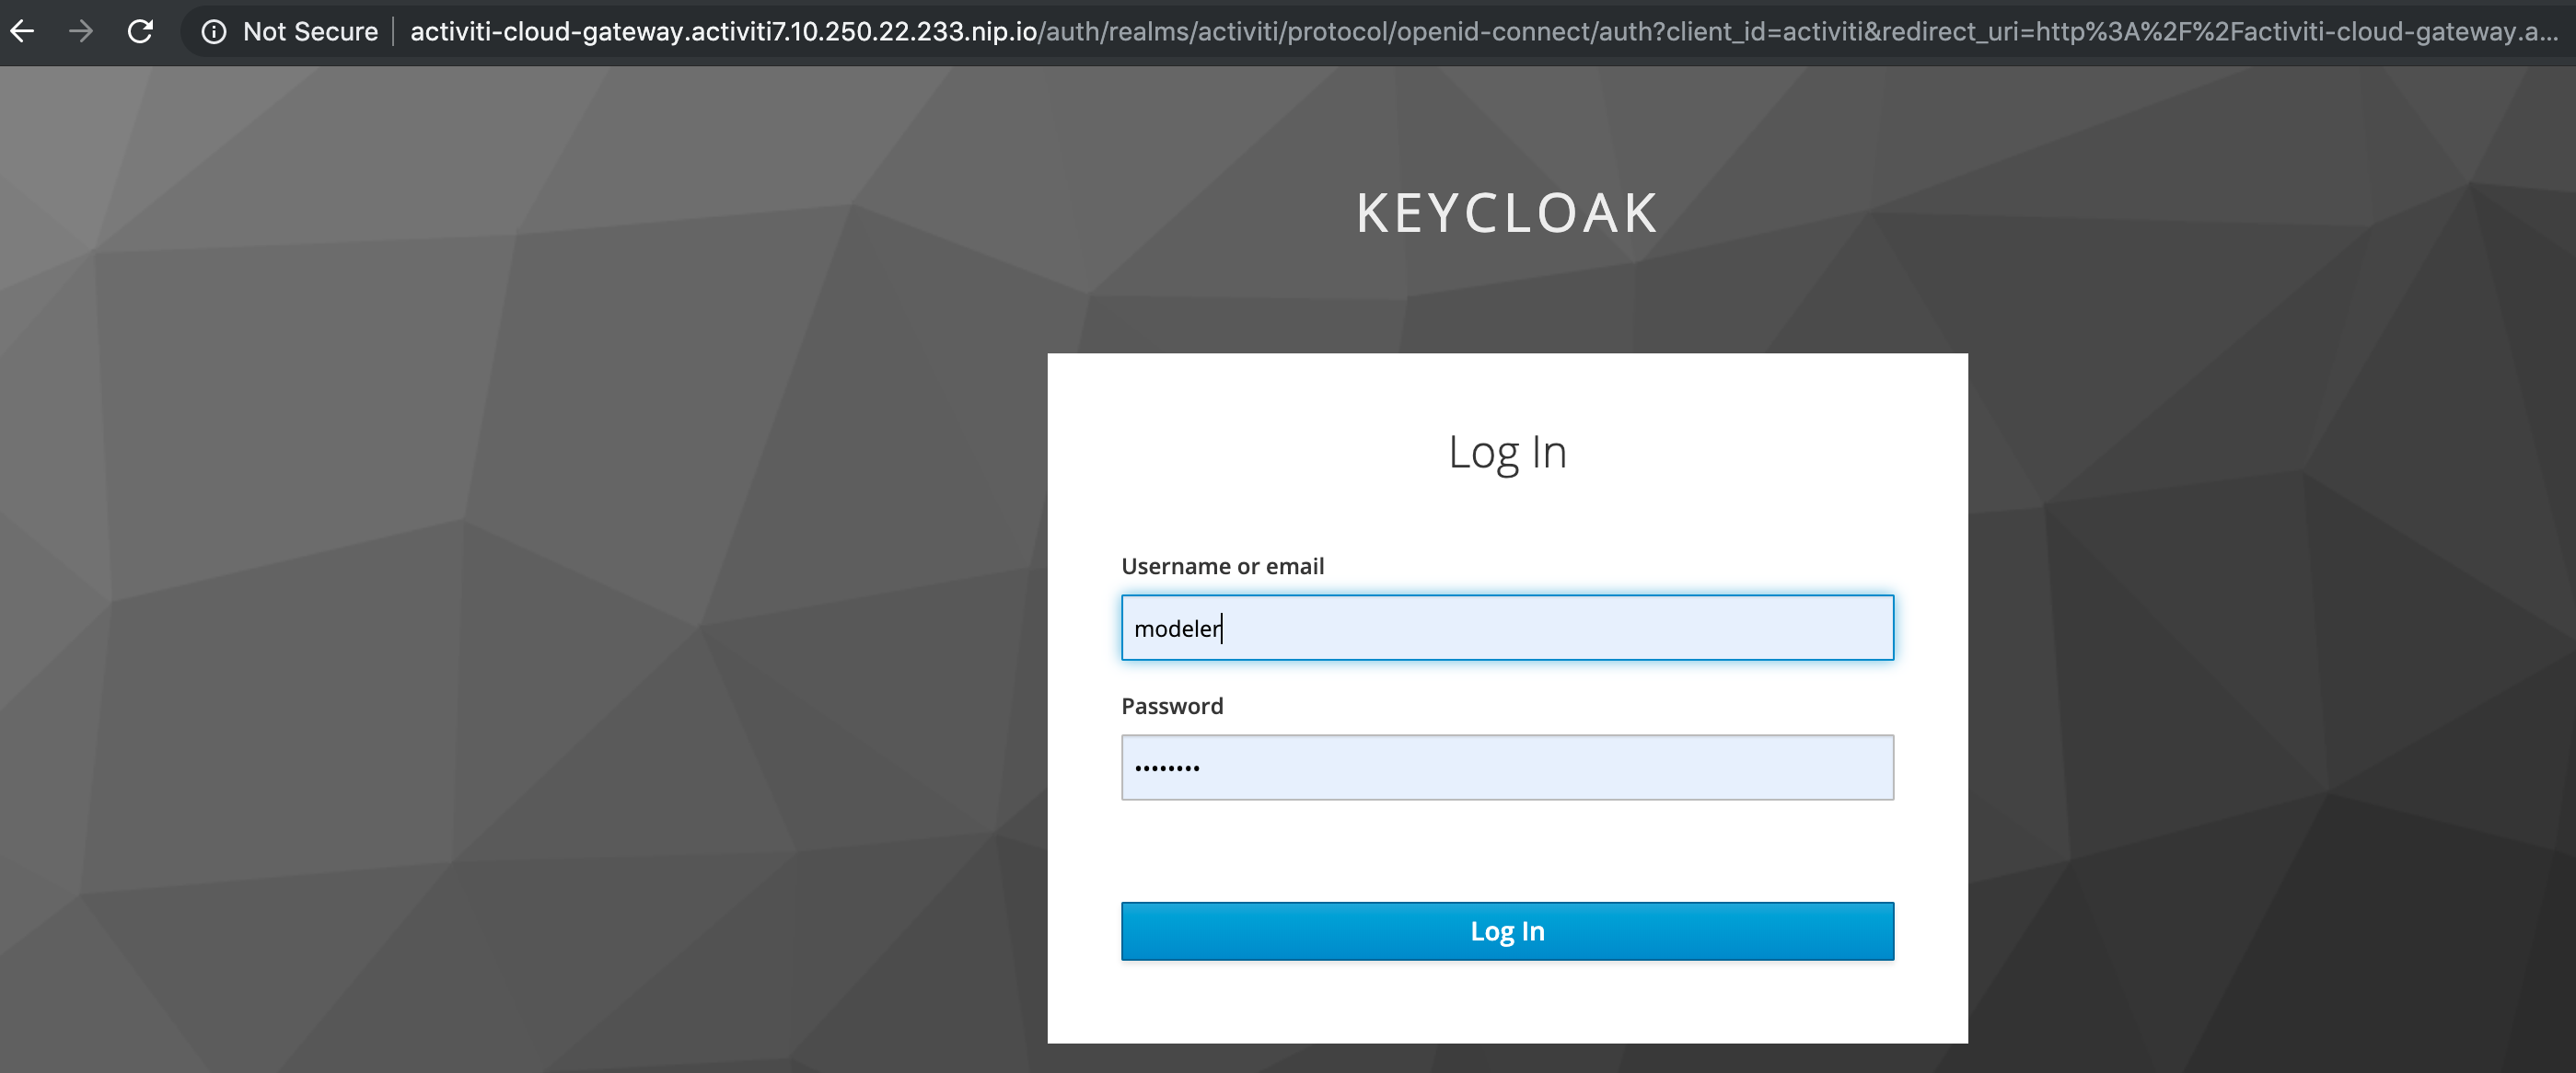
After successful login you should now see:

All good so far, let’s create a Process Application just to be sure it works all the way. Click NEW | Project and give it a name and description:

Cool, all works!
Quick test to verify environment setup
We can do a quick test with curl to verify that the Activiti 7 Full Example has been deployed correctly.
First, request an access token for testuser from Keycloak:
$ curl -d 'client_id=activiti' -d 'username=testuser' -d 'password=password' -d 'grant_type=password' 'http://activiti-cloud-gateway.activiti7.10.250.22.233.nip.io/auth/realms/activiti/protocol/openid-connect/token' | python -m json.tool
% Total % Received % Xferd Average Speed Time Time Time Current
Dload Upload Total Spent Left Speed
100 2871 100 2797 100 74 12376 327 --:--:-- --:--:-- --:--:-- 12760
{
"access_token": "eyJhbGciOiJSUzI1NiIsInR5cCIgOiAiSldUIiwia2lkIiA6ICJoTUJPYnNyb1BJS2JJeTVOUGdnU0pPSGRDcmZFUWlva2otQUIwQjBaS3U0In0.eyJqdGkiOiI0YzQ2NjAzZS03NDQ3LTQ2NDktYTNhYS05ZTkxM2Y4NDg5NTEiLCJleHAiOjE1NTk1NzM2OTksIm5iZiI6MCwiaWF0IjoxNTU5NTczMzk5LCJpc3MiOiJodHRwOi8vYWN0aXZpdGktY2xvdWQtZ2F0ZXdheS5hY3Rpdml0aTcuMTAuMjUwLjIyLjIzMy5uaXAuaW8vYXV0aC9yZWFsbXMvYWN0aXZpdGkiLCJhdWQiOiJhY3Rpdml0aSIsInN1YiI6IjMzMWExMmQxLTc2NmUtNDg5Ny1iMGE4LTMwOWFlNWNhZWIyNSIsInR5cCI6IkJlYXJlciIsImF6cCI6ImFjdGl2aXRpIiwiYXV0aF90aW1lIjowLCJzZXNzaW9uX3N0YXRlIjoiZjMwNmM0NDgtMTlmYi00NGZhLTkwMzktNGYwZjRmZmI2ODJkIiwiYWNyIjoiMSIsImFsbG93ZWQtb3JpZ2lucyI6WyIqIl0sInJlYWxtX2FjY2VzcyI6eyJyb2xlcyI6WyJvZmZsaW5lX2FjY2VzcyIsIkFDVElWSVRJX1VTRVIiLCJ1bWFfYXV0aG9yaXphdGlvbiJdfSwicmVzb3VyY2VfYWNjZXNzIjp7ImFjY291bnQiOnsicm9sZXMiOlsibWFuYWdlLWFjY291bnQiLCJtYW5hZ2UtYWNjb3VudC1saW5rcyIsInZpZXctcHJvZmlsZSJdfX0sInNjb3BlIjoiZW1haWwgcHJvZmlsZSIsImVtYWlsX3ZlcmlmaWVkIjpmYWxzZSwibmFtZSI6InRlc3QgdXNlciIsInByZWZlcnJlZF91c2VybmFtZSI6InRlc3R1c2VyIiwiZ2l2ZW5fbmFtZSI6InRlc3QiLCJmYW1pbHlfbmFtZSI6InVzZXIiLCJlbWFpbCI6InRlc3R1c2VyQHRlc3QuY29tIn0.Q30sSXmhkbjamoXlc6PArklehCyCwiJzw2RhmYEE1ILy3nBtAUOt75TFxsLA6MU7xV9X-NALvEpTEFxsfarWAteHC98LMdVpt7wzANLZVtuu-6BVXu1Nnxeqes32wz5Tb0Y6pLuk5ADBRN4-MWHIUzNMztXJBOAcJhtrcu2zUYCB6kYiVJfvSO55FP3R6RPJWRCw4Uc7HqnvVaMfGGsXKcekUrB8YlpsOWmnLSH4tnv6XiFBGKTPOHH6v6U6_Hn7AdNrxFjE1LNogZujcYfdFeUYxwJwzyumpQ1X-Wrl8l0nlD9qOQqtWFWVw8tfWakEgO8JkPRh8QBcS-SCxAScLg",
"expires_in": 300,
"refresh_expires_in": 1800,
"refresh_token": "eyJhbGciOiJSUzI1NiIsInR5cCIgOiAiSldUIiwia2lkIiA6ICJoTUJPYnNyb1BJS2JJeTVOUGdnU0pPSGRDcmZFUWlva2otQUIwQjBaS3U0In0.eyJqdGkiOiIzZTc1NmEwMS03NjNjLTQxYWMtOTg5Zi1hNzQ3NmQ1NDBkNmIiLCJleHAiOjE1NTk1NzUxOTksIm5iZiI6MCwiaWF0IjoxNTU5NTczMzk5LCJpc3MiOiJodHRwOi8vYWN0aXZpdGktY2xvdWQtZ2F0ZXdheS5hY3Rpdml0aTcuMTAuMjUwLjIyLjIzMy5uaXAuaW8vYXV0aC9yZWFsbXMvYWN0aXZpdGkiLCJhdWQiOiJhY3Rpdml0aSIsInN1YiI6IjMzMWExMmQxLTc2NmUtNDg5Ny1iMGE4LTMwOWFlNWNhZWIyNSIsInR5cCI6IlJlZnJlc2giLCJhenAiOiJhY3Rpdml0aSIsImF1dGhfdGltZSI6MCwic2Vzc2lvbl9zdGF0ZSI6ImYzMDZjNDQ4LTE5ZmItNDRmYS05MDM5LTRmMGY0ZmZiNjgyZCIsInJlYWxtX2FjY2VzcyI6eyJyb2xlcyI6WyJvZmZsaW5lX2FjY2VzcyIsIkFDVElWSVRJX1VTRVIiLCJ1bWFfYXV0aG9yaXphdGlvbiJdfSwicmVzb3VyY2VfYWNjZXNzIjp7ImFjY291bnQiOnsicm9sZXMiOlsibWFuYWdlLWFjY291bnQiLCJtYW5hZ2UtYWNjb3VudC1saW5rcyIsInZpZXctcHJvZmlsZSJdfX0sInNjb3BlIjoiZW1haWwgcHJvZmlsZSJ9.PHHWPGqpTwB9v7qzkT6SnVOjC60beeQTCRgwsAB7qYCwptA1gkKFEBGMQ0H1mdUWxrOqZOVN05aD2r1lyCB6-YRSUmdxqj7BBuU5UGCNcE7yCjtYpzOJRBgjKtIiAF4sKU2TMASjXRUY9zWgwk3UNWX8w9qH9XY9uPrQ3AKb00RiKGQQ8_zzTQvt0VQyPuinna8aS5Z2e8dqI8J5mrClLy9Pcvg98r07JXqWlBXjZ3dimkBgrSZ12R1igVCW01D17vHyY19YMrtC5u6IeKzRZfxhE58wnh2V7MVeQDR2GKae_LOD--TNArGDdqRQk99YmHQznleMULtpNgGFoMfKow",
"token_type": "bearer",
"not-before-policy": 0,
"session_state": "f306c448-19fb-44fa-9039-4f0f4ffb682d",
"scope": "email profile"
}
Now, use this access token to make a call to the Runtime Bundle for deployed process definitions:
$ curl http://activiti-cloud-gateway.activiti7.10.250.22.233.nip.io/rb-my-app/v1/process-definitions -H "Authorization: bearer eyJhbGciOiJSUzI1NiIsInR5cCIgOiAiSldUIiwia2lkIiA6ICJoTUJPYnNyb1BJS2JJeTVOUGdnU0pPSGRDcmZFUWlva2otQUIwQjBaS3U0In0.eyJqdGkiOiI0YzQ2NjAzZS03NDQ3LTQ2NDktYTNhYS05ZTkxM2Y4NDg5NTEiLCJleHAiOjE1NTk1NzM2OTksIm5iZiI6MCwiaWF0IjoxNTU5NTczMzk5LCJpc3MiOiJodHRwOi8vYWN0aXZpdGktY2xvdWQtZ2F0ZXdheS5hY3Rpdml0aTcuMTAuMjUwLjIyLjIzMy5uaXAuaW8vYXV0aC9yZWFsbXMvYWN0aXZpdGkiLCJhdWQiOiJhY3Rpdml0aSIsInN1YiI6IjMzMWExMmQxLTc2NmUtNDg5Ny1iMGE4LTMwOWFlNWNhZWIyNSIsInR5cCI6IkJlYXJlciIsImF6cCI6ImFjdGl2aXRpIiwiYXV0aF90aW1lIjowLCJzZXNzaW9uX3N0YXRlIjoiZjMwNmM0NDgtMTlmYi00NGZhLTkwMzktNGYwZjRmZmI2ODJkIiwiYWNyIjoiMSIsImFsbG93ZWQtb3JpZ2lucyI6WyIqIl0sInJlYWxtX2FjY2VzcyI6eyJyb2xlcyI6WyJvZmZsaW5lX2FjY2VzcyIsIkFDVElWSVRJX1VTRVIiLCJ1bWFfYXV0aG9yaXphdGlvbiJdfSwicmVzb3VyY2VfYWNjZXNzIjp7ImFjY291bnQiOnsicm9sZXMiOlsibWFuYWdlLWFjY291bnQiLCJtYW5hZ2UtYWNjb3VudC1saW5rcyIsInZpZXctcHJvZmlsZSJdfX0sInNjb3BlIjoiZW1haWwgcHJvZmlsZSIsImVtYWlsX3ZlcmlmaWVkIjpmYWxzZSwibmFtZSI6InRlc3QgdXNlciIsInByZWZlcnJlZF91c2VybmFtZSI6InRlc3R1c2VyIiwiZ2l2ZW5fbmFtZSI6InRlc3QiLCJmYW1pbHlfbmFtZSI6InVzZXIiLCJlbWFpbCI6InRlc3R1c2VyQHRlc3QuY29tIn0.Q30sSXmhkbjamoXlc6PArklehCyCwiJzw2RhmYEE1ILy3nBtAUOt75TFxsLA6MU7xV9X-NALvEpTEFxsfarWAteHC98LMdVpt7wzANLZVtuu-6BVXu1Nnxeqes32wz5Tb0Y6pLuk5ADBRN4-MWHIUzNMztXJBOAcJhtrcu2zUYCB6kYiVJfvSO55FP3R6RPJWRCw4Uc7HqnvVaMfGGsXKcekUrB8YlpsOWmnLSH4tnv6XiFBGKTPOHH6v6U6_Hn7AdNrxFjE1LNogZujcYfdFeUYxwJwzyumpQ1X-Wrl8l0nlD9qOQqtWFWVw8tfWakEgO8JkPRh8QBcS-SCxAScLg" | python -m json.tool
% Total % Received % Xferd Average Speed Time Time Time Current
Dload Upload Total Spent Left Speed
100 13172 0 13172 0 0 12185 0 --:--:-- 0:00:01 --:--:-- 12185
{
"_embedded": {
"processDefinitions": [
{
"appName": "default-app",
"appVersion": "",
"serviceName": "rb-my-app",
"serviceFullName": "rb-my-app",
"serviceType": "runtime-bundle",
"serviceVersion": "",
"id": "18fd5aaa-860b-11e9-8824-46715ef8b86c",
"name": "parentProcess",
"key": "parentproc-8e992556-5785-4ee0-9fe7-354decfea4a8",
"version": 1,
"_links": {
"self": {
"href": "http://rb-my-app/v1/process-definitions/18fd5aaa-860b-11e9-8824-46715ef8b86c"
},
"startProcess": {
"href": "http://rb-my-app/v1/process-instances"
},
"home": {
"href": "http://rb-my-app/v1"
}
}
},
{
"appName": "default-app",
"appVersion": "",
"serviceName": "rb-my-app",
"serviceFullName": "rb-my-app",
"serviceType": "runtime-bundle",
"serviceVersion": "",
"id": "18fd81bc-860b-11e9-8824-46715ef8b86c",
"name": "Process Information",
"key": "processinf-4e42752c-cc4d-429b-9528-7d3df24a9537",
"description": "my documentation text",
"version": 1,
"_links": {
"self": {
"href": "http://rb-my-app/v1/process-definitions/18fd81bc-860b-11e9-8824-46715ef8b86c"
},
"startProcess": {
"href": "http://rb-my-app/v1/process-instances"
},
"home": {
"href": "http://rb-my-app/v1"
}
}
},
{
"appName": "default-app",
"appVersion": "",
"serviceName": "rb-my-app",
"serviceFullName": "rb-my-app",
"serviceType": "runtime-bundle",
"serviceVersion": "",
"id": "18fd81c2-860b-11e9-8824-46715ef8b86c",
"name": "SingleTaskProcessGroupCandidatesTestGroup",
"key": "singletask-b6095889-6177-4b73-b3d9-316e47749a36",
"version": 1,
"_links": {
"self": {
"href": "http://rb-my-app/v1/process-definitions/18fd81c2-860b-11e9-8824-46715ef8b86c"
},
"startProcess": {
"href": "http://rb-my-app/v1/process-instances"
},
"home": {
"href": "http://rb-my-app/v1"
}
}
},
{
"appName": "default-app",
"appVersion": "",
"serviceName": "rb-my-app",
"serviceFullName": "rb-my-app",
"serviceType": "runtime-bundle",
"serviceVersion": "",
"id": "18fd81c4-860b-11e9-8824-46715ef8b86c",
"name": "subProcess",
"key": "subprocess-970cb8df-2d4c-482b-a7f8-c19a983c2ef2",
"version": 1,
"_links": {
"self": {
"href": "http://rb-my-app/v1/process-definitions/18fd81c4-860b-11e9-8824-46715ef8b86c"
},
"startProcess": {
"href": "http://rb-my-app/v1/process-instances"
},
"home": {
"href": "http://rb-my-app/v1"
}
}
},
...
},
"_links": {
"self": {
"href": "http://rb-my-app/v1/process-definitions?page=0&size=100"
}
},
"page": {
"size": 100,
"totalElements": 18,
"totalPages": 1,
"number": 0
}
}
...
It’s all working and we got a bunch of process definitions back that has been deployed in our Runtime Bundle. We can now explore the Runtime Bundle further by starting process instances etc.
Interacting with the Full Example Deployment
So the Full Example application is now deployed, but how do you interact with it to start a process and manage the tasks for it? There is no UI but we can use a Postman Collection that is available with the source code for the Full Example.
Clone the following project:
$ git clone https://github.com/Activiti/activiti-cloud-examples.git
In Postman import the collection as follows. Select File | Import… so you see:
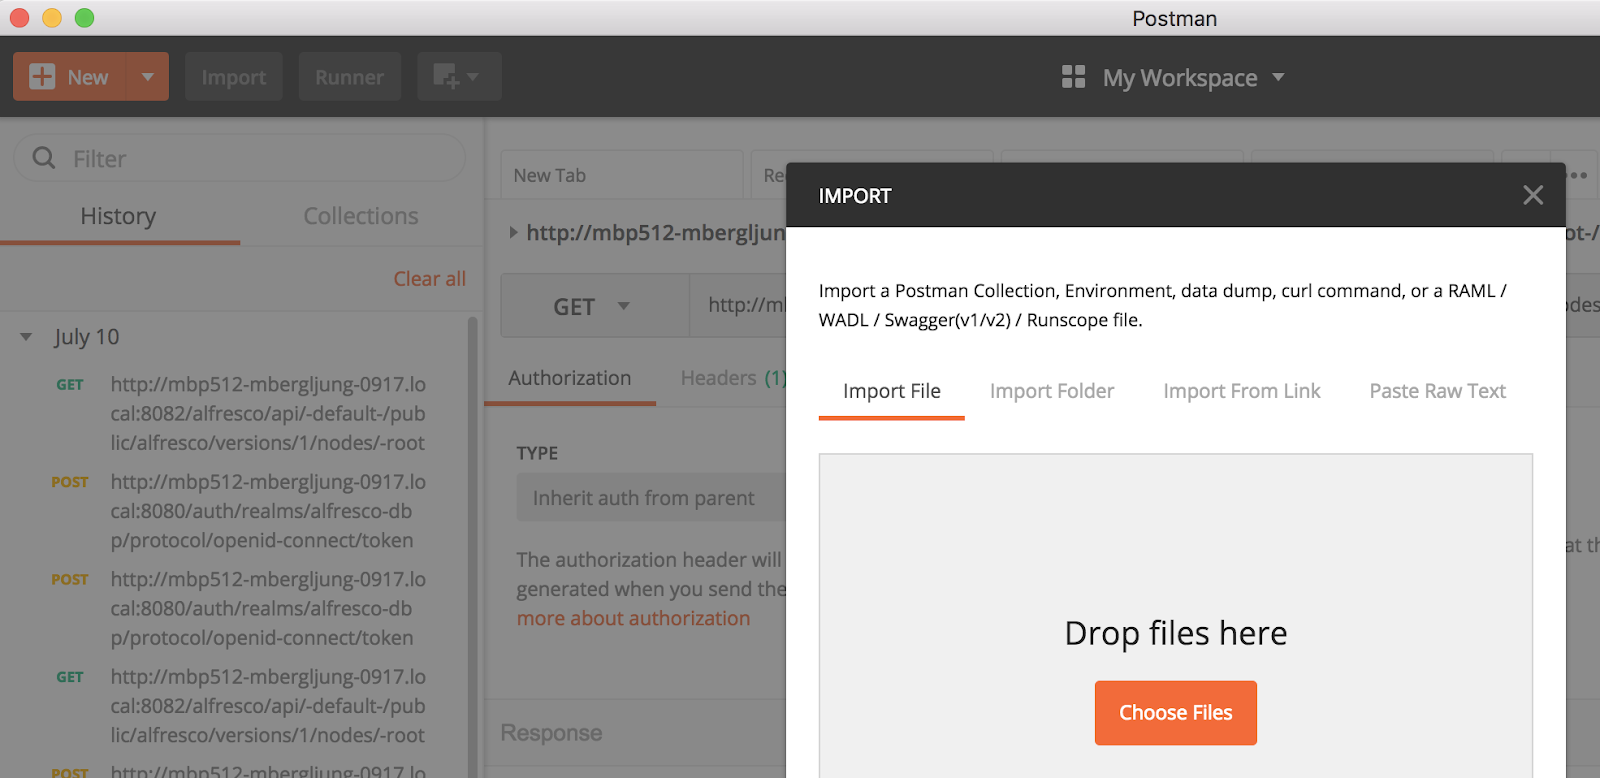
Click Choose Files and then navigate and pick the following file (i.e. Activiti v7 REST API.postman_collection.json) from the project we just cloned:

Before calling any service you will need to create a new Environment in Postman. You can do that by going to the Manage Environment icon (cogwheel in upper right corner):

In Manage Environments click the Add button to add a new environment. Give it a name such as Activiti 7. Then configure the following variables for the environment: gateway (value =
activiti-cloud-gateway.activiti7.10.250.22.233.nip.io
), idm (value = activiti-cloud-gateway.activiti7.10.250.22.233.nip.io) and realm (value = activiti):
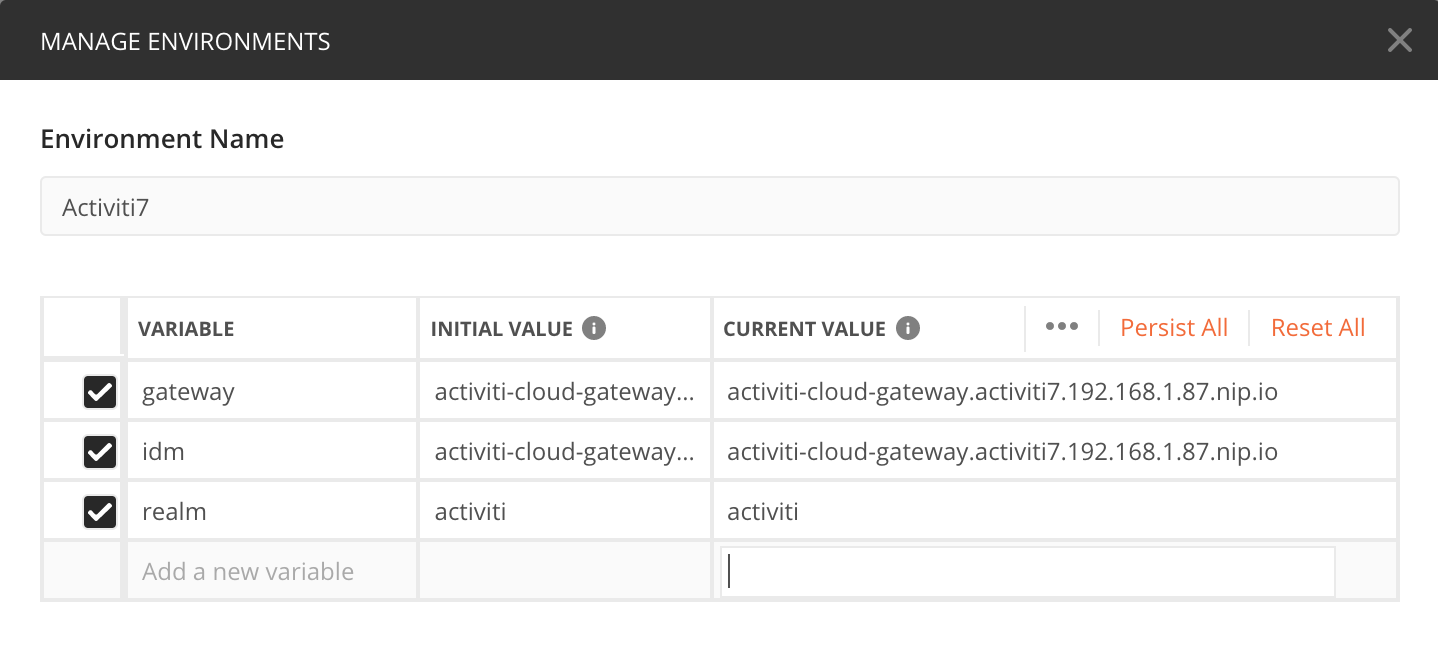
Click Add to add this new Activiti 7 environment. The gateway and idm variable values you will recognise from the printout after a successful installation, not that /auth is left out from the idm URL. The keycloak realm is preconfigured to activiti.
Make sure that you select the environment in the drop down in the upper right corner. Also, select the collection that we imported:

To be able to make any ReST calls we need to acquire an access token from Keycloak. If you go to the keycloak folder in the Postman collection and select the getKeycloakToken testuser you will get an access token:

You can see here how the environment variables are being used in the POST URL (i.e. {{idm}}/auth/realms/{{realm}}/protocol/openid-connect/token). Click the Send button to make the ReST call:

The returned access token will be used to authenticate further requests. Look at the Tests tab and you will see a script that sets the access token variable (i.e. kcAccessToken) that is then used by other ReST calls:
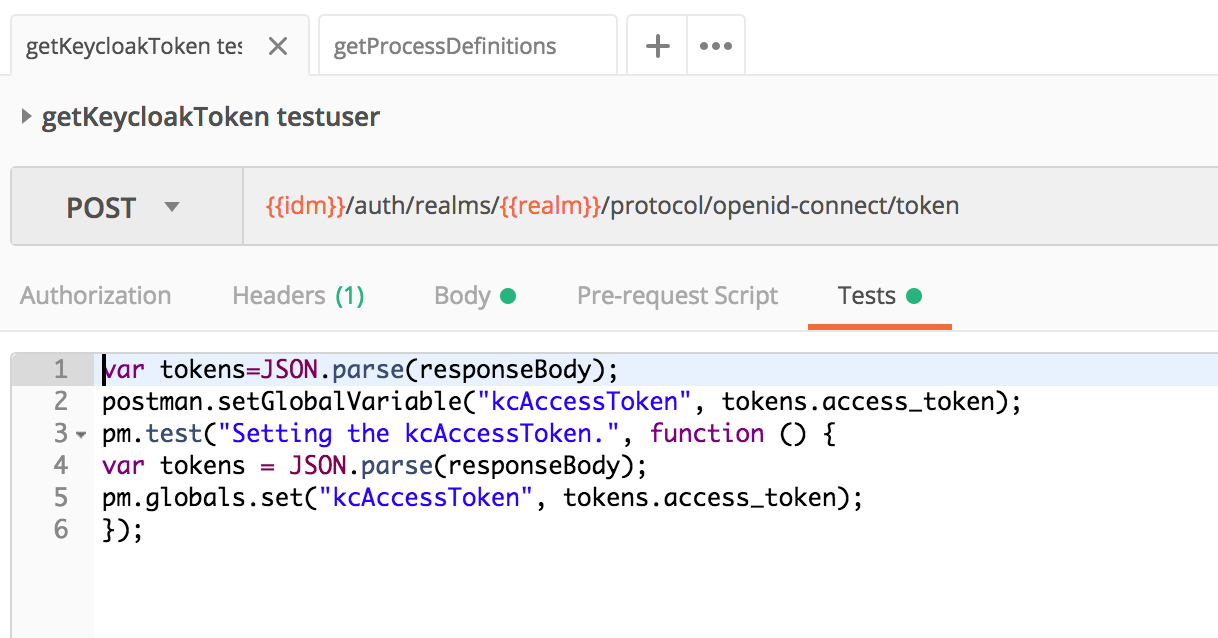
Note that this token is time sensitive and it will be automatically invalidated at some point, so you might need to request it again if you start getting unauthorised errors (you will see 401 Unauthorized errors to the right in the middle of the screen).
Once we get the token for a user we can interact with all the user endpoints. For example, we can invoke a ReST call to see what Process Definitions that are deployed inside our Example Runtime Bundle (rb-my-app/getProcessDefinitions):

Now, let’s start a process instance with one of the process definitions. If we look at the source code for the Example Runtime Bundle we can see that there are a number of process definitions deployed, such as:
- ConnectorProcess.bpmn20.xml - process with service task implemented as Cloud Connector
- SignalCatchEventProcess.bpmn20.xml - process that waits for event
- SignalThrowEventProcess.bpmn20.xml - process that sends message to external service, similar to service task
- Simple subprocess.bpmn20.xml - process with user task. Can be used as subprocess
- Subprocess Parent.bpmn20.xml - parent process with subprocess
- SimpleProcess.bpmn20.xml - simple process with user task
- SubProcessTest.fixSystemFailureProcess.bpmn20.xml - another process that shows subprocess usage
- processWithVariables.bpmn20.xml - process with user task and process variables
We will use the SimpleProcess that has one User task. To start a process instance based on this process definition we can use the startProcess Postman request that is in the rb-my-app folder. This request is defined as the {{gateway}}/rb-my-app/v1/process-instances POST ReST call. It is specifically targeting a Runtime Bundle identified by the /rb-my-app URL path:

Note the POST body, it specifies the processDefinitionKey as SimpleProcess to tell Activiti to start a process instance based on the latest version of the SimpleProcess definition.
Click the Send button (but make sure you have a valid access token first, otherwise you will see a 401 Unauthorized status). You should get a response with information about the new process instance:
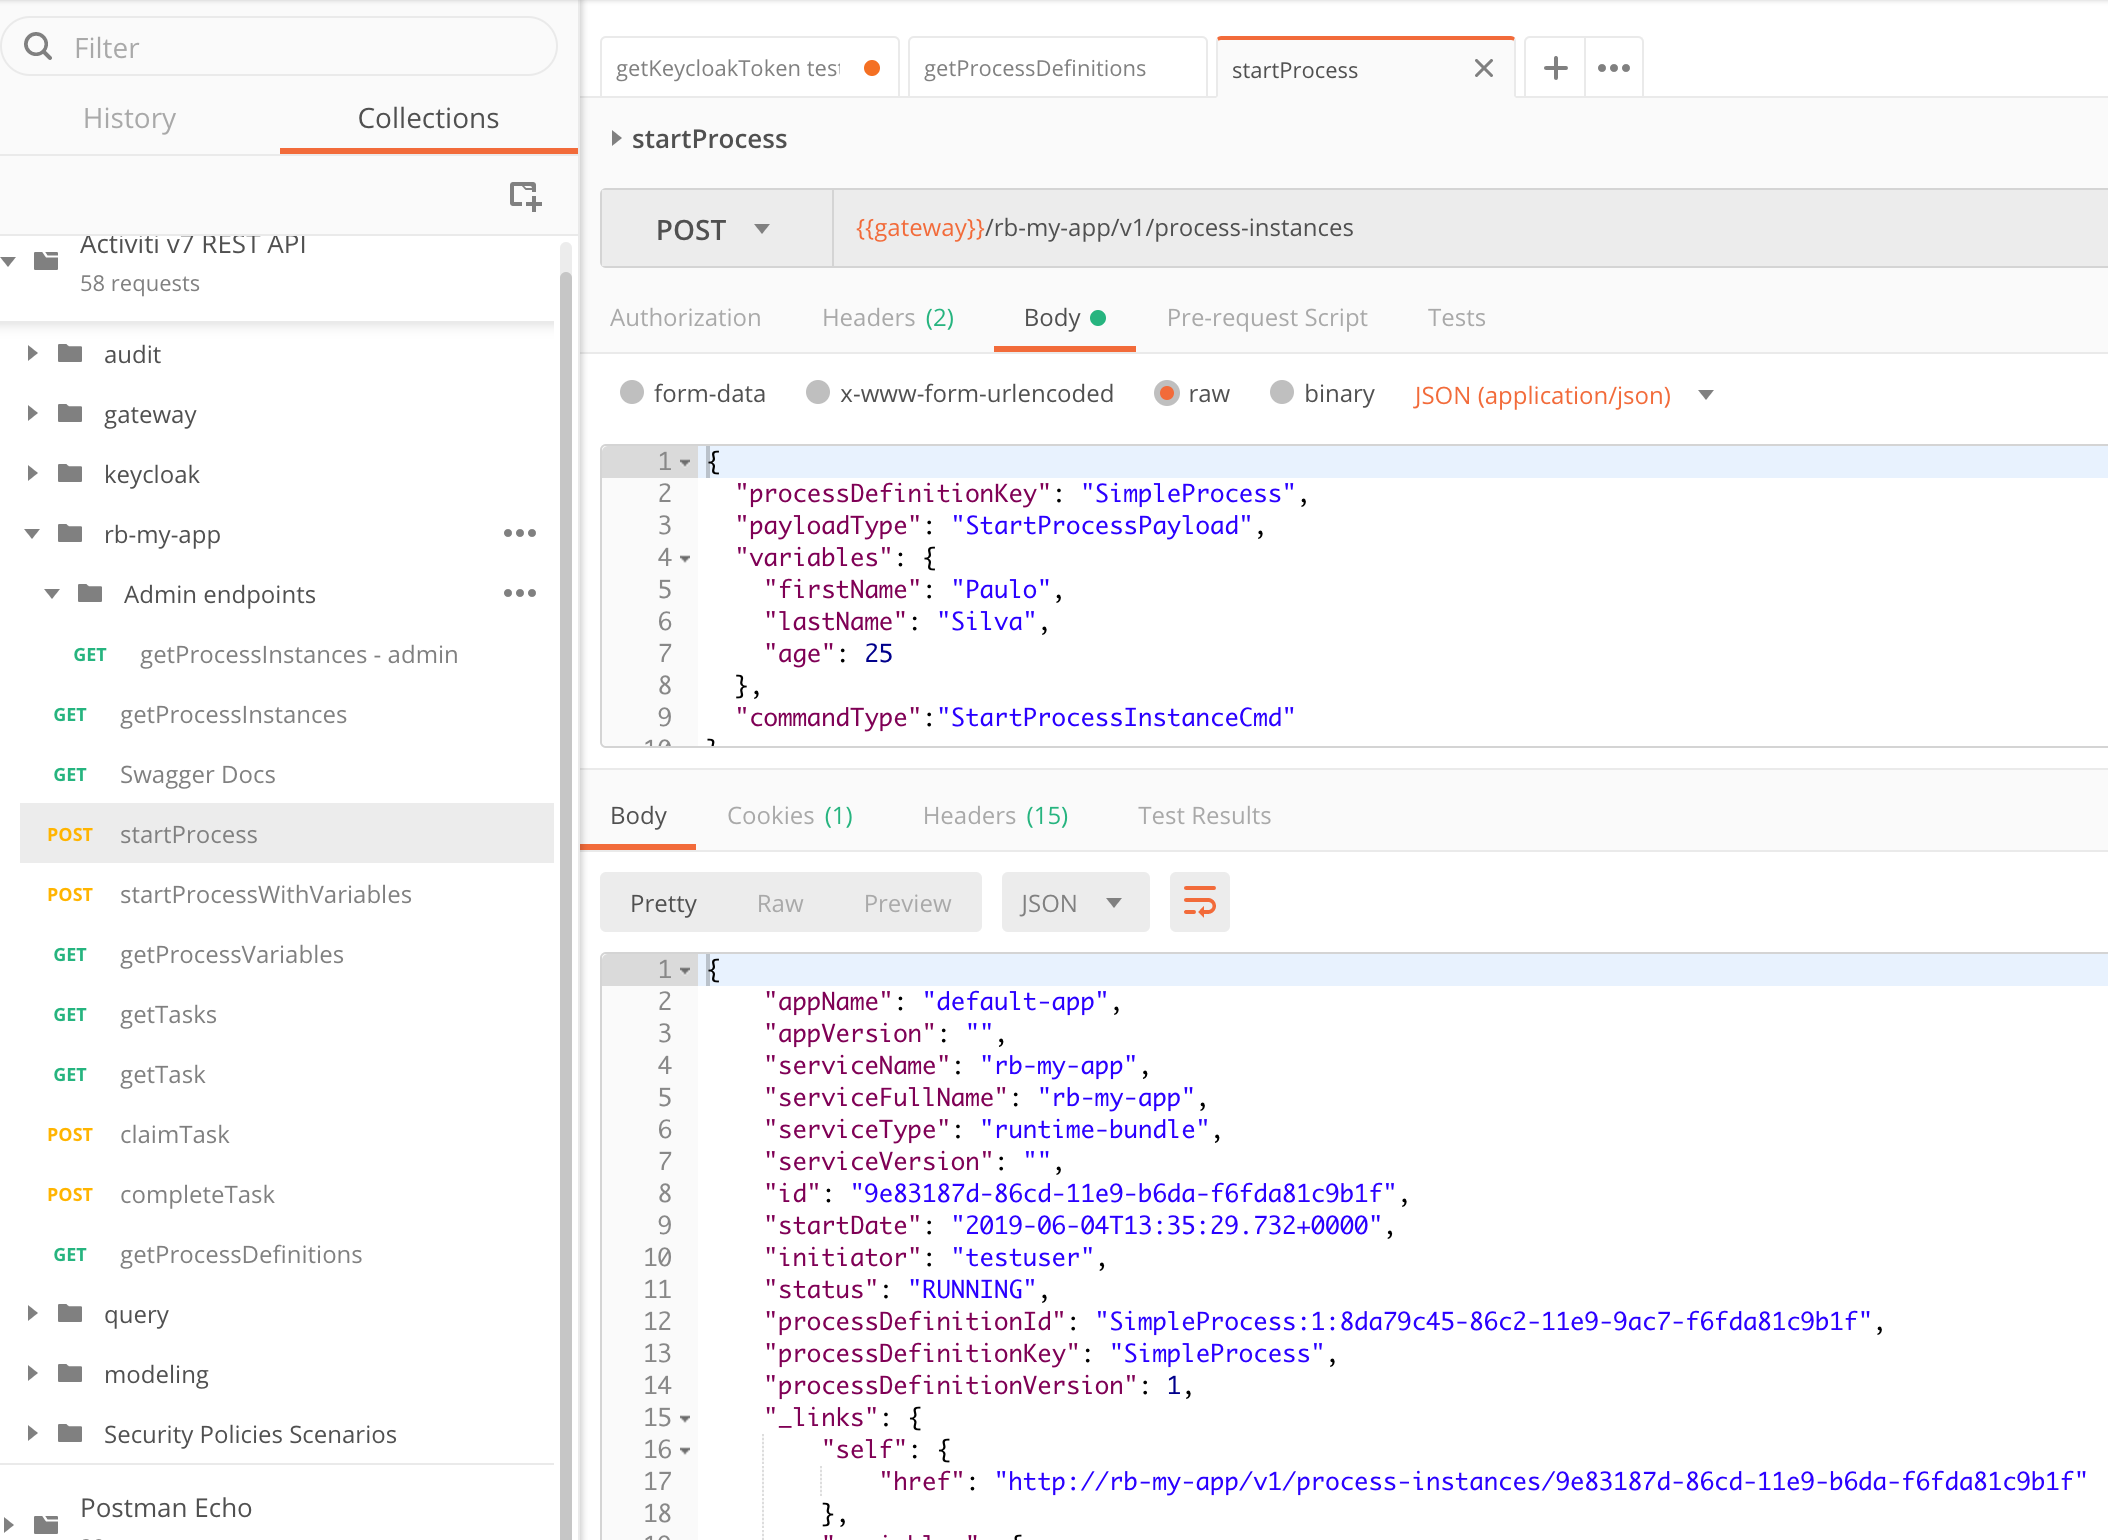
Next thing we would probably do is to list active tasks. We can do that with the getTasks request. It uses the {{gateway}}/rb-my-app/v1/tasks?page=0&size=10 URL, which is associated with the rb-my-app runtime bundle.
However, before we can do that we need to login with another user as the task definition in the SimpleProcess looks like this:
<userTask id="sid-CDFE7219-4627-43E9-8CA8-866CC38EBA94" name="Perform action" activiti:candidateGroups="hr">
...
</userTask>As we can see, the task is assigned to the hr candidate group. And our testuser is not part of that group. So we need to login with a user that is part of the hr group. We can login with getKeycloakToken hruser under the keycloak folder.
Now, after logging in as hruser, we should be able to run the getTasks request in the rb-my-app folder and see a response such as this:
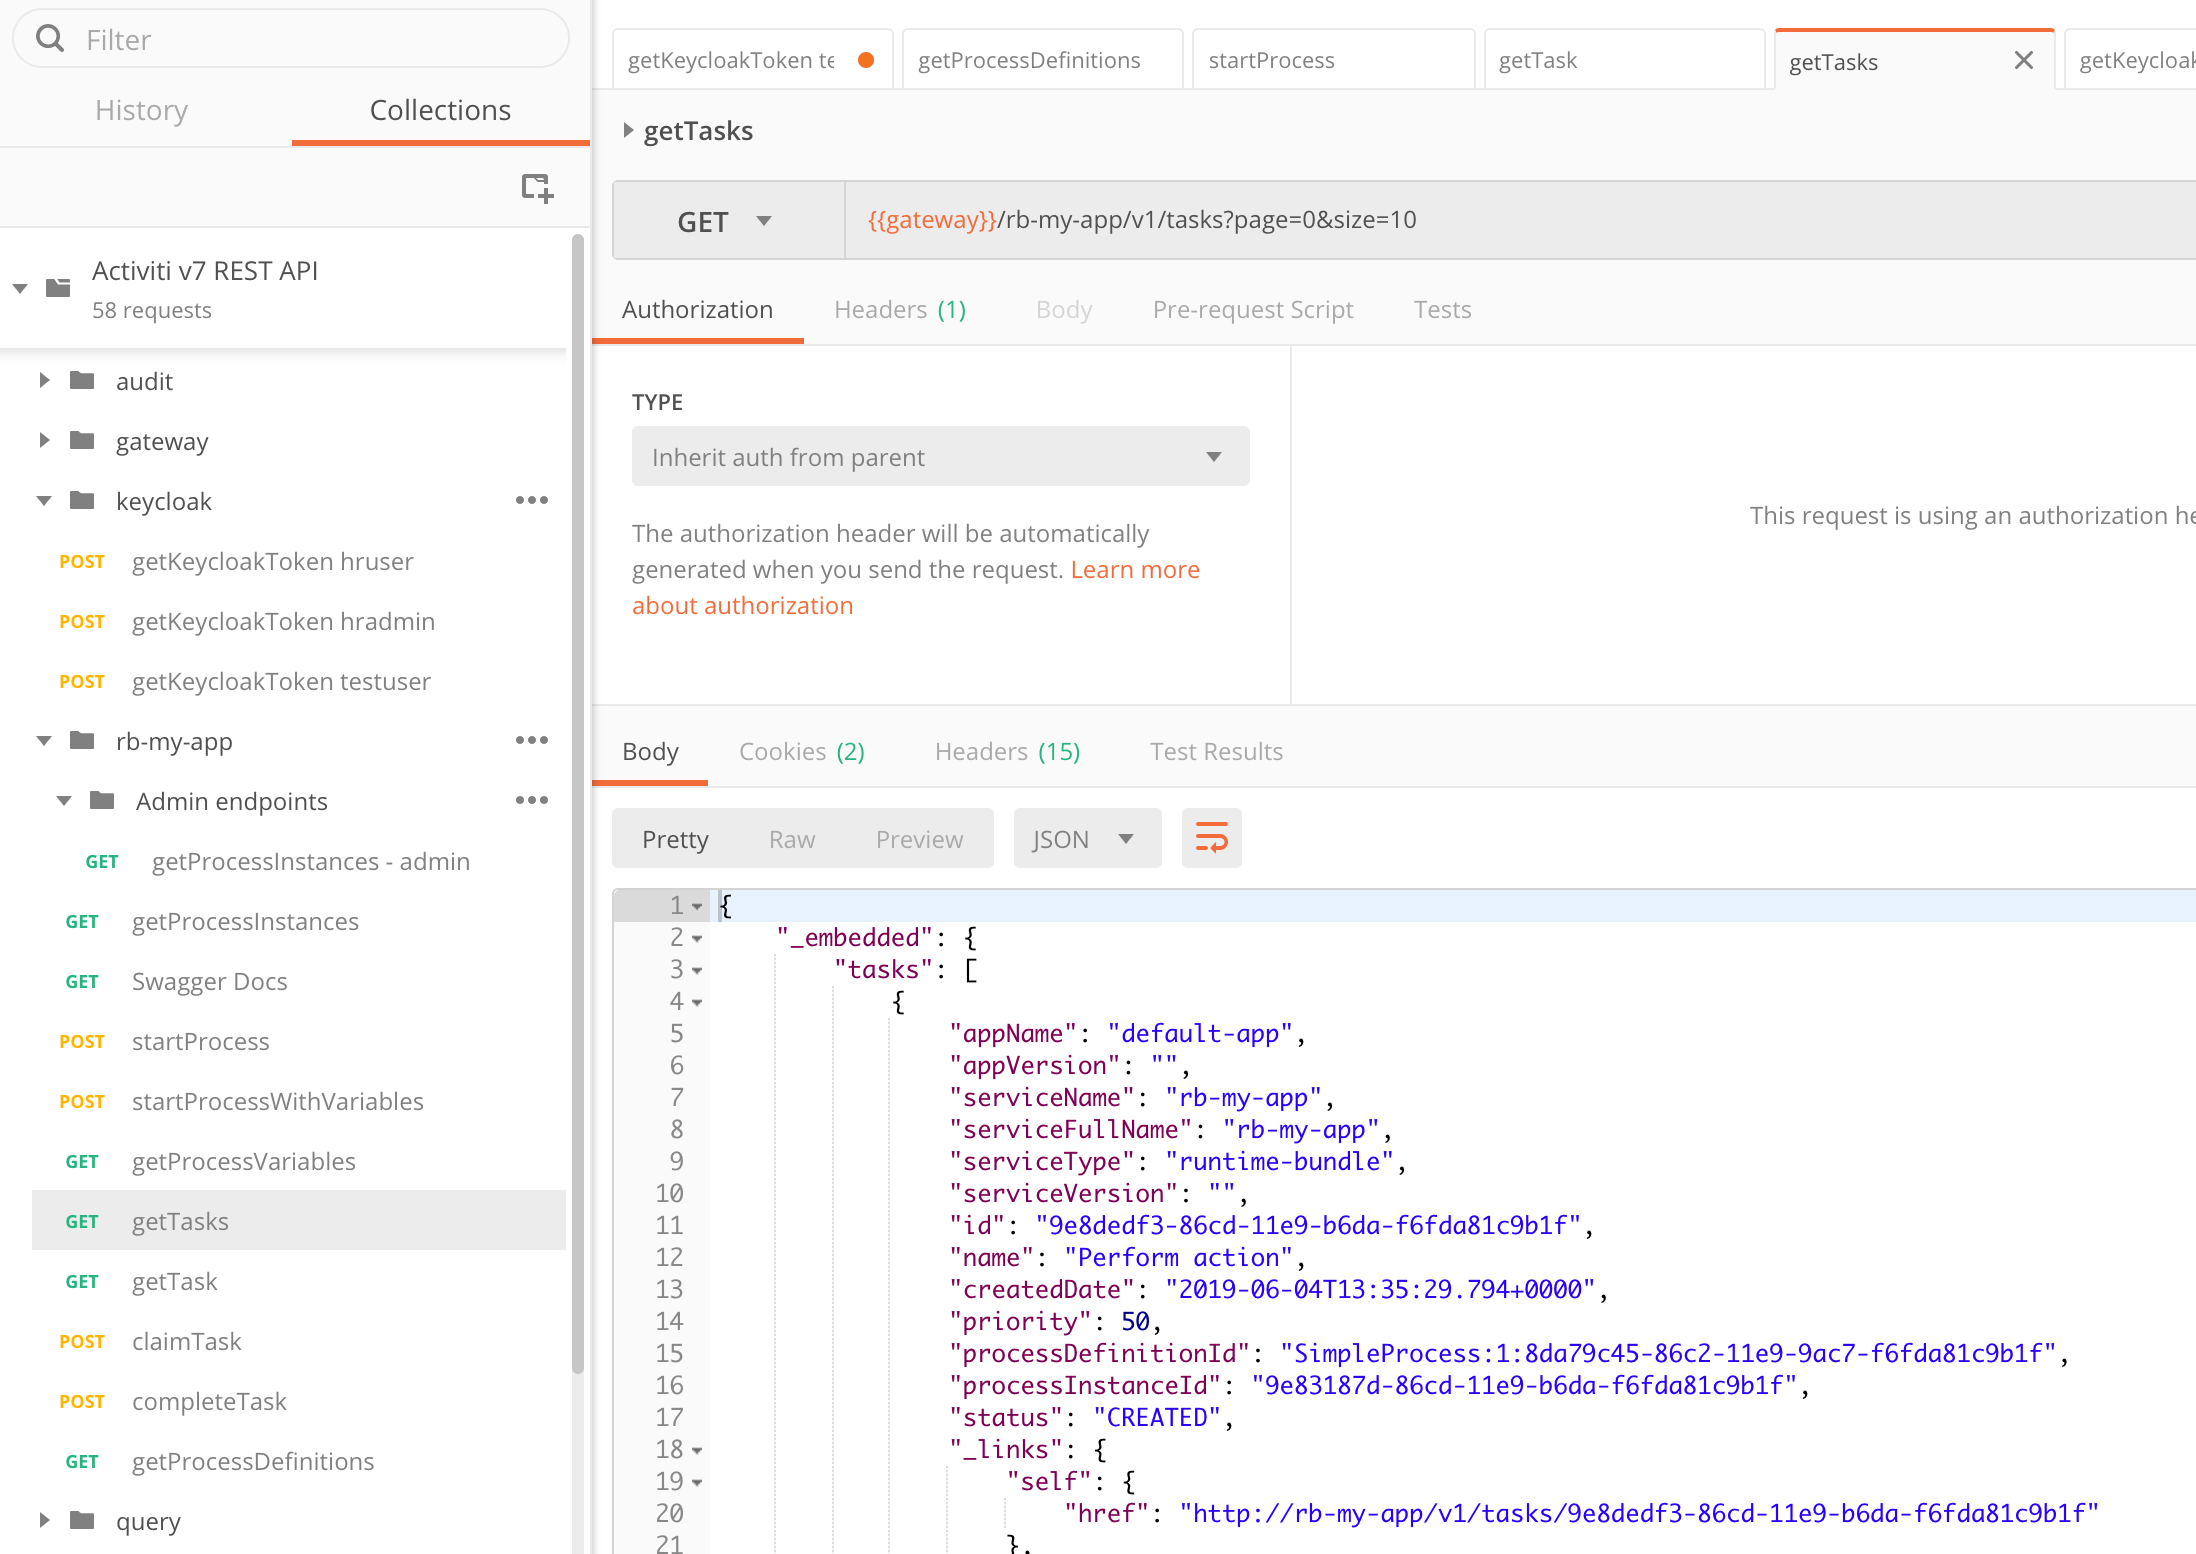
We can see the id of the task here and it is 9e8dedf3-86cd-11e9-b6da-f6fda81c9b1f. We should be able to use it to claim the task (we need to claim it before we can complete it as it is a pooled task). Use the claimTask POST request using the id to claim the task for the user:

Here I have updated the URL to {{gateway}}/rb-my-app/v1/tasks/9e8dedf3-86cd-11e9-b6da-f6fda81c9b1f/claim?assignee=hruser using the task id. The task is now assigned to the hruser and can be completed by that user using the completeTask request as follows:

Here I have also updated the URL to include the task id: {{gateway}}/rb-my-app/v1/tasks/9e8dedf3-86cd-11e9-b6da-f6fda81c9b1f/complete.
This concludes the interactive part where we talk to the runtime bundle via its ReST API. If you are wondering about how to get access to the complete ReST API without using Postman, then this can be achieved with the following URL: http://activiti-cloud-gateway.activiti7.10.250.22.233.nip.io/rb-my-app/swagger-ui.html:

You might also want to check out the Audit and Query services.
In the next article we will use the Activiti Modeler to define a custom Process Definition.
Blog posts and updates about Alfresco Process Services and Activiti.
- Activiti Cloud 7.1.0.M2 released!
- Alfresco Process Services SDK Maven Module
- Activiti Updates, Just in Time for Summer
- New OSS challenges ahead
- Activiti Cloud 7.1.0.M1 released!
- Activiti: Last week Dev Logs #87
- Activiti: Last week Dev Logs #86
- Activiti Cloud SR1 Released!
- Activiti: Last week Dev Logs #85
- Activiti: Last week Dev Logs #84
- Activiti: Last week Dev Logs #83
- Activiti Cloud 7.0.0.GA Released
- Activiti: Last week Dev Logs #82
- Activiti: Last week Dev Logs #81
- Activiti Cloud @ DevCon 2019
We use cookies on this site to enhance your user experience
By using this site, you are agreeing to allow us to collect and use cookies as outlined in Alfresco’s Cookie Statement and Terms of Use (and you have a legitimate interest in Alfresco and our products, authorizing us to contact you in such methods). If you are not ok with these terms, please do not use this website.
