Activiti Cloud & Jenkins X: Blueprint in AWS and GCE
- Alfresco Hub
- :
- APS & Activiti - Blog
- :
- Activiti Cloud & Jenkins X: Blueprint in AWS and ...
Activiti Cloud & Jenkins X: Blueprint in AWS and GCE
- Subscribe to RSS Feed
- Mark as New
- Mark as Read
- Bookmark
- Subscribe
- Printer Friendly Page
- Report Inappropriate Content

![]()
Hey there, on this blog post I wanted to touch base on using Activiti Cloud with Jenkins X. As mentioned in previous blog posts we wanted to make sure that Activiti Cloud provides the right tools for you to build, deploy and scale new Activiti Cloud Applications following standard practices around the technologies required to deploy to public clouds that uses Kubernetes.
Having automated pipelines which can:
- Build your domain specific project’s source code (Jar)
- Publish to Nexus (or Artifactory)
- Create a Docker Image
- Publish it to a docker registry
- Create a set of descriptors (kubernetes and helm charts) following industry best practices
- Publish these descriptors into a helm chart repository (Chart Museum)
- Promote/provision these projects into an environment (namespace in a running kubernetes cluster)
Sounds too way to complicated to build in-house and at the same time it sounds like a must if you really want to provide Continous Integration and Continuous Deployment (CI/CD) approach in a serious way. Luckily for us Jenkins X provide these and much more. It also validates the approach that we have adopted in Activiti Cloud, where we can build each individual piece in isolation and each of the pieces are designed to behave and operate in a cloud native way and promote and push forward our main objective of providing an industry standard and modern platform to build business applications in a fast an interactive way.
In order to test Jenkins X capabilities I’ve migrated our Activiti Cloud Blueprint to a set of individual repositories so we can benefit from Jenkins X conventions.
Getting Started / Installing JX
Because I was just starting with Jenkins X I needed to basically create a Kubernetes Cluster and install JX. This is quite an easy procedure if you have access to an AWS account to play with. Jenkins X CLI tools will use Kops to create and setup the cluster and install all the JenkinsX services in a Kubernetes namespace called “jx”.
So first of all download the JX CLI. I did that by using homebrew because I'm using Mac OSX:
brew tap jenkins-x/jx
brew install jx
Note: I evaluated the option of using MiniKube, but this is not even recommend in their docs. You can make it work, but it is unrealistic to try to run all jx services plus all your own services locally.
So first step was to get hold of some AWS credentials (aka aws_access_key_id and aws_secret_access_key). Once I got those I created a file called credentials with those values inside ~/.aws
If you take a look at JX docs, you will find that they recommend to go with the configurations provided in a Cloud9 workshop which is AWS IDE. I didn’t wanted to go in that direction for now, so I decided to configure the environment to just install JX.
At this point I executed:
jx create cluster aws -n=activiti-cloud
This downloaded the AWS SDK to my local environment but the installation failed because I needed to set some things first. One important thing to know is that Kops will use an S3 bucket to store the cluster state, so you need to create that bucket first, and you can do this with a very simple command as soon as you have the AWS SDK installed with the right credentials:
export S3_BUCKET=kops-state-store-$(cat /dev/urandom | LC_ALL=C tr -dc "[:alpha:]" | tr '[:upper:]' '[:lower:]' | head -c 32)
export KOPS_STATE_STORE=s3://${S3_BUCKET}
aws s3 mb $KOPS_STATE_STORE
aws s3api put-bucket-versioning --bucket $S3_BUCKET --versioning-configuration Status=Enabled
This basically do 3 things:
- Create an S3 Bucket with a random ID at the end of the name kops-state-store-<random>
- Exports a variable called KOPS_STATE_STORE to be used by KOPS
- Create an S3 bucket with that name
- Enable versioning in the bucket
Next you need to select in which availability zone you want to use to set up your cluster, you should obviously choose the one that is close to your location from the AWS Web Console, then I used the following line to export in an environment variable the available Availability Zones from my account:
export AWS_AVAILABILITY_ZONES="$(aws ec2 describe-availability-zones --query 'AvailabilityZones[].ZoneName' --output text | awk -v OFS="," '$1=$1')"
After this, you should be able to execute again:
jx create cluster aws -n=activiti-cloud
While this is running you can check in your EC2 Section inside AWS Web Console how your cluster is being created and how your nodes are being restarted as part of the set up.
Once this is done, congrats your cluster is app and it has Jenkins X inside and you CLI is configure to work with it.
Some important things that happens during the installation:
- It install AWS SDK, HELM and KOPS
- Configure a token to work with a GitHub account
- It creates two repositories in your GitHub account to configure the staging and production environments. Jenkins X treats these environments following the principles of dealing with infrastructure as code (GitOps), so these repositories will contain everything you need to recreate, rollback or upgrade these environment from the scratch
- Jenkins X by default install the following services inside the “jx” namespace (also referred as dev environment):
- Jenkins
- Nexus
- Docker Registry
- ChartMuseum and UI
- Create two more namespaces called jx-staging and jx-production and setup all the web hooks needed to monitor these repositories for changes and trigger the correspondent pipelines to apply changes to these environments
- It uses nip.io to bind the AWS external URL to <service>.jenkins.jx.<IP>.nip.io
At the end of the installation it prints out the password for the admin user. Make sure that you keep copy it and keep it safe somewhere.
Troubleshooting
Some things that might become handy to know:
- You can of course delete the cluster and restart again if things goes wrong, for doing that you can use kops:
kops delete cluster <name> --state=s3://kops-state-store-<random> --yes
Notice that this is really time consuming and there is no need to delete the cluster unless you want to change something from the cluster itself
- If you want completely uninstall Jenkins X you can run:
helm delete jenkins-x --debug --no-hooks --purge
- The jx uninstall command does something similar but it leaves the environments jx-staging and jx-production intact, it only uninstall services from the jx namespace
Activiti Cloud Blueprint Demo
As mentioned in the introduction the source code of each different service inside our Trending Topics Campaigns BluePrint was now refactored out to individual repositories prefixed by ttc-* inside the http://github.com/Activiti/organization in GitHub.

A quick recap of our BluePrint: Trending Topic Campaigns:

As you might remember (link) we had a global marketing company creating campaigns based on Trending Topics. They need to be quick and react fast on the current trending topics on different social media streams in order to promote their customers’ products. Different departments all over the world might be creating campaigns at the same time not only based on the Twitter feed, other social media feeds can be plugged into the infrastructure, so we need to make sure that our solution scale to support those requirements.
The following video shows how you can import these projects into JenkinsX and how to customise the Staging Environment to provide some of the infrastructural service required for the services to interact between each other, such as RabbitMQ and PostgreSQL to store the Campaign’s Process Runtime state.
One configuration step that is required until you can consume Activiti Cloud artifacts from Maven Central is to add into JenkinsX nexus the Alfresco Snapshot Repository. In order to do that you can do:
- jx get urls (in the dev environment, by doing jx env dev)
- Open in your browser the Nexus url
- Login with admin and your password, generated by jenkinsX during installation
- Go to repositories
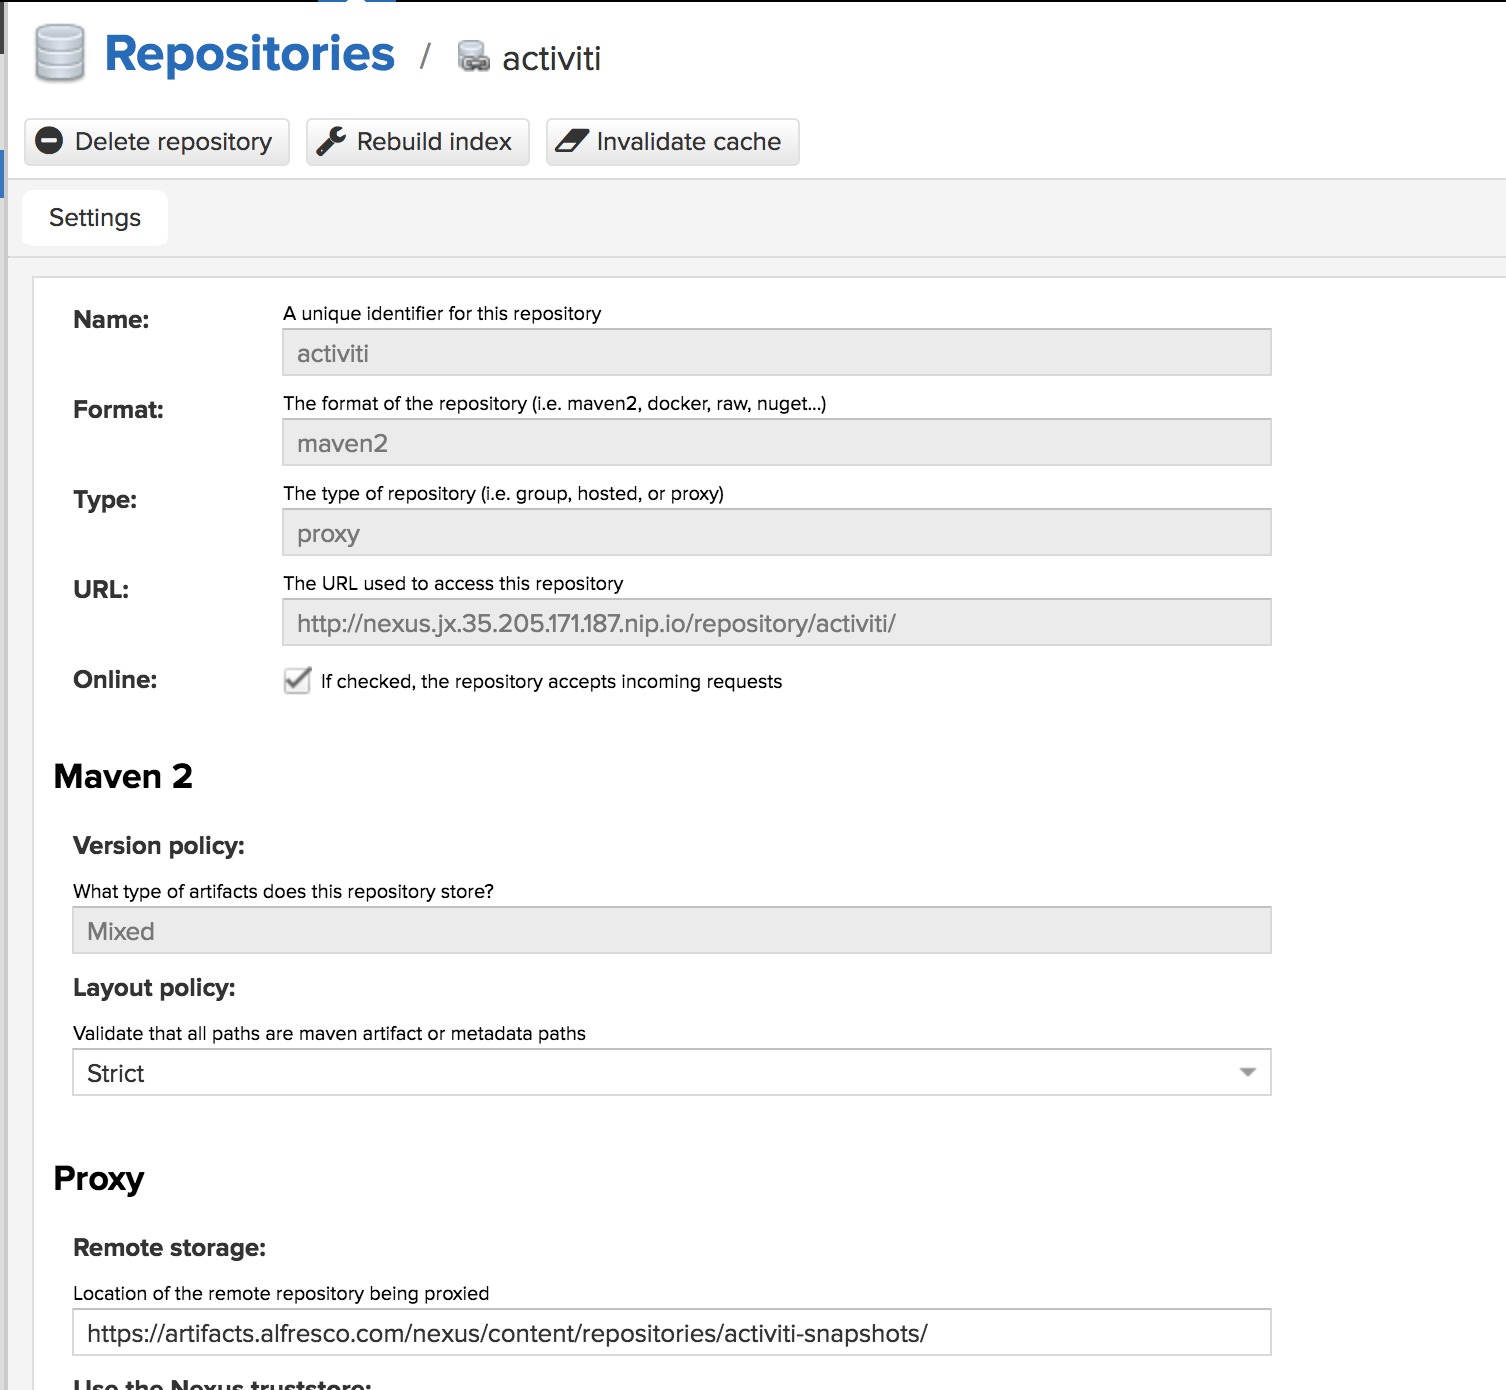
- Create new maven2 proxy
- enter the name: Activiti
- change version policy from Release to Mixed
- and add our snapshots repository: https://artifacts.alfresco.com/nexus/content/repositories/activiti-snapshots/
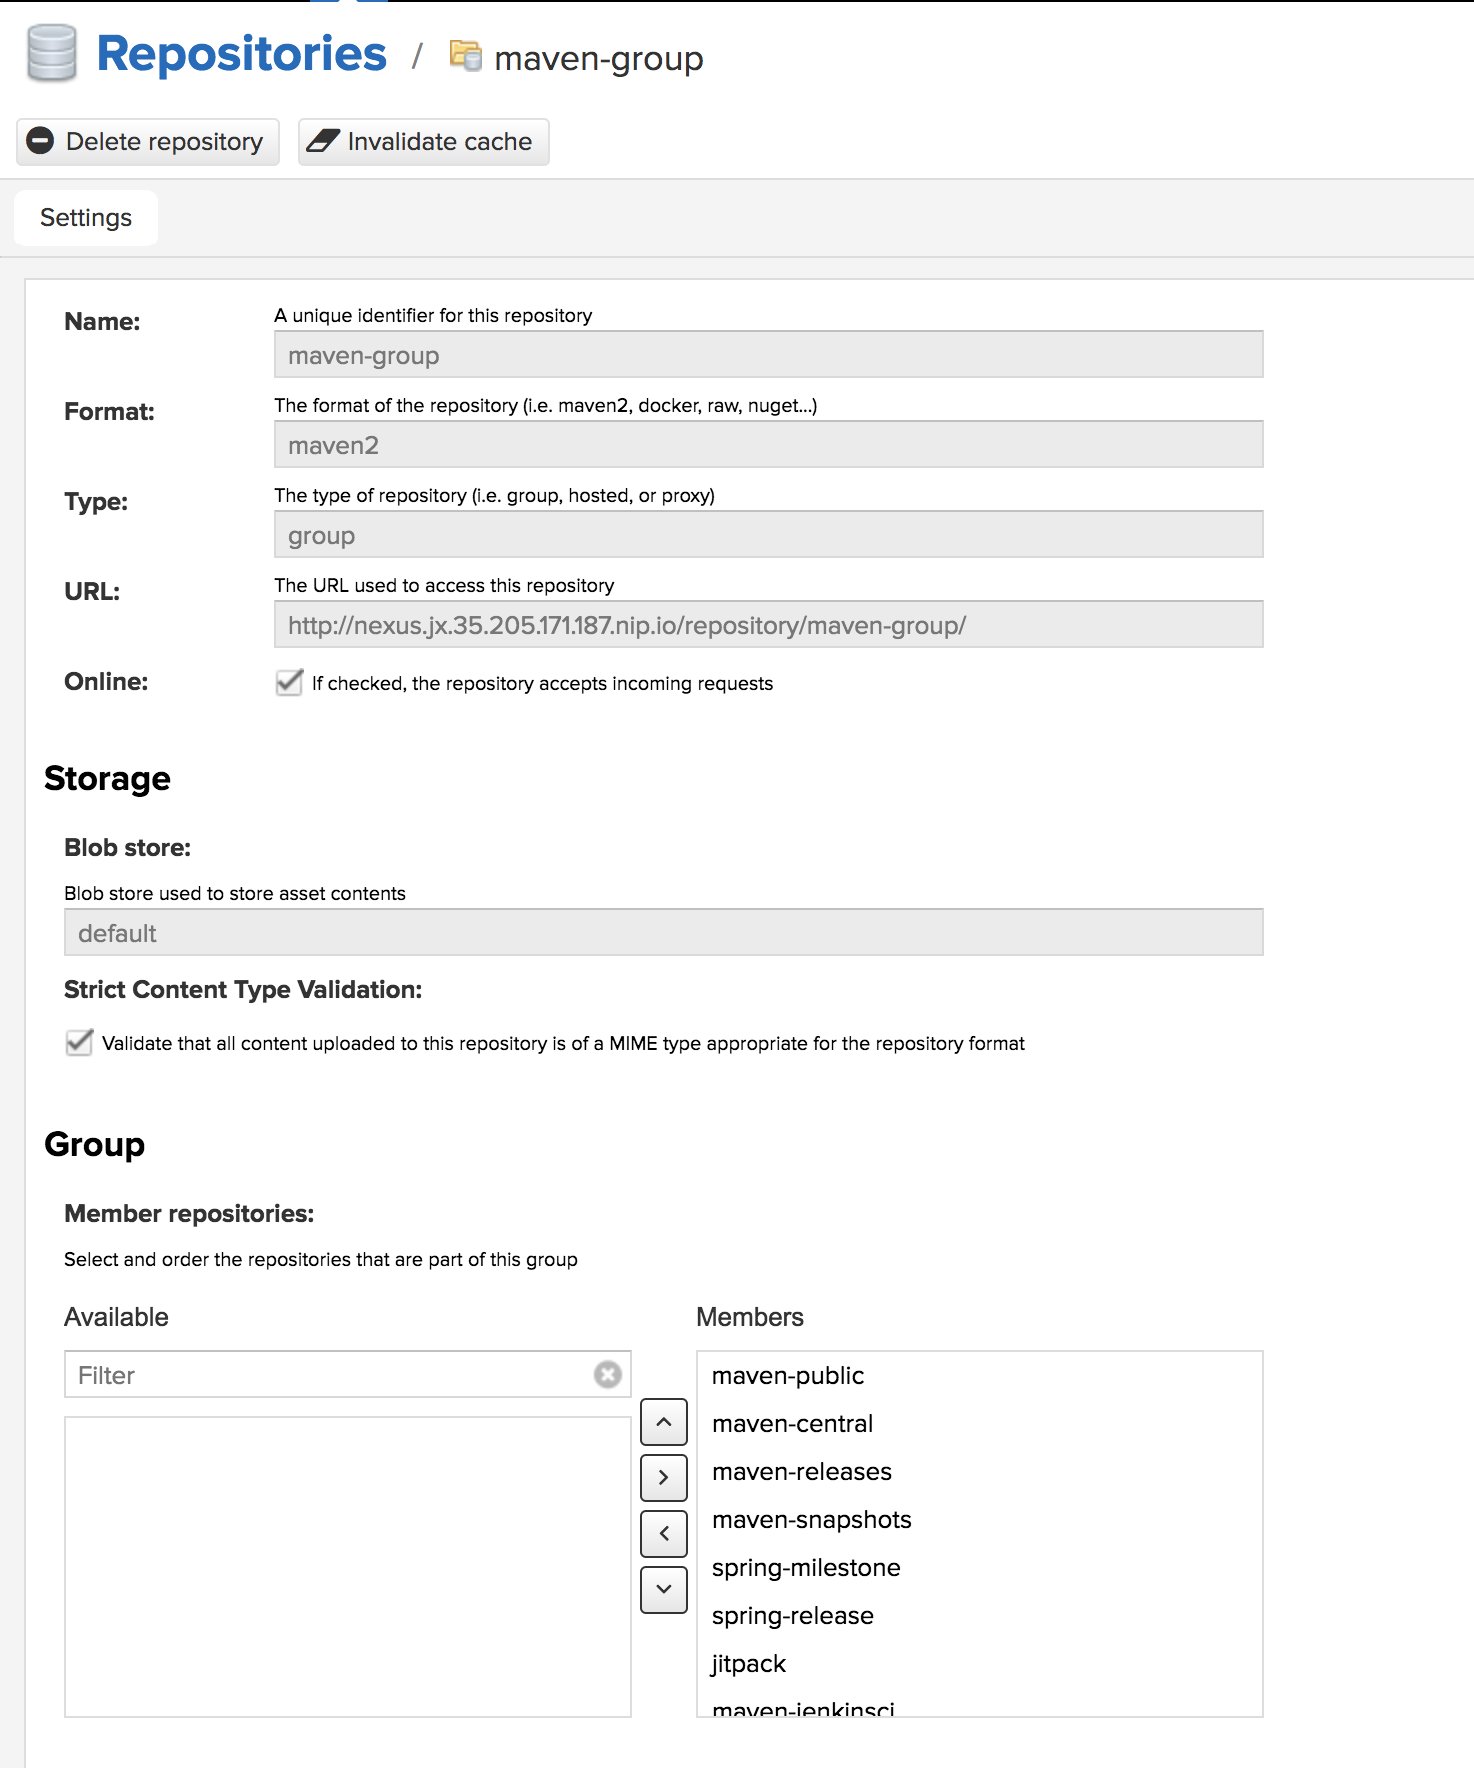
- Go back to the repository list and edit the one called maven group
- Make sure that the Activiti repository belongs to the member repositories (meaning that it needs to be on the column of the right, by default when you create a new one is not inside the group).


Conclusions
I’m quite excited to see how easy is becoming to get an Activiti Cloud Application running in a Cloud Native way on top of Kubernetes which is running in a real AWS and GCE cluster. Even if it is still quite early in the journey we can clearly see all the advantages of having these pipelines set up and managing how the changes are applied into each of our services. It also make it dead simple to add new campaigns, so we look forward to have this application running in a continuous deployment approach to test our Beta and future releases.
If you are interested in these projects and want to participate in our community get in touch, we look forward to improve this BluePrint to exemplify the most common patterns that you will find in real life scenarios, while we keep improving what Activiti Cloud can do to make business automation modern and as easy as possible.
Feel free to join us in our
Blog posts and updates about Alfresco Process Services and Activiti.
- Activiti Cloud 7.1.0.M2 released!
- Alfresco Process Services SDK Maven Module
- Activiti Updates, Just in Time for Summer
- New OSS challenges ahead
- Activiti Cloud 7.1.0.M1 released!
- Activiti: Last week Dev Logs #87
- Activiti: Last week Dev Logs #86
- Activiti Cloud SR1 Released!
- Activiti: Last week Dev Logs #85
- Activiti: Last week Dev Logs #84
- Activiti: Last week Dev Logs #83
- Activiti Cloud 7.0.0.GA Released
- Activiti: Last week Dev Logs #82
- Activiti: Last week Dev Logs #81
- Activiti Cloud @ DevCon 2019
We use cookies on this site to enhance your user experience
By using this site, you are agreeing to allow us to collect and use cookies as outlined in Alfresco’s Cookie Statement and Terms of Use (and you have a legitimate interest in Alfresco and our products, authorizing us to contact you in such methods). If you are not ok with these terms, please do not use this website.
