CI/CD Example for Alfresco Process Services Applications
- Alfresco Hub
- :
- APS & Activiti - Blog
- :
- CI/CD Example for Alfresco Process Services Applic...
CI/CD Example for Alfresco Process Services Applications
- Subscribe to RSS Feed
- Mark as New
- Mark as Read
- Bookmark
- Subscribe
- Printer Friendly Page
- Report Inappropriate Content
The aim of this blog post is to show a working CI/CD example for managing process applications built using Alfresco Process Services (APS) powered by Activiti. Please note that the selection of the tools that are used in this article is my personal choice from an ever growing list of open source tools in this area! You should be able to swap one or more of these with your preferred tools/technologies. Similarly, things like release steps, versioning etc which I used in this article is just one way of doing it. I understand that every organization/team have their own established standard release processes. Again, the idea is you should be able to adjust the process to suit your needs!
CI/CD Process Steps
A typical CI/CD process for process applications built using Alfresco Process Services (APS) involves the following steps.
- Develop processes, forms, decision tables, data models, stencil etc. in the APS Web UI (App Designer)
- Group everything to an "App" and export the app.
- Create a java project using your IDE and write custom java extensions and delegates that are used by the process
- Add the exported app package into to the java project
- Write unit tests against the BPMN xml(s) available in the app package
- Configure the project to build an app.zip and app.jar upon build & package
- Add the java project to a version control repository
- Integrate the project in version control repository with an automation server and continuously build and unit test upon changes
- Version and upload the packages (zip and jar) built by the automation server job to an artifact repository.
- Download and deploy the versioned components from artifact repository to higher environments.
- Run any automated system integration tests that you may have after deployment.
DevOps Tools Used
The tools used in this example are:
- Jenkins - a leading open-source automation server
- JFrog Artifactory - open-source artifact repository manager
- GitHub - popular web based Git version control repository
- Ansible - open-source deployment automation engine
- Apache Maven - open-source software project management tool (used for dependency management & packaging in this demo)
Component Diagram

Configuration Details
Sample Process Project (GitHub)
The first step in the demo is to create a simple process application in Alfresco Process Services. It is assumed that you are familiar with this step. If not, please refer to Get started with APS or APS User Guide. Once a process and associated components are built in the APS web modeler, group everything to an "App" and export the “App” archive. As the next step, we will save the process app components to GitHub. Please refer to GitHub: super-cool-process-app for a sample maven project structure. The process models and associated components we modeled in the web modeler are stored in this directory. The pom.xml of this project is configured to build the following two artifacts upon packaging.
- app.jar file - this will include all the custom java extensions that you may have to support the processes in the app.
- app.zip - this is just a zip archive of the app content models built using the maven assembly plugin.
Note: If you notice this project, the unit tests and java classes in this project are just some empty classes and not really related to process testing or process java delegates! The reason is, I just wanted to focus on the whole lifecycle in this article rather than focussing on the technical aspects. Check out the following two blogs where I have covered unit testing of APS applications in great depth
JFrog Artifactory Configuration
Artifactory is used for the resolving dependencies (including remote artifacts) at build & test time and also to store the output of each build (jar, app.zip and build info). Download and install Artifactory if you don’t already have one running. Once Artifactory is installed and running, we will do the following configuration.
In order to build an APS maven project, you would need to access the Alfresco Nexus Repo. I like to keep all such remote repository information at one place and just use one url to download all my dependencies rather than including various repository informations in pom files, maven settings files etc. To do this in Artifactory we can first create a remote repo in Artifactory pointing it to Alfresco Enterprise Repo and then add this remote repo to a virtual repo in Artifactory.
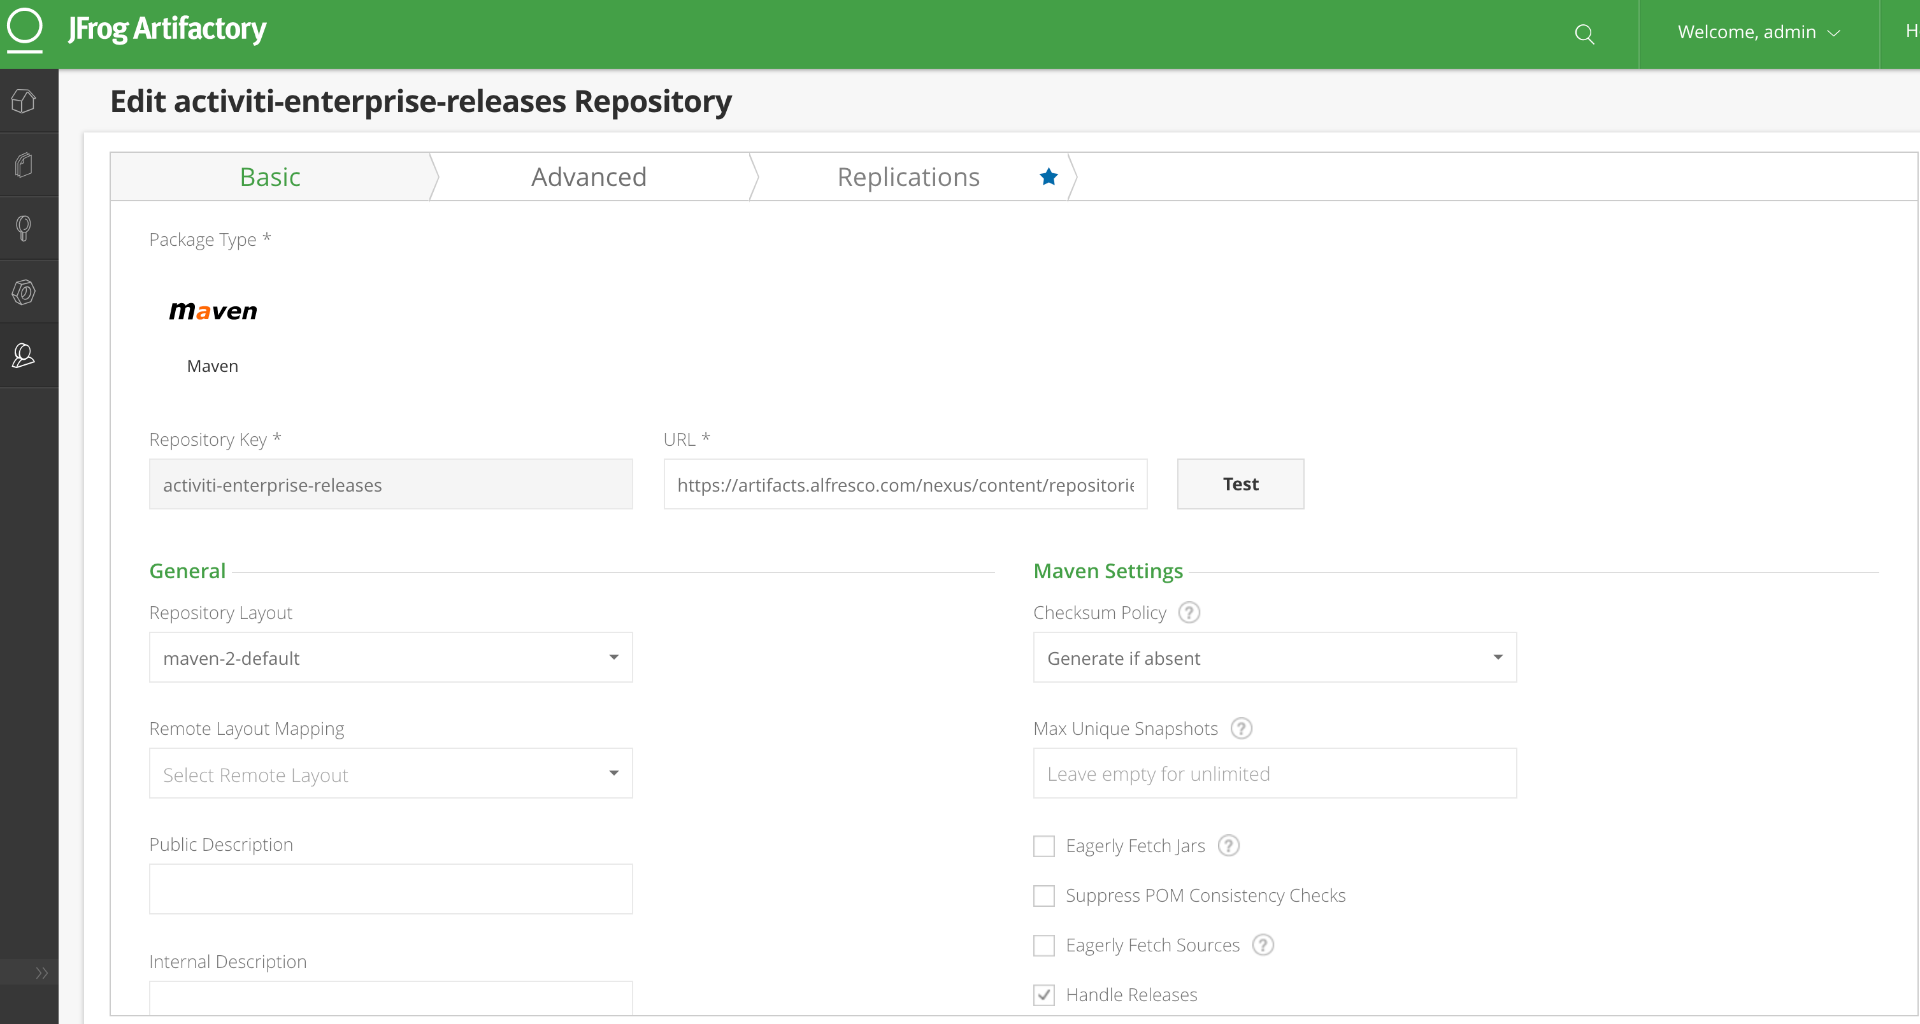
Creation of Remote Repository in Artifactory
- Repository Key: activiti-enterprise-releases
- URL: Use the alfresco enterprise repo url
- Advanced -> Username/Password: use your alfresco nexus repo credentials
Please refer Artifactory Remote Repositories for more details on remote repositories.

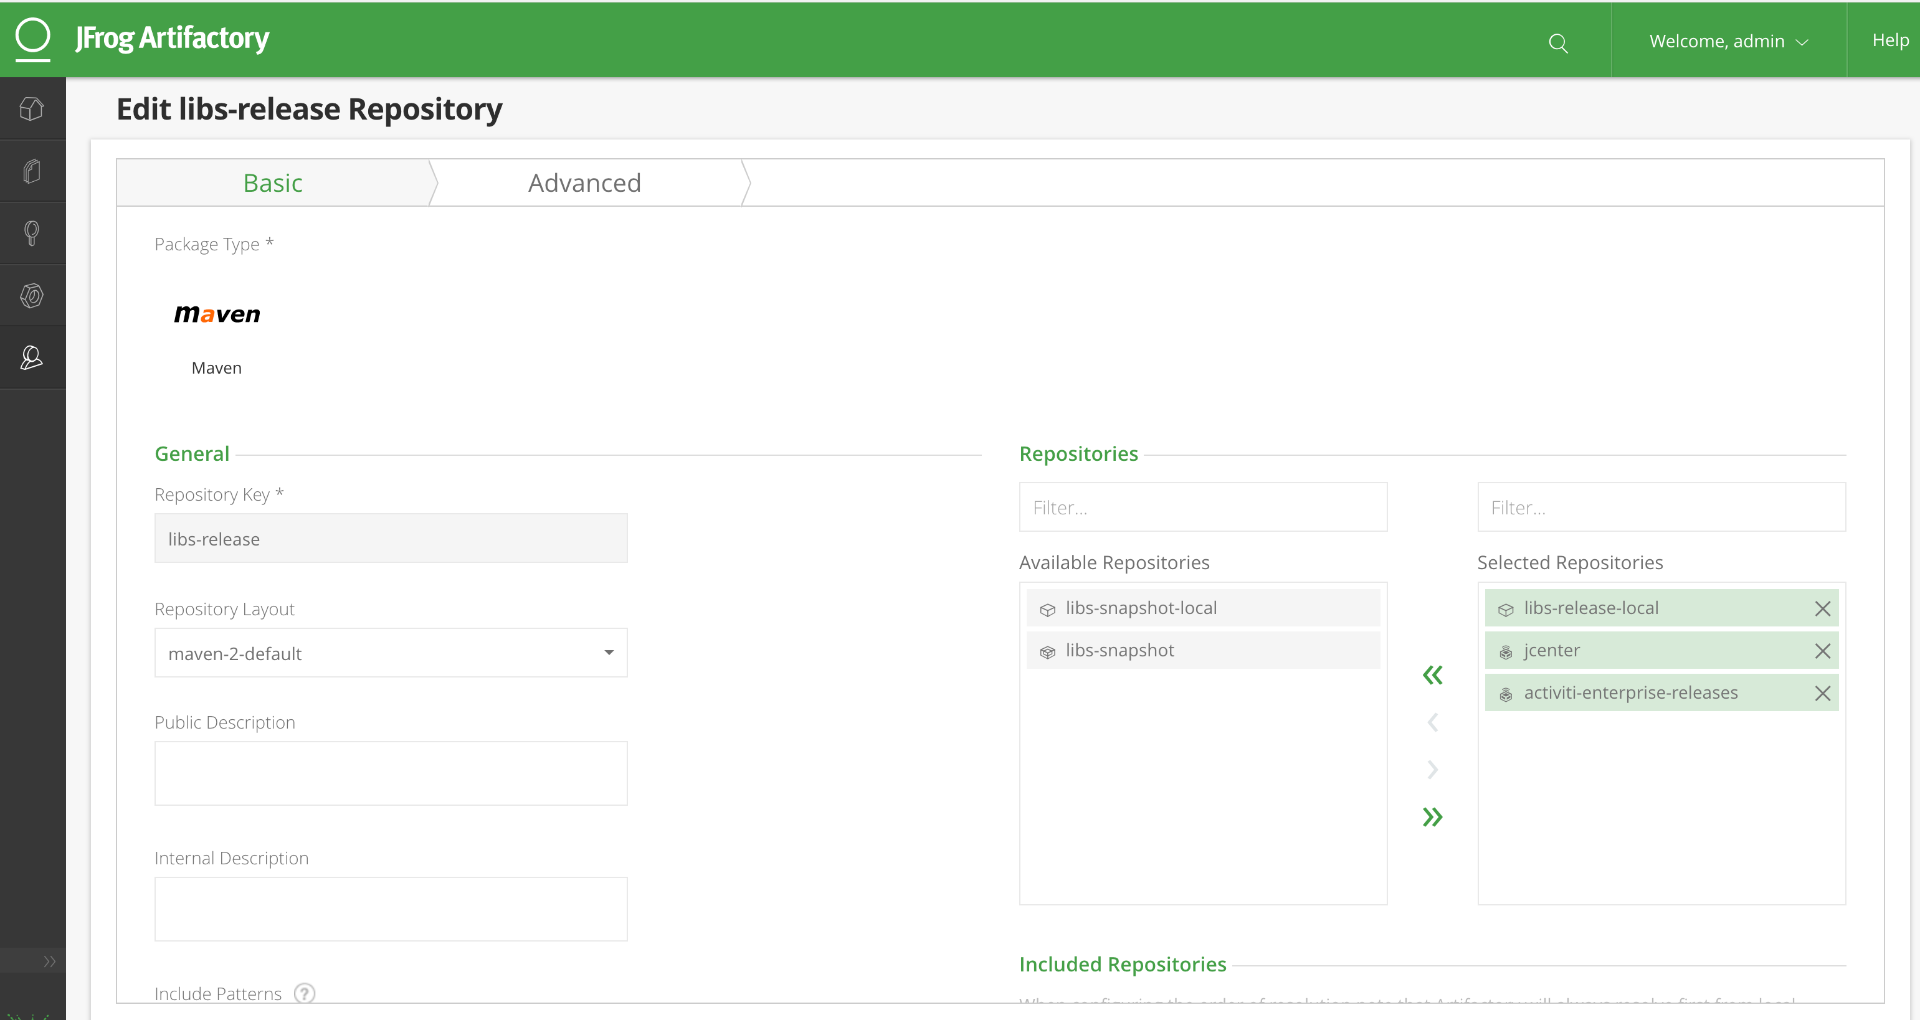
Add Remote Repository to Virtual Repository in Artifactory
Now add the newly created remote repo to the default virtual release repo (named “libs-release”). Please refer Artifactory Virtual Repositories for more details on virtual repositories.

Ansible Scripts
Ansible is a very simple but powerful tool that can help you automate your application deployment steps! If you are not familiar with Ansible, I recommend you to check it out at https://www.ansible.com/. A typical APS process application deployment involves the deployment of two types of artifacts:
- Process application archive (containing process models, form models, decision tables, data models and stencils)
- A jar file containing the dependant java extensions and customizations
The Ansible scripts (Ansible Playbook) that I used to automate the deployment of above artifacts are:
- app-deployment playbook - deploys the process application archive using the deployment REST APIs of APS. Note: Since this deployment is saving the models to the Process Engine database, no need to run this playbook on all nodes in a cluster. So you can just run this against one node in the cluster or against a load balancer url.
- jar-deployment playbook - deploys/copies the process application jar file to tomcat/webapps/activiti-app/WEB-INF/lib and also deletes any old version of the same jar file. This step needs to be run on all nodes in the APS cluster if you have a clustered deployment. Things that are not covered in the playbook are:
- Custom property file deployments - it is also common to have property files per environment that are associated with your jar files.
- Restart of app server, waiting for the server to come back up, making an api call to make sure the app is up and running etc - After the jar/property file deployment, a restart is often recommended. You should be able to add those steps into your Ansible Playbooks.
Jenkins Configuration
Jenkins can be deployed in a number of ways, please refer jenkins-download for details. Once it is installed, open the Web UI of Jenkins and install the following plugins which we would be using in this demo (Jenkins -> Manage Jenkins -> Manage Plugins)
Please refer to the respective documentation for the configuration of the plugins. Once all the plugins are correctly configured, let’s create the build and deployment jobs in Jenkins that will pull the above mentioned sample code from GitHub, creates deployable artifacts and deploys the code to target environments. We’ll be creating the following two jobs:
- Build Job: The Jenkins job responsible for testing, building, publishing the build to Artifactory and triggering the deployment job after a successful build. Instructions on creating this job below:
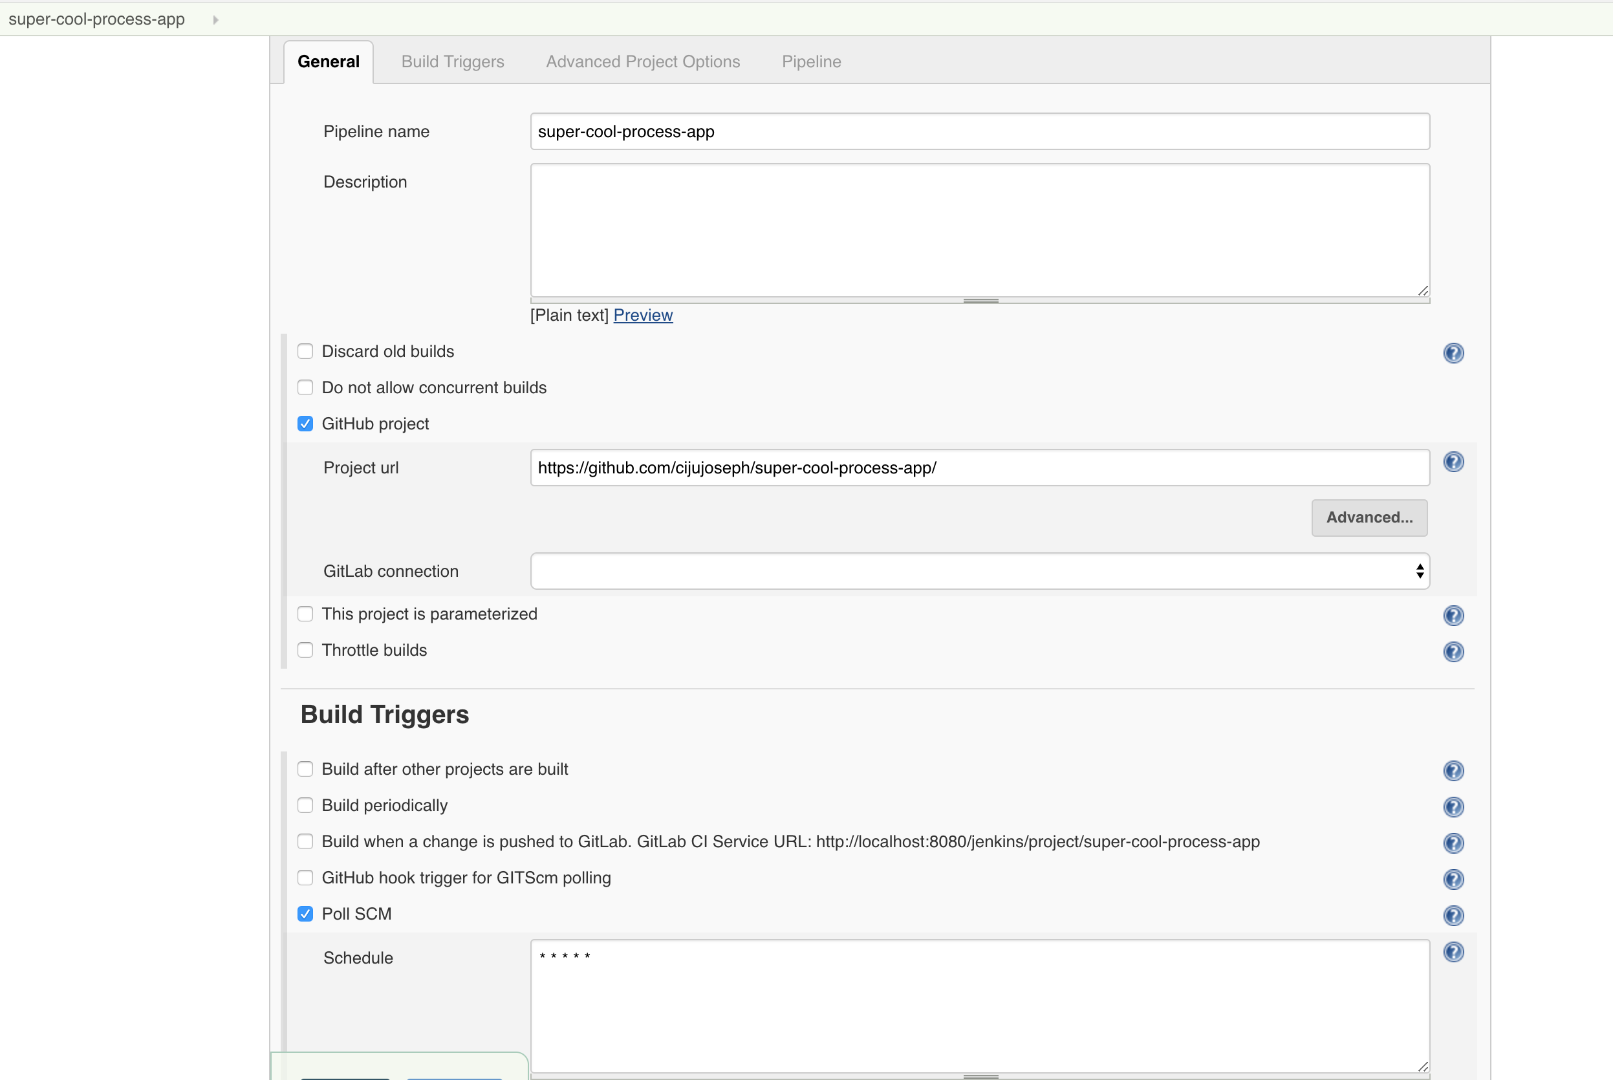
- Jenkins -> New Item -> Select “Pipeline” type and give it a name. Eg: “super-cool-process-app” in this demo
- GitHub project -> Project url -> https://github.com/cijujoseph/super-cool-process-app/
- You can configure various build triggers. For this example, I elected to do a poll every minute against GitHub. Poll SCM -> Schedule -> * * * * *
- Now we will create a pipeline script as shown in pipeline-script-file. The pipeline is split to 5 stages:
- Clone - clone the project from GitHub
- Test - maven based testing which will execute all the unit tests in the project
- Artifactory config - configuration of Artifactory repo using the artifactory plugin. Various examples of this can be found at artifactory-project-examples
- Package and publish to Artifactory - this step will package and publish the build artifacts to Artifactory
- Kick off deployment - this step will kick off the downstream deployment job explained in next section
Screenshots of this config shown below:


- Deploy Job: This job takes care of the deployment of artifacts built in the previous “Build Job” using the above mentioned Ansible Playbooks. Instructions on creating this job below:
- Jenkins -> New Item -> Select “FreeStyle” type and give it a name. Eg: super-cool-process-app-deploy (this name is used in the previous pipeline script in the last stage (“Start Deployment Job”)
- Check (tick) the “This project is parameterized” checkbox to configure some input parameters for this job. This is because, the Ansible Playbooks I wrote is generic and can work for any process application. Hence it requires few input variables to correctly identify the artifact that is deployed.
- APP_NAME: Default value is set to the name of the process application. in the case “Super Cool App”
- ARTIFACT_NAME: Default value is set to the name of the artifact (maven project). In this case “super-cool-process-app”
- ARTIFACT_VERSION: We don’t set any default value. The value for this parameter will be passed when this job is triggered. For example: if triggered from a build job, pass the build version. If triggered manually, enter manually via UI.
- The next item “Source Code Management” is configured to point to the GitHub repository where I saved the Ansible Playbooks. Git -> Repositories -> Repository URL -> https://github.com/cijujoseph/aps-process-app-devops
- Build Environment -> Check the box “Delete workspace before build starts”
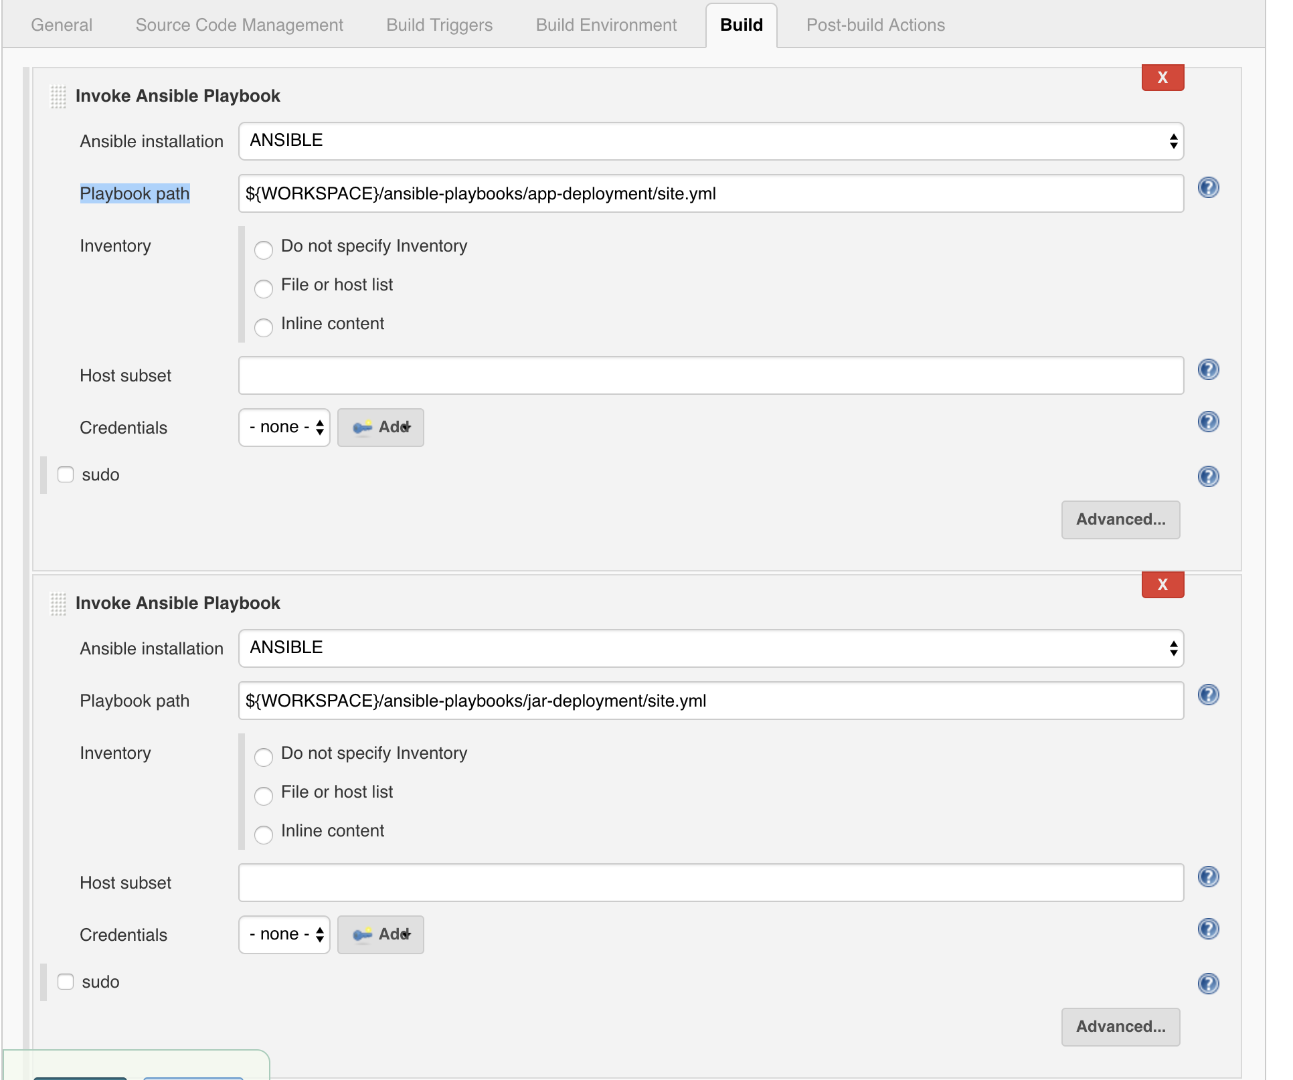
- Now we need to configure two “Invoke Ansible Playbooks” in the next section under “Build”.
- The first Ansible Playbook will deploy the process app package via the REST APIs of APS. Configuration as below:
- Ansible installation -> Select the Ansible configuration available in dropdown
- Playbook path -> ${WORKSPACE}/ansible-playbooks/app-deployment/site.yml (this will resolve to app-deployment-playbook)
- The second Ansible Playbook will deploy the process app jar file. Configuration as below:
- Ansible installation -> Select the Ansible configuration available in dropdown
- Playbook path -> ${WORKSPACE}/ansible-playbooks/jar-deployment/site.yml (this will resolve to jar-deployment-playbook)
- The first Ansible Playbook will deploy the process app package via the REST APIs of APS. Configuration as below:
Screenshots of this config shown below:


Demo Video
A short video of the whole process in action is available here
Things to consider
Since this is not a production ready sample, listing down some of the factors you may want to consider when implementing it in your production environment.
- Extend the pipeline to manage the APS software deployment as well - embedded, standalone in a application server, container deployment etc
- If using dockerized deployments, creating a docker image per build is also an option instead of copying thing like jars, property files etc to an existing image.
- If there are breaking changes in the java classes during process modifications, consider a proper deprecation strategy to handle any running process instances.
- Securely manage the credential storage using features such as "Vault"
- Management of environment variables
- Manage re-usable java libraries/stencil libraries etc separate from processes specific libraries.
- The app package can grow quite big if you have a lot of processes in one app and this might make the release management and versioning of individual processes difficult. For a more granular control on each processes, you can create smaller apps containing one or two processes. Then those applications can be deployed via its own CI/CD pipeline. However if you would like to expose these processes in a single app to the end user (especially if the processes are user initiated process involving start forms) you can lock down the smaller individual apps to just a small set set of PVT (Production Verification Test) users and the CI/CD user. Once the processes are verified, those processes can be made available to the end users via a separate public facing process app.
Conclusion
So, if you don’t already have a CI/CD process around your process applications in APS, go ahead and set one up and I’m sure it will make your application development experience with Alfresco Process Services much easier!
Blog posts and updates about Alfresco Process Services and Activiti.
- Activiti Cloud 7.1.0.M2 released!
- Alfresco Process Services SDK Maven Module
- Activiti Updates, Just in Time for Summer
- New OSS challenges ahead
- Activiti Cloud 7.1.0.M1 released!
- Activiti: Last week Dev Logs #87
- Activiti: Last week Dev Logs #86
- Activiti Cloud SR1 Released!
- Activiti: Last week Dev Logs #85
- Activiti: Last week Dev Logs #84
- Activiti: Last week Dev Logs #83
- Activiti Cloud 7.0.0.GA Released
- Activiti: Last week Dev Logs #82
- Activiti: Last week Dev Logs #81
- Activiti Cloud @ DevCon 2019
We use cookies on this site to enhance your user experience
By using this site, you are agreeing to allow us to collect and use cookies as outlined in Alfresco’s Cookie Statement and Terms of Use (and you have a legitimate interest in Alfresco and our products, authorizing us to contact you in such methods). If you are not ok with these terms, please do not use this website.
